HP 2500c Service Manual - Page 184
Paper Knob, Installing the, Replacement of Paper Knob
 |
View all HP 2500c manuals
Add to My Manuals
Save this manual to your list of manuals |
Page 184 highlights
Replacement of Parts Installing the Carriage Motor Step 1. Reinstall the new carriage motor by putting one screw loosely into the screw hole, reattach the drive belt and secure the screws back in. Step 2. Reconnect the wiring of the carriage motor. Step 3. Slot the cover back to place. Make sure it is properly secured. Step 4. Replace the remaining components for the Paper Knob (refer to the procedures in Installing the Paper Knob from Replacement of Paper Knob). 7-34 Removal and Replacement of Parts (without Calibration)
-
 1
1 -
2
-
3
-
4
-
5
-
6
-
7
-
8
-
9
-
10
-
11
-
12
-
13
-
14
-
15
-
16
-
17
-
18
-
19
-
20
-
21
-
22
-
23
-
24
-
25
-
26
-
27
-
28
-
29
-
30
-
31
-
32
-
33
-
34
-
35
-
36
-
37
-
38
-
39
-
40
-
41
-
42
-
43
-
44
-
45
-
46
-
47
-
48
-
49
-
50
-
51
-
52
-
53
-
54
-
55
-
56
-
57
-
58
-
59
-
60
-
61
-
62
-
63
-
64
-
65
-
66
-
67
-
68
-
69
-
70
-
71
-
72
-
73
-
74
-
75
-
76
-
77
-
78
-
79
-
80
-
81
-
82
-
83
-
84
-
85
-
86
-
87
-
88
-
89
-
90
-
91
-
92
-
93
-
94
-
95
-
96
-
97
-
98
-
99
-
100
-
101
-
102
-
103
-
104
-
105
-
106
-
107
-
108
-
109
-
110
-
111
-
112
-
113
-
114
-
115
-
116
-
117
-
118
-
119
-
120
-
121
-
122
-
123
-
124
-
125
-
126
-
127
-
128
-
129
-
130
-
131
-
132
-
133
-
134
-
135
-
136
-
137
-
138
-
139
-
140
-
141
-
142
-
143
-
144
-
145
-
146
-
147
-
148
-
149
-
150
-
151
-
152
-
153
-
154
-
155
-
156
-
157
-
158
-
159
-
160
-
161
-
162
-
163
-
164
-
165
-
166
-
167
-
168
-
169
-
170
-
171
-
172
-
173
-
174
-
175
-
176
-
177
-
178
-
 179
179 -
 180
180 -
 181
181 -
 182
182 -
 183
183 -
 184
184 -
 185
185 -
 186
186 -
 187
187 -
 188
188 -
 189
189 -
190
-
191
-
192
-
193
-
194
-
195
-
196
-
197
-
198
-
199
-
200
-
201
-
202
-
203
-
204
-
205
-
206
-
207
-
208
-
209
-
210
-
211
-
212
-
213
-
214
-
215
-
216
-
217
-
218
-
219
-
220
-
221
-
222
-
223
-
224
-
225
 |
 |

Removal and Replacement of Parts (without Calibration)
7-34
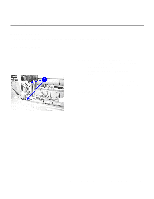
Replacement of Parts
Installing the Carriage Motor
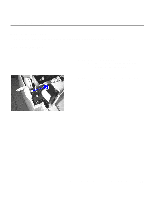
Step 1.
Reinstall the new carriage motor by putting one screw loosely into the screw hole, reattach the drive
belt and secure the screws back in.
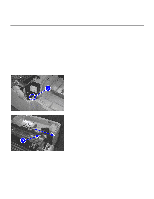
Step 2.
Reconnect the wiring of the carriage motor.
Step 3.
Slot the cover back to place.
Make sure it is properly secured.
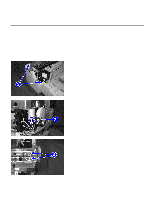
Step 4.
Replace the remaining components for the
Paper Knob
(refer to the procedures in
Installing the
Paper Knob
from
Replacement of Paper Knob
).