HP AirLife 100 Compaq AirLife 100 - User Guide - Page 13
Insert battery, Remove battery, Charge a battery, Battery LED indicator, Solid green, Solid amber
 |
View all HP AirLife 100 manuals
Add to My Manuals
Save this manual to your list of manuals |
Page 13 highlights
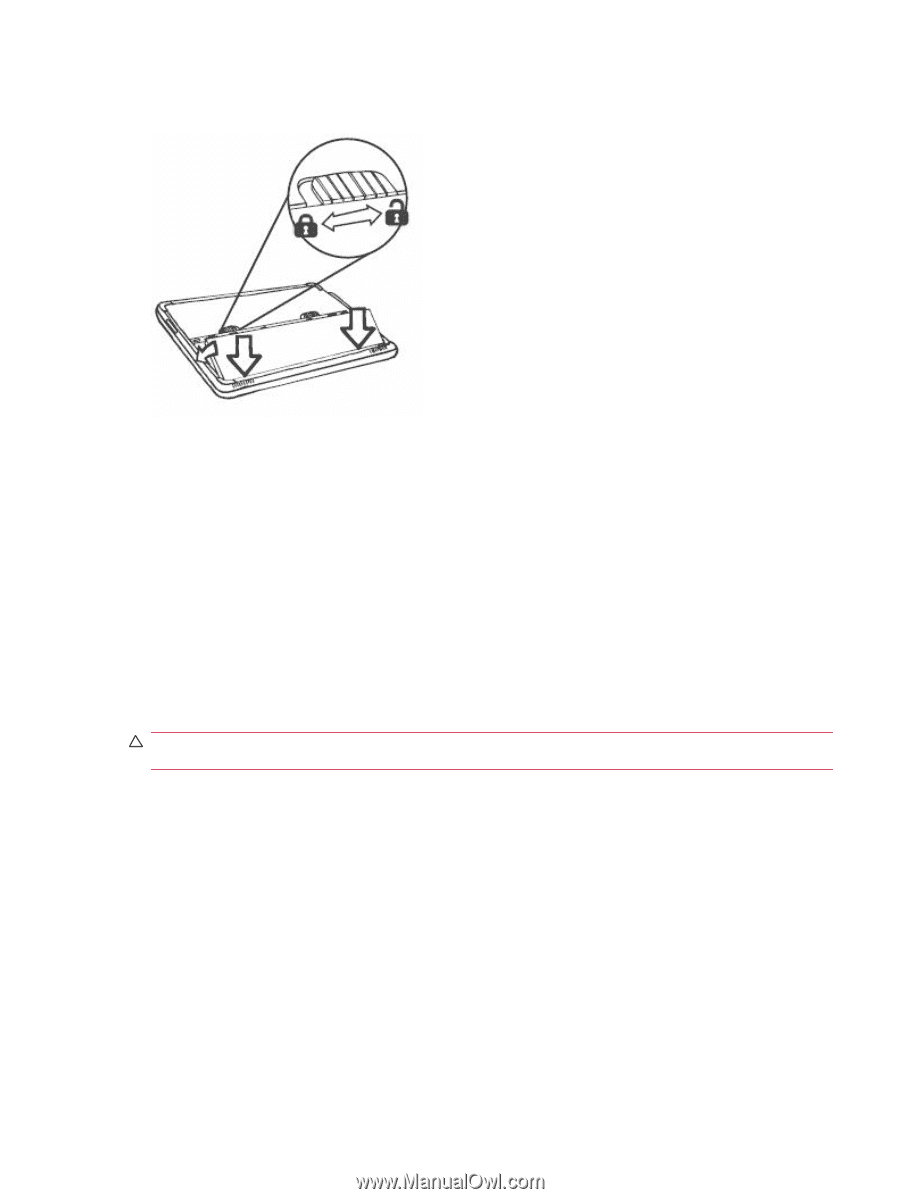
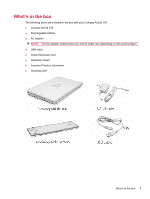
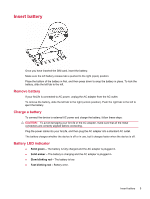
Insert battery Once you have inserted the SIM card, insert the battery. Make sure the left battery release tab is pushed to the right (open) position. Place the bottom of the battery in first, and then press down to snap the battery in place. To lock the battery, slide the left tab to the left. Remove battery If your AirLife is connected to AC power, unplug the AC adapter from the AC outlet. To remove the battery, slide the left tab to the right (unlock position). Push the right tab to the left to eject the battery. Charge a battery To connect the device to external AC power and charge the battery, follow these steps: CAUTION: To avoid damaging your AirLife or the AC adapter, make sure that all the metal connectors are correctly aligned before connecting. Plug the power cable into your AirLife, and then plug the AC adapter into a standard AC outlet. The battery charges whether the device is off or in use, but it charges faster when the device is off. Battery LED indicator ● Solid green - The battery is fully charged and the AC adapter is plugged in. ● Solid amber - The battery is charging and the AC adapter is plugged in. ● Slow blinking red - The battery is low. ● Fast blinking red - Battery error. Insert battery 5
-
 1
1 -
2
-
3
-
4
-
5
-
6
-
7
-
 8
8 -
 9
9 -
 10
10 -
 11
11 -
 12
12 -
 13
13 -
 14
14 -
 15
15 -
 16
16 -
 17
17 -
 18
18 -
19
-
20
-
21
-
22
-
23
-
24
-
25
-
26
-
27
-
28
-
29
-
30
-
31
-
32
-
33
-
34
-
35
-
36
-
37
-
38
-
39
-
40
-
41
-
42
-
43
-
44
-
45
-
46
-
47
-
48
-
49
-
50
-
51
-
52
-
53
-
54
-
55
-
56
-
57
-
58
-
59
-
60
-
61
-
62
-
63
-
64
-
65
-
66
-
67
-
68
-
69
-
70
-
71
-
72
-
73
-
74
-
75
-
76
-
77
-
78
-
79
-
80
-
81
-
82
-
83
-
84
-
85
-
86
-
87
-
88
-
89
-
90
-
91
-
92
-
93
-
94
-
95
-
96
-
97
-
98
-
99
-
100
-
101
-
102
-
103
-
104
-
105
-
106
-
107
-
108
-
109
-
110
-
111
-
112
-
113
-
114
-
115
-
116
-
117
 |
 |