HP CM3530 HP Color LaserJet CM3530 Series - Software Technical Reference (exte - Page 222
Applications, Utilities, Printer Setup Utility, Printer List, Print & Fax, System Preferences
 |
UPC - 884420196501
View all HP CM3530 manuals
Add to My Manuals
Save this manual to your list of manuals |
Page 222 highlights
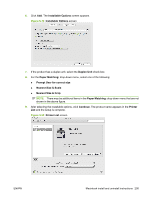
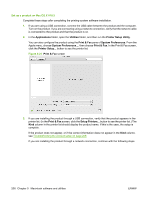
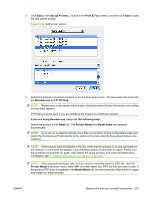
2. In the Applications folder, open the Utilities folder, and then run the Printer Setup Utility. The Printer List screen appears. The following figure is an example of a typical Printer List screen on a computer that has multiple products installed. Figure 5-15 Printer List screen You can also configure the product by using the Print & Fax dialog box of System Preferences. From the Apple menu, choose System Preferences..., then choose Print & Fax. Figure 5-16 Print & Fax dialog box NOTE: The following steps use the Printer Setup Utility to setup the product. 3. If you are installing the product through a USB connection, verify that the product appears in the printer list. The Kind column in the Printer List, or the Kind field in the Print & Fax dialog box, should display the product name. If this is the case, the setup is complete. If the product does not appear, or if the correct information does not appear in the Kind field, see Troubleshooting the product setup on page 208. If you are installing the product through a network connection, continue with the following steps. 4. Click Add in the Printer List (or the + button in the Print & Fax utility) to open the Printer Browser screen. 5. You can use either Bonjour or IP Printing for the network connection. NOTE: Bonjour is the easiest method and is the best method to use if the product is installed on your local network. IP Printing must be used if you are installing the product on a different network. 202 Chapter 5 Macintosh software and utilities ENWW
-
 1
1 -
2
-
3
-
4
-
5
-
6
-
7
-
8
-
9
-
10
-
11
-
12
-
13
-
14
-
15
-
16
-
17
-
18
-
19
-
20
-
21
-
22
-
23
-
24
-
25
-
26
-
27
-
28
-
29
-
30
-
31
-
32
-
33
-
34
-
35
-
36
-
37
-
38
-
39
-
40
-
41
-
42
-
43
-
44
-
45
-
46
-
47
-
48
-
49
-
50
-
51
-
52
-
53
-
54
-
55
-
56
-
57
-
58
-
59
-
60
-
61
-
62
-
63
-
64
-
65
-
66
-
67
-
68
-
69
-
70
-
71
-
72
-
73
-
74
-
75
-
76
-
77
-
78
-
79
-
80
-
81
-
82
-
83
-
84
-
85
-
86
-
87
-
88
-
89
-
90
-
91
-
92
-
93
-
94
-
95
-
96
-
97
-
98
-
99
-
100
-
101
-
102
-
103
-
104
-
105
-
106
-
107
-
108
-
109
-
110
-
111
-
112
-
113
-
114
-
115
-
116
-
117
-
118
-
119
-
120
-
121
-
122
-
123
-
124
-
125
-
126
-
127
-
128
-
129
-
130
-
131
-
132
-
133
-
134
-
135
-
136
-
137
-
138
-
139
-
140
-
141
-
142
-
143
-
144
-
145
-
146
-
147
-
148
-
149
-
150
-
151
-
152
-
153
-
154
-
155
-
156
-
157
-
158
-
159
-
160
-
161
-
162
-
163
-
164
-
165
-
166
-
167
-
168
-
169
-
170
-
171
-
172
-
173
-
174
-
175
-
176
-
177
-
178
-
179
-
180
-
181
-
182
-
183
-
184
-
185
-
186
-
187
-
188
-
189
-
190
-
191
-
192
-
193
-
194
-
195
-
196
-
197
-
198
-
199
-
200
-
201
-
202
-
203
-
204
-
205
-
206
-
207
-
208
-
209
-
210
-
211
-
212
-
213
-
214
-
215
-
216
-
 217
217 -
 218
218 -
 219
219 -
 220
220 -
 221
221 -
 222
222 -
 223
223 -
 224
224 -
 225
225 -
 226
226 -
 227
227 -
228
-
229
-
230
-
231
-
232
-
233
-
234
-
235
-
236
-
237
-
238
-
239
-
240
-
241
-
242
-
243
-
244
-
245
-
246
-
247
-
248
-
249
-
250
-
251
-
252
-
253
-
254
-
255
-
256
-
257
-
258
-
259
-
260
-
261
-
262
-
263
-
264
-
265
-
266
-
267
-
268
-
269
-
270
-
271
-
272
-
273
-
274
-
275
-
276
-
277
-
278
-
279
-
280
-
281
-
282
-
283
-
284
-
285
-
286
-
287
-
288
-
289
-
290
-
291
-
292
-
293
-
294
 |
 |
