HP CM3530 HP Color LaserJet CM3530 Series - Software Technical Reference (exte - Page 227
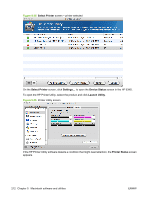
Print & Fax, Rendezvous, IP Printing, If you are using Rendezvous, carry out the following step
 |
UPC - 884420196501
View all HP CM3530 manuals
Add to My Manuals
Save this manual to your list of manuals |
Page 227 highlights
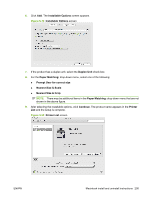
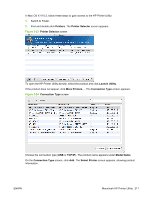
4. Click Add (or the Set Up Printers... button in the Print & Fax screen), and then click Add to open the add printer screen. Figure 5-22 Add printer screen 5. Select the network connection protocol in the top drop-down menu. The two supported protocols are Rendezvous and IP Printing. NOTE: Rendezvous is the easiest method and is the best method to use if the product is installed on your local network. IP Printing must be used if you are installing the product on a different network. If you are using Rendezvous, carry out the following step: Select the product in the Name list. The Printer Model and Model Name are selected automatically. NOTE: If you are on a network that has more than one product, print a configuration page and match the Rendezvous Printer Name to the name on the list to identify the product that you are installing. NOTE: If the product does not appear in the list, verify that the product is on and connected to the network. If it still does not appear, try turning the product off and then on again. Finally, turn the computer off and then on again, then restart the setup process. For more troubleshooting information, see Troubleshooting the product setup on page 208. NOTE: If the automatic selection fails, or if you want to manually select a .PPD file, click the Printer Model drop-down menu, select HP, and then select the .PPD file that you want to add. If the product PPD does not appear in the Model Name list, turn the computer off and then on again and restart the setup process. ENWW Macintosh install and uninstall instructions 207
-
 1
1 -
2
-
3
-
4
-
5
-
6
-
7
-
8
-
9
-
10
-
11
-
12
-
13
-
14
-
15
-
16
-
17
-
18
-
19
-
20
-
21
-
22
-
23
-
24
-
25
-
26
-
27
-
28
-
29
-
30
-
31
-
32
-
33
-
34
-
35
-
36
-
37
-
38
-
39
-
40
-
41
-
42
-
43
-
44
-
45
-
46
-
47
-
48
-
49
-
50
-
51
-
52
-
53
-
54
-
55
-
56
-
57
-
58
-
59
-
60
-
61
-
62
-
63
-
64
-
65
-
66
-
67
-
68
-
69
-
70
-
71
-
72
-
73
-
74
-
75
-
76
-
77
-
78
-
79
-
80
-
81
-
82
-
83
-
84
-
85
-
86
-
87
-
88
-
89
-
90
-
91
-
92
-
93
-
94
-
95
-
96
-
97
-
98
-
99
-
100
-
101
-
102
-
103
-
104
-
105
-
106
-
107
-
108
-
109
-
110
-
111
-
112
-
113
-
114
-
115
-
116
-
117
-
118
-
119
-
120
-
121
-
122
-
123
-
124
-
125
-
126
-
127
-
128
-
129
-
130
-
131
-
132
-
133
-
134
-
135
-
136
-
137
-
138
-
139
-
140
-
141
-
142
-
143
-
144
-
145
-
146
-
147
-
148
-
149
-
150
-
151
-
152
-
153
-
154
-
155
-
156
-
157
-
158
-
159
-
160
-
161
-
162
-
163
-
164
-
165
-
166
-
167
-
168
-
169
-
170
-
171
-
172
-
173
-
174
-
175
-
176
-
177
-
178
-
179
-
180
-
181
-
182
-
183
-
184
-
185
-
186
-
187
-
188
-
189
-
190
-
191
-
192
-
193
-
194
-
195
-
196
-
197
-
198
-
199
-
200
-
201
-
202
-
203
-
204
-
205
-
206
-
207
-
208
-
209
-
210
-
211
-
212
-
213
-
214
-
215
-
216
-
217
-
218
-
219
-
220
-
221
-
 222
222 -
 223
223 -
 224
224 -
 225
225 -
 226
226 -
 227
227 -
 228
228 -
 229
229 -
 230
230 -
 231
231 -
 232
232 -
233
-
234
-
235
-
236
-
237
-
238
-
239
-
240
-
241
-
242
-
243
-
244
-
245
-
246
-
247
-
248
-
249
-
250
-
251
-
252
-
253
-
254
-
255
-
256
-
257
-
258
-
259
-
260
-
261
-
262
-
263
-
264
-
265
-
266
-
267
-
268
-
269
-
270
-
271
-
272
-
273
-
274
-
275
-
276
-
277
-
278
-
279
-
280
-
281
-
282
-
283
-
284
-
285
-
286
-
287
-
288
-
289
-
290
-
291
-
292
-
293
-
294
 |
 |
