HP CM3530 HP Color LaserJet CM3530 Series - Software Technical Reference (exte - Page 263
Remote firmware update by using the HP Embedded Web Server, Messages during the firmware update
 |
UPC - 884420196501
View all HP CM3530 manuals
Add to My Manuals
Save this manual to your list of manuals |
Page 263 highlights
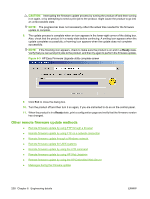
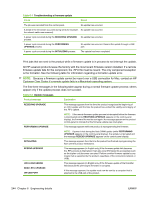
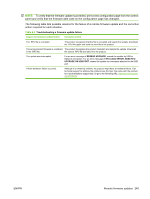
8. Click Update Firmware. HP Web Jetadmin sends the selected .RFU file to the product. The controlpanel shows messages that indicate the progress of the update. At the end of the update process, the control-panel shows the Ready message. 9. Start HP Web Jetadmin. 10. Create a product group by following these steps: a. Click the Device Management folder, and then click the All Devices option. b. Shift-click to select products that are to be included in the group, and then click the OK button. c. When prompted, type a name for the new product group, and then click the OK button. 11. To modify several products in a group, click the group name, and then click the Open button. 12. The Device Group Tools drop-down menu appears on the right side of the window. Scroll if necessary to view it. 13. In the Device Group Tools drop-down menu, select an action. Type the appropriate information. Click Return to Device Group when finished. 14. When the product is in a Ready state, print a configuration page and verify that the firmware version has changed. Also, print the Menu map and check for settings changes. Remote firmware update by using the HP Embedded Web Server CAUTION: Use extreme caution when using this method. Only use this method as a last resort. CAUTION: When trying to install or update firmware, do not use any buttons, browse to another site, close or touch the browser page in any way until the product has reset and displays Ready. 1. Print a menu map from the product control-panel. To print a menu map, see Print the configuration page on page 236. 2. Open the HP Embedded Web Server (HP EWS). 3. On the Information tab, click the Print menu item. 4. Click Browse and navigate to the .RFU file. 5. Click Apply. 6. After the product automatically reboots, you might need to reboot manually. Turn the product off, then on. 7. When the product is in a Ready state, print a configuration page and verify that the firmware version has changed. Also, print the Menu map and check for settings changes. NOTE: Print a menu map to see what user settings are configured in the current firmware. This menu map can be compared with a menu map printed before the firmware update to determine what user settings have been added or changed in the new firmware. To print a menu map from the product controlpanel, see Print the configuration page on page 236. Messages during the firmware update The following table lists the causes and results of possible interruptions to the firmware update. ENWW Remote firmware updates 243
-
 1
1 -
2
-
3
-
4
-
5
-
6
-
7
-
8
-
9
-
10
-
11
-
12
-
13
-
14
-
15
-
16
-
17
-
18
-
19
-
20
-
21
-
22
-
23
-
24
-
25
-
26
-
27
-
28
-
29
-
30
-
31
-
32
-
33
-
34
-
35
-
36
-
37
-
38
-
39
-
40
-
41
-
42
-
43
-
44
-
45
-
46
-
47
-
48
-
49
-
50
-
51
-
52
-
53
-
54
-
55
-
56
-
57
-
58
-
59
-
60
-
61
-
62
-
63
-
64
-
65
-
66
-
67
-
68
-
69
-
70
-
71
-
72
-
73
-
74
-
75
-
76
-
77
-
78
-
79
-
80
-
81
-
82
-
83
-
84
-
85
-
86
-
87
-
88
-
89
-
90
-
91
-
92
-
93
-
94
-
95
-
96
-
97
-
98
-
99
-
100
-
101
-
102
-
103
-
104
-
105
-
106
-
107
-
108
-
109
-
110
-
111
-
112
-
113
-
114
-
115
-
116
-
117
-
118
-
119
-
120
-
121
-
122
-
123
-
124
-
125
-
126
-
127
-
128
-
129
-
130
-
131
-
132
-
133
-
134
-
135
-
136
-
137
-
138
-
139
-
140
-
141
-
142
-
143
-
144
-
145
-
146
-
147
-
148
-
149
-
150
-
151
-
152
-
153
-
154
-
155
-
156
-
157
-
158
-
159
-
160
-
161
-
162
-
163
-
164
-
165
-
166
-
167
-
168
-
169
-
170
-
171
-
172
-
173
-
174
-
175
-
176
-
177
-
178
-
179
-
180
-
181
-
182
-
183
-
184
-
185
-
186
-
187
-
188
-
189
-
190
-
191
-
192
-
193
-
194
-
195
-
196
-
197
-
198
-
199
-
200
-
201
-
202
-
203
-
204
-
205
-
206
-
207
-
208
-
209
-
210
-
211
-
212
-
213
-
214
-
215
-
216
-
217
-
218
-
219
-
220
-
221
-
222
-
223
-
224
-
225
-
226
-
227
-
228
-
229
-
230
-
231
-
232
-
233
-
234
-
235
-
236
-
237
-
238
-
239
-
240
-
241
-
242
-
243
-
244
-
245
-
246
-
247
-
248
-
249
-
250
-
251
-
252
-
253
-
254
-
255
-
256
-
257
-
 258
258 -
 259
259 -
 260
260 -
 261
261 -
 262
262 -
 263
263 -
 264
264 -
 265
265 -
 266
266 -
 267
267 -
 268
268 -
269
-
270
-
271
-
272
-
273
-
274
-
275
-
276
-
277
-
278
-
279
-
280
-
281
-
282
-
283
-
284
-
285
-
286
-
287
-
288
-
289
-
290
-
291
-
292
-
293
-
294
 |
 |