HP P4000 9.0 HP StorageWorks P4000 SAN Solution User Guide - Page 168
Finishing up with VI Client, Uninstalling the Failover Manager from VMware ESX Server
 |
View all HP P4000 manuals
Add to My Manuals
Save this manual to your list of manuals |
Page 168 highlights
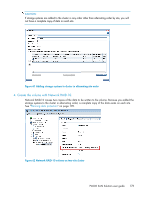
7. Configure the IP Address one of two ways. Using DHCP Configure IP address manually 1. Tab to the choice Obtain IP address automatically using DHCP, and press Enter to select it. 2. Tab to OK, and press Enter. A message opens, asking you to verify the request. 1. Tab to the choice Use the Following IP Address, and press Enter. The IP Address, Netmask, and Gateway list opens for editing. 3. Tab to OK, and press Enter. 2. Tab to each field, and enter the appropriate information. After a short pause, another message opens that displays the new IP address. Record this IP address for later use. Gateway is a required field. If you do not have a gateway, enter 0.0.0.0. 8. Tab to OK, and press Enter. A confirmation message opens. 9. Press Enter. The network interface is now configured (wait a few seconds). 10. On the Available Network Devices window, tab to Back and press Enter to return to the Configuration Interface menu. 11. Tab to Log Out, and press Enter. 12. Press Ctrl+Alt to get the cursor back from the Console. Finishing up with VI Client 1. In the VI Client Information Panel, click the Summary tab. 2. In the General section on the Summary tab, verify that the IP address and host name are correct, and that VMware Tools are running. NOTE: If VMware Tools show "out of date" then they are still running correctly. The "out of date" status is not a problem. VMware Tools are updated with each SAN/iQ software upgrade. 3. In the Inventory panel, right-click the Failover Manager, and select Rename. 4. Change the name of the Failover Manager to match the host name, if desired. Your Failover Manager is ready to use. 5. Minimize your VI Client session. Next, use the Find function to discover the Failover Manager in the CMC, and then add the Failover Manager to a management group. Uninstalling the Failover Manager from VMware ESX Server 1. Remove the Failover Manager from the management group. 2. Power off the Failover Manager virtual machine in the VI Client. 168 Using specialized managers
-
 1
1 -
2
-
3
-
4
-
5
-
6
-
7
-
8
-
9
-
10
-
11
-
12
-
13
-
14
-
15
-
16
-
17
-
18
-
19
-
20
-
21
-
22
-
23
-
24
-
25
-
26
-
27
-
28
-
29
-
30
-
31
-
32
-
33
-
34
-
35
-
36
-
37
-
38
-
39
-
40
-
41
-
42
-
43
-
44
-
45
-
46
-
47
-
48
-
49
-
50
-
51
-
52
-
53
-
54
-
55
-
56
-
57
-
58
-
59
-
60
-
61
-
62
-
63
-
64
-
65
-
66
-
67
-
68
-
69
-
70
-
71
-
72
-
73
-
74
-
75
-
76
-
77
-
78
-
79
-
80
-
81
-
82
-
83
-
84
-
85
-
86
-
87
-
88
-
89
-
90
-
91
-
92
-
93
-
94
-
95
-
96
-
97
-
98
-
99
-
100
-
101
-
102
-
103
-
104
-
105
-
106
-
107
-
108
-
109
-
110
-
111
-
112
-
113
-
114
-
115
-
116
-
117
-
118
-
119
-
120
-
121
-
122
-
123
-
124
-
125
-
126
-
127
-
128
-
129
-
130
-
131
-
132
-
133
-
134
-
135
-
136
-
137
-
138
-
139
-
140
-
141
-
142
-
143
-
144
-
145
-
146
-
147
-
148
-
149
-
150
-
151
-
152
-
153
-
154
-
155
-
156
-
157
-
158
-
159
-
160
-
161
-
162
-
 163
163 -
 164
164 -
 165
165 -
 166
166 -
 167
167 -
 168
168 -
 169
169 -
 170
170 -
 171
171 -
 172
172 -
 173
173 -
174
-
175
-
176
-
177
-
178
-
179
-
180
-
181
-
182
-
183
-
184
-
185
-
186
-
187
-
188
-
189
-
190
-
191
-
192
-
193
-
194
-
195
-
196
-
197
-
198
-
199
-
200
-
201
-
202
-
203
-
204
-
205
-
206
-
207
-
208
-
209
-
210
-
211
-
212
-
213
-
214
-
215
-
216
-
217
-
218
-
219
-
220
-
221
-
222
-
223
-
224
-
225
-
226
-
227
-
228
-
229
-
230
-
231
-
232
-
233
-
234
-
235
-
236
-
237
-
238
-
239
-
240
-
241
-
242
-
243
-
244
-
245
-
246
-
247
-
248
-
249
-
250
-
251
-
252
-
253
-
254
-
255
-
256
-
257
-
258
-
259
-
260
-
261
-
262
-
263
-
264
-
265
-
266
-
267
-
268
-
269
-
270
-
271
-
272
-
273
-
274
-
275
-
276
-
277
-
278
-
279
-
280
-
281
-
282
-
283
-
284
-
285
-
286
-
287
-
288
-
289
-
290
-
291
-
292
-
293
-
294
-
295
-
296
-
297
-
298
-
299
-
300
-
301
-
302
-
303
-
304
-
305
-
306
-
307
-
308
-
309
-
310
-
311
-
312
-
313
-
314
-
315
-
316
-
317
-
318
-
319
-
320
-
321
-
322
-
323
-
324
-
325
-
326
-
327
-
328
-
329
-
330
-
331
-
332
-
333
-
334
-
335
-
336
-
337
-
338
-
339
-
340
-
341
-
342
-
343
-
344
-
345
-
346
-
347
-
348
-
349
-
350
 |
 |
