HP P4000 9.0 HP StorageWorks P4000 SAN Solution User Guide - Page 55
Explaining RAID devices in the RAID setup report, Description, RAID level
 |
View all HP P4000 manuals
Add to My Manuals
Save this manual to your list of manuals |
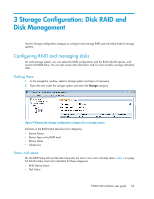
Page 55 highlights
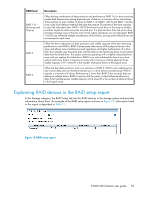
RAID level RAID 1+0 - Mirroring and Striping RAID 5 RAID 6 Description Offers the best combination of data protection and performance. RAID 1+0 or drive mirroring creates fault tolerance by storing duplicate sets of data on a minimum off our hard drives. There must be an even number of drives for RAID 1+0. RAID 1+0(10) and RAID 1 are the most costly fault tolerance methods because they require 50 percent of the drive capacity to store the redundant data. RAID 1+0(10) first mirrors each drive in the array to another, and then stripes the data across the mirrored pair. If a physical drive fails, the mirror drive provides a backup copy of the files and normal system operations are not interrupted. RAID 1+0(10) can withstand multiple simultaneous drive failures, as long as the failed drives are not mirrored to each other. Offers the best combination of data protection and usable capacity while also improving performance over RAID 6. RAID 5 stores parity data across all the physical drives in the array and allows more simultaneous read operations and higher performance. If a drive fails, the controller uses the parity data and the data on the remaining drives to reconstruct data from the failed drive. The system continues operating with a slightly reduced performance until you replace the failed drive. RAID 5 can only withstand the loss of one drive without total array failure. It requires an array with a minimum of three physical drives. Usable capacity is N-1 where N is the number of physical drives in the logical array. Offers the best data protection and is an extension of RAID 5. RAID 6 uses multiple parity sets to store data and can therefore tolerate up to 2 drive failures simultaneously. RAID 6 requires a minimum of 4 drives. Performance is lower than RAID 5 due to parity data updating on multiple drives. RAID 6 uses two disk for parity; its fault tolerance allows two disks to fail simultaneously. Usable capacity is N-2 where N is the number of physical drives in the logical array. Explaining RAID devices in the RAID setup report In the Storage category, the RAID Setup tab lists the RAID devices in the storage system and provides information about them. An example of the RAID setup report is shown in Figure 10. Information listed in the report is described in Table 11. Figure 10 RAID setup report . P4000 SAN Solution user guide 55
-
 1
1 -
2
-
3
-
4
-
5
-
6
-
7
-
8
-
9
-
10
-
11
-
12
-
13
-
14
-
15
-
16
-
17
-
18
-
19
-
20
-
21
-
22
-
23
-
24
-
25
-
26
-
27
-
28
-
29
-
30
-
31
-
32
-
33
-
34
-
35
-
36
-
37
-
38
-
39
-
40
-
41
-
42
-
43
-
44
-
45
-
46
-
47
-
48
-
49
-
 50
50 -
 51
51 -
 52
52 -
 53
53 -
 54
54 -
 55
55 -
 56
56 -
 57
57 -
 58
58 -
 59
59 -
 60
60 -
61
-
62
-
63
-
64
-
65
-
66
-
67
-
68
-
69
-
70
-
71
-
72
-
73
-
74
-
75
-
76
-
77
-
78
-
79
-
80
-
81
-
82
-
83
-
84
-
85
-
86
-
87
-
88
-
89
-
90
-
91
-
92
-
93
-
94
-
95
-
96
-
97
-
98
-
99
-
100
-
101
-
102
-
103
-
104
-
105
-
106
-
107
-
108
-
109
-
110
-
111
-
112
-
113
-
114
-
115
-
116
-
117
-
118
-
119
-
120
-
121
-
122
-
123
-
124
-
125
-
126
-
127
-
128
-
129
-
130
-
131
-
132
-
133
-
134
-
135
-
136
-
137
-
138
-
139
-
140
-
141
-
142
-
143
-
144
-
145
-
146
-
147
-
148
-
149
-
150
-
151
-
152
-
153
-
154
-
155
-
156
-
157
-
158
-
159
-
160
-
161
-
162
-
163
-
164
-
165
-
166
-
167
-
168
-
169
-
170
-
171
-
172
-
173
-
174
-
175
-
176
-
177
-
178
-
179
-
180
-
181
-
182
-
183
-
184
-
185
-
186
-
187
-
188
-
189
-
190
-
191
-
192
-
193
-
194
-
195
-
196
-
197
-
198
-
199
-
200
-
201
-
202
-
203
-
204
-
205
-
206
-
207
-
208
-
209
-
210
-
211
-
212
-
213
-
214
-
215
-
216
-
217
-
218
-
219
-
220
-
221
-
222
-
223
-
224
-
225
-
226
-
227
-
228
-
229
-
230
-
231
-
232
-
233
-
234
-
235
-
236
-
237
-
238
-
239
-
240
-
241
-
242
-
243
-
244
-
245
-
246
-
247
-
248
-
249
-
250
-
251
-
252
-
253
-
254
-
255
-
256
-
257
-
258
-
259
-
260
-
261
-
262
-
263
-
264
-
265
-
266
-
267
-
268
-
269
-
270
-
271
-
272
-
273
-
274
-
275
-
276
-
277
-
278
-
279
-
280
-
281
-
282
-
283
-
284
-
285
-
286
-
287
-
288
-
289
-
290
-
291
-
292
-
293
-
294
-
295
-
296
-
297
-
298
-
299
-
300
-
301
-
302
-
303
-
304
-
305
-
306
-
307
-
308
-
309
-
310
-
311
-
312
-
313
-
314
-
315
-
316
-
317
-
318
-
319
-
320
-
321
-
322
-
323
-
324
-
325
-
326
-
327
-
328
-
329
-
330
-
331
-
332
-
333
-
334
-
335
-
336
-
337
-
338
-
339
-
340
-
341
-
342
-
343
-
344
-
345
-
346
-
347
-
348
-
349
-
350
 |
 |
