HP P4000 9.0 HP StorageWorks P4000 SAN Solution User Guide - Page 228
Continue with standard roll back, This will only the roll back the volume of, the selected snapshot
 |
View all HP P4000 manuals
Add to My Manuals
Save this manual to your list of manuals |
Page 228 highlights
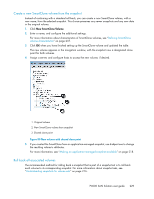
3. Click Snapshot Tasks on the Details tab, and select Roll Back Volume. A warning message opens. This message illustrates all the possible consequences of performing a rollback, including • Existing iSCSI sessions present a risk of data inconsistencies. • All newer snapshots will be deleted. • Changes to the original volume since the snapshot was created will be lost. If you do not have connected iSCSI sessions or newer snapshots, those issues will not be reflected in the message. If the snapshot is not part of a snapshot set If the snapshot is part of a snapshot set You have three choices for continuing from this message window: • Click OK. See "Continue with standard roll back" on page 228. • Click New SmartClone Volume. See "Create a new SmartClone volume from the snapshot" on page 229. • Click Cancel. See "Cancel the rollback operation" on page 230. You have the following possible choices for continuing from this message window: • Click Roll Back ALL Associated Volumes. See "Roll back all associated volumes" on page 229. • Click Roll Back Selected Volume Only. See "Continue with standard roll back" on page 228. NOTE: This will only the roll back the volume of the selected snapshot, click OK. This is not recommended. • Click Roll Back Volume. See "Continue with standard roll back" on page 228 NOTE: This will leave some snapshot sets incomplete. • Click Cancel. See "Cancel the rollback operation" on page 230 Continue with standard roll back The following steps result with the original volume, with its original name, returned to the state of the rolled back snapshot. If the snapshot is part of a snapshot set, this is not recommended. The volume rolls back to the snapshot, deleting any newer snapshots. The rolled back snapshot remains intact underneath the volume and retains the data. Any data that had been added to the volume since the snapshot was created is deleted. 1. If you rolled back an application-managed snapshot, use diskpart.exe to change the resulting volume's attributes. For more information, see "Making an application-managed snapshot available" on page 218. 2. Reconnect iSCSI sessions to the volume, and restart the applications. 228 Using snapshots
-
 1
1 -
2
-
3
-
4
-
5
-
6
-
7
-
8
-
9
-
10
-
11
-
12
-
13
-
14
-
15
-
16
-
17
-
18
-
19
-
20
-
21
-
22
-
23
-
24
-
25
-
26
-
27
-
28
-
29
-
30
-
31
-
32
-
33
-
34
-
35
-
36
-
37
-
38
-
39
-
40
-
41
-
42
-
43
-
44
-
45
-
46
-
47
-
48
-
49
-
50
-
51
-
52
-
53
-
54
-
55
-
56
-
57
-
58
-
59
-
60
-
61
-
62
-
63
-
64
-
65
-
66
-
67
-
68
-
69
-
70
-
71
-
72
-
73
-
74
-
75
-
76
-
77
-
78
-
79
-
80
-
81
-
82
-
83
-
84
-
85
-
86
-
87
-
88
-
89
-
90
-
91
-
92
-
93
-
94
-
95
-
96
-
97
-
98
-
99
-
100
-
101
-
102
-
103
-
104
-
105
-
106
-
107
-
108
-
109
-
110
-
111
-
112
-
113
-
114
-
115
-
116
-
117
-
118
-
119
-
120
-
121
-
122
-
123
-
124
-
125
-
126
-
127
-
128
-
129
-
130
-
131
-
132
-
133
-
134
-
135
-
136
-
137
-
138
-
139
-
140
-
141
-
142
-
143
-
144
-
145
-
146
-
147
-
148
-
149
-
150
-
151
-
152
-
153
-
154
-
155
-
156
-
157
-
158
-
159
-
160
-
161
-
162
-
163
-
164
-
165
-
166
-
167
-
168
-
169
-
170
-
171
-
172
-
173
-
174
-
175
-
176
-
177
-
178
-
179
-
180
-
181
-
182
-
183
-
184
-
185
-
186
-
187
-
188
-
189
-
190
-
191
-
192
-
193
-
194
-
195
-
196
-
197
-
198
-
199
-
200
-
201
-
202
-
203
-
204
-
205
-
206
-
207
-
208
-
209
-
210
-
211
-
212
-
213
-
214
-
215
-
216
-
217
-
218
-
219
-
220
-
221
-
222
-
 223
223 -
 224
224 -
 225
225 -
 226
226 -
 227
227 -
 228
228 -
 229
229 -
 230
230 -
 231
231 -
 232
232 -
 233
233 -
234
-
235
-
236
-
237
-
238
-
239
-
240
-
241
-
242
-
243
-
244
-
245
-
246
-
247
-
248
-
249
-
250
-
251
-
252
-
253
-
254
-
255
-
256
-
257
-
258
-
259
-
260
-
261
-
262
-
263
-
264
-
265
-
266
-
267
-
268
-
269
-
270
-
271
-
272
-
273
-
274
-
275
-
276
-
277
-
278
-
279
-
280
-
281
-
282
-
283
-
284
-
285
-
286
-
287
-
288
-
289
-
290
-
291
-
292
-
293
-
294
-
295
-
296
-
297
-
298
-
299
-
300
-
301
-
302
-
303
-
304
-
305
-
306
-
307
-
308
-
309
-
310
-
311
-
312
-
313
-
314
-
315
-
316
-
317
-
318
-
319
-
320
-
321
-
322
-
323
-
324
-
325
-
326
-
327
-
328
-
329
-
330
-
331
-
332
-
333
-
334
-
335
-
336
-
337
-
338
-
339
-
340
-
341
-
342
-
343
-
344
-
345
-
346
-
347
-
348
-
349
-
350
 |
 |
