HP P4000 9.0 HP StorageWorks P4000 SAN Solution User Guide - Page 178
Con virtual IP and iSNS for iSCSI, Using Virtual IP addresses, Adding an iSNS server
 |
View all HP P4000 manuals
Add to My Manuals
Save this manual to your list of manuals |
Page 178 highlights
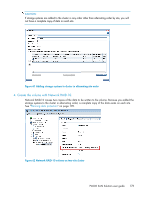
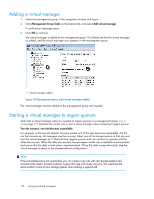
4. Enter a meaningful name for the cluster. A cluster name is case sensitive and must be from 1 to 127 characters. It cannot be changed after the cluster is created. 5. (Optional) Enter a description of the cluster. 6. Select one or more storage systems from the list. Use the up and down arrows on the left to promote and demote storage systems in the list to set the logical order in which they appear. For information about one specific disaster recovery configuration when the order matters, see "Configuring a cluster for disaster recovery" on page 172. 7. Click the iSCSI tab. Configure virtual IP and iSNS for iSCSI VIPs are required for iSCSI load balancing and fault tolerance and for using HP DSM for MPIO. For more information, see Chapter 19 on page 299. Using Virtual IP addresses Virtual IP (VIP) addresses are required for all clusters in SAN/iQ software versions 8.0 and higher. 1. Click the iSCSI tab to bring it to the front. Because a VIP is required in release 8.0 and greater, the choice to use a virtual IP is disabled by default in the 8.0 CMC. If you have management groups that are running 7.0 or earlier software, the choice to use a VIP remains enabled. 2. Add the IP address and subnet mask. Adding an iSNS server (Optional) Add an iSNS server. NOTE: If you use an iSNS server, you may not need to add Target Portals in the Microsoft iSCSI Initiator. 1. In the iSCSI tab view, click the iSCSI Tasks menu, and select Add iSNS Server. The Add iSNS Server window opens. 2. Enter the IP address of the iSNS server. 3. Click OK. 4. Click OK when you have finished. The cluster is created and displayed inside the management group. 5. Select the cluster to open the Clusters tab window. Clusters Map View After you create clusters and volumes and finish setting up the SAN, use the Map View tab for viewing the relationships between clusters, sites, volumes and systems. For more information on using the map view tools, see "Manipulating the Map View" on page 29. 178 Working with clusters
-
 1
1 -
2
-
3
-
4
-
5
-
6
-
7
-
8
-
9
-
10
-
11
-
12
-
13
-
14
-
15
-
16
-
17
-
18
-
19
-
20
-
21
-
22
-
23
-
24
-
25
-
26
-
27
-
28
-
29
-
30
-
31
-
32
-
33
-
34
-
35
-
36
-
37
-
38
-
39
-
40
-
41
-
42
-
43
-
44
-
45
-
46
-
47
-
48
-
49
-
50
-
51
-
52
-
53
-
54
-
55
-
56
-
57
-
58
-
59
-
60
-
61
-
62
-
63
-
64
-
65
-
66
-
67
-
68
-
69
-
70
-
71
-
72
-
73
-
74
-
75
-
76
-
77
-
78
-
79
-
80
-
81
-
82
-
83
-
84
-
85
-
86
-
87
-
88
-
89
-
90
-
91
-
92
-
93
-
94
-
95
-
96
-
97
-
98
-
99
-
100
-
101
-
102
-
103
-
104
-
105
-
106
-
107
-
108
-
109
-
110
-
111
-
112
-
113
-
114
-
115
-
116
-
117
-
118
-
119
-
120
-
121
-
122
-
123
-
124
-
125
-
126
-
127
-
128
-
129
-
130
-
131
-
132
-
133
-
134
-
135
-
136
-
137
-
138
-
139
-
140
-
141
-
142
-
143
-
144
-
145
-
146
-
147
-
148
-
149
-
150
-
151
-
152
-
153
-
154
-
155
-
156
-
157
-
158
-
159
-
160
-
161
-
162
-
163
-
164
-
165
-
166
-
167
-
168
-
169
-
170
-
171
-
172
-
 173
173 -
 174
174 -
 175
175 -
 176
176 -
 177
177 -
 178
178 -
 179
179 -
 180
180 -
 181
181 -
 182
182 -
 183
183 -
184
-
185
-
186
-
187
-
188
-
189
-
190
-
191
-
192
-
193
-
194
-
195
-
196
-
197
-
198
-
199
-
200
-
201
-
202
-
203
-
204
-
205
-
206
-
207
-
208
-
209
-
210
-
211
-
212
-
213
-
214
-
215
-
216
-
217
-
218
-
219
-
220
-
221
-
222
-
223
-
224
-
225
-
226
-
227
-
228
-
229
-
230
-
231
-
232
-
233
-
234
-
235
-
236
-
237
-
238
-
239
-
240
-
241
-
242
-
243
-
244
-
245
-
246
-
247
-
248
-
249
-
250
-
251
-
252
-
253
-
254
-
255
-
256
-
257
-
258
-
259
-
260
-
261
-
262
-
263
-
264
-
265
-
266
-
267
-
268
-
269
-
270
-
271
-
272
-
273
-
274
-
275
-
276
-
277
-
278
-
279
-
280
-
281
-
282
-
283
-
284
-
285
-
286
-
287
-
288
-
289
-
290
-
291
-
292
-
293
-
294
-
295
-
296
-
297
-
298
-
299
-
300
-
301
-
302
-
303
-
304
-
305
-
306
-
307
-
308
-
309
-
310
-
311
-
312
-
313
-
314
-
315
-
316
-
317
-
318
-
319
-
320
-
321
-
322
-
323
-
324
-
325
-
326
-
327
-
328
-
329
-
330
-
331
-
332
-
333
-
334
-
335
-
336
-
337
-
338
-
339
-
340
-
341
-
342
-
343
-
344
-
345
-
346
-
347
-
348
-
349
-
350
 |
 |