IBM 621410U Hardware Maintenance Manual - Page 59
Preinstallation steps, CD-ROM or diskette drive installation
 |
UPC - 087944665854
View all IBM 621410U manuals
Add to My Manuals
Save this manual to your list of manuals |
Page 59 highlights
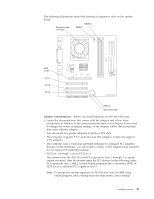
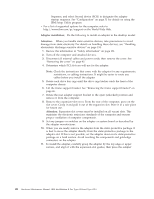
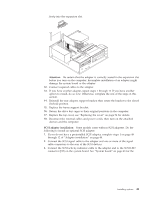
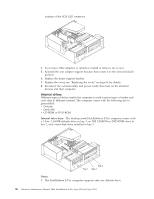
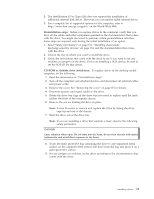
2. The IntelliStation E Pro Type 6204 does not support the installation of additional internal disk drives. However, you can replace failed internal drives. 3. For a complete list of supported options for the computer, refer to http://www.ibm.com/pc/support/ on the World Wide Web. Preinstallation steps: Before you replace drives in the computer, verify that you have all the cables and other equipment specified in the documentation that comes with the drive. You might also need to perform certain preinstallation activities. Some steps are required only during the initial installation of an option. 1. Read "Safety information" on page 131, "Handling electrostatic discharge-sensitive devices" on page 134, and the documentation that comes with the drive. 2. Choose the bay in which you want to install the drive. 3. Check the instructions that come with the drive to see if you need to set any switches or jumpers on the drive. If you are installing a SCSI device, be sure to set the SCSI ID for that device. CD-ROM or diskette drive installation: To replace drives in the desktop model computer, do the following: 1. Read the information in "Preinstallation steps". 2. Turn off the computer and attached devices, and disconnect all external cables and power cords. 3. Remove the cover. See "Removing the cover" on page 45 for details. 4. Disconnect power and signal cables to the drive. 5. Rotate the drive bay cage of the drive that you need to replace until the latch catches the front of the computer chassis. 6. Remove the screws holding the drive in place. Note: It may be easier to remove and replace the drive by lifting the drive cage up and out of the chassis. 7. Slide the drive out of the drive bay. Note: If you are installing a drive that contains a laser, observe the following safety precaution. DANGER Laser radiation when open. Do not stare into the beam, do not view directly with optical instruments, and avoid direct exposure to the beam. 8. Touch the static-protective bag containing the drive to any unpainted metal surface on the computer; then remove the drive from the bag and place it on a static-protective surface. 9. Set any jumpers or switches on the drive according to the documentation that comes with the drive. Installing options 51
-
 1
1 -
2
-
3
-
4
-
5
-
6
-
7
-
8
-
9
-
10
-
11
-
12
-
13
-
14
-
15
-
16
-
17
-
18
-
19
-
20
-
21
-
22
-
23
-
24
-
25
-
26
-
27
-
28
-
29
-
30
-
31
-
32
-
33
-
34
-
35
-
36
-
37
-
38
-
39
-
40
-
41
-
42
-
43
-
44
-
45
-
46
-
47
-
48
-
49
-
50
-
51
-
52
-
53
-
 54
54 -
 55
55 -
 56
56 -
 57
57 -
 58
58 -
 59
59 -
 60
60 -
 61
61 -
 62
62 -
 63
63 -
 64
64 -
65
-
66
-
67
-
68
-
69
-
70
-
71
-
72
-
73
-
74
-
75
-
76
-
77
-
78
-
79
-
80
-
81
-
82
-
83
-
84
-
85
-
86
-
87
-
88
-
89
-
90
-
91
-
92
-
93
-
94
-
95
-
96
-
97
-
98
-
99
-
100
-
101
-
102
-
103
-
104
-
105
-
106
-
107
-
108
-
109
-
110
-
111
-
112
-
113
-
114
-
115
-
116
-
117
-
118
-
119
-
120
-
121
-
122
-
123
-
124
-
125
-
126
-
127
-
128
-
129
-
130
-
131
-
132
-
133
-
134
-
135
-
136
-
137
-
138
-
139
-
140
-
141
-
142
-
143
-
144
-
145
-
146
-
147
-
148
-
149
-
150
-
151
-
152
-
153
-
154
-
155
-
156
-
157
-
158
-
159
-
160
-
161
-
162
-
163
-
164
-
165
-
166
-
167
-
168
-
169
-
170
-
171
-
172
-
173
-
174
-
175
-
176
 |
 |
