IBM 621410U Hardware Maintenance Manual - Page 76
SCSI adapter installation, through 9
 |
UPC - 087944665854
View all IBM 621410U manuals
Add to My Manuals
Save this manual to your list of manuals |
Page 76 highlights
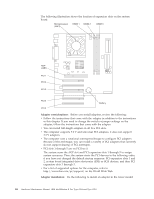
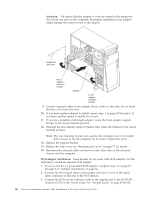
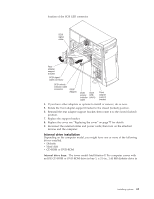
Attention: Be certain that the adapter is correctly seated in the expansion slot before you turn on the computer. Incomplete installation of an adapter might damage the system board or the adapter. Expansion slot cover Rear adapter retention bracket Adapter Front adapter retention bracket 9. Connect required cables to the adapter. Route cables so that they do not block the flow of air from the fans. 10. If you have another adapter to install, repeat steps 1 on page 67 through 9. If you have another option to install, do so now. 11. If you have installed a full-length adapter, rotate the front adapter support bracket to the closed (locked) position. 12. Reinstall the rear adapter support bracket; then rotate the bracket to the closed (locked) position. Note: The rear retaining bracket rests against the computer cover. You might find it easier to lay the computer on its side to replace the cover. 13. Replace the support bracket. 14. Replace the side cover, see "Replacing the cover" on page 77 for details. 15. Reconnect the external cables and power cords; then turn on the attached devices and the computer. SCSI adapter installation: Some models do not come with SCSI adapters. Do the following to install an optional SCSI adapter: 1. If you do not have a preinstalled SCSI adapter, complete steps 1 on page 67 through 9 of "Adapter installation" on page 66. 2. Connect the SCSI signal cable to the adapter and one or more of the signal cable connectors to the rear of the SCSI devices. 3. Connect the SCSI activity indicator cable to the adapter and to the SCSI LED connector (J35) on the system board. See "System board" on page 43 for the 68 Hardware Maintenance Manual: IBM IntelliStation E Pro Type 6204 and Type 6214
-
 1
1 -
2
-
3
-
4
-
5
-
6
-
7
-
8
-
9
-
10
-
11
-
12
-
13
-
14
-
15
-
16
-
17
-
18
-
19
-
20
-
21
-
22
-
23
-
24
-
25
-
26
-
27
-
28
-
29
-
30
-
31
-
32
-
33
-
34
-
35
-
36
-
37
-
38
-
39
-
40
-
41
-
42
-
43
-
44
-
45
-
46
-
47
-
48
-
49
-
50
-
51
-
52
-
53
-
54
-
55
-
56
-
57
-
58
-
59
-
60
-
61
-
62
-
63
-
64
-
65
-
66
-
67
-
68
-
69
-
70
-
 71
71 -
 72
72 -
 73
73 -
 74
74 -
 75
75 -
 76
76 -
 77
77 -
 78
78 -
 79
79 -
 80
80 -
 81
81 -
82
-
83
-
84
-
85
-
86
-
87
-
88
-
89
-
90
-
91
-
92
-
93
-
94
-
95
-
96
-
97
-
98
-
99
-
100
-
101
-
102
-
103
-
104
-
105
-
106
-
107
-
108
-
109
-
110
-
111
-
112
-
113
-
114
-
115
-
116
-
117
-
118
-
119
-
120
-
121
-
122
-
123
-
124
-
125
-
126
-
127
-
128
-
129
-
130
-
131
-
132
-
133
-
134
-
135
-
136
-
137
-
138
-
139
-
140
-
141
-
142
-
143
-
144
-
145
-
146
-
147
-
148
-
149
-
150
-
151
-
152
-
153
-
154
-
155
-
156
-
157
-
158
-
159
-
160
-
161
-
162
-
163
-
164
-
165
-
166
-
167
-
168
-
169
-
170
-
171
-
172
-
173
-
174
-
175
-
176
 |
 |
