IBM 621410U Hardware Maintenance Manual - Page 77
Internal drive installation, Internal drive bays, CD-ROM or DVD-ROM
 |
UPC - 087944665854
View all IBM 621410U manuals
Add to My Manuals
Save this manual to your list of manuals |
Page 77 highlights
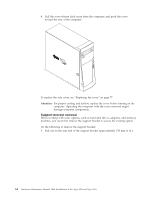
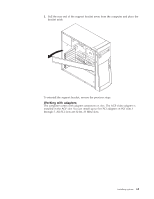
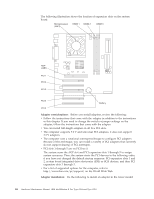
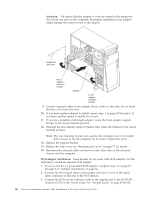
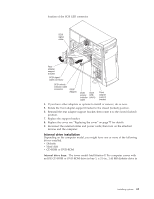
location of the SCSI LED connector. 4. If you have other adapters or options to install or remove, do so now. 5. Rotate the front adapter-support bracket to the closed (locked) position. 6. Reinstall the rear adapter-support bracket; then rotate it to the closed (locked) position. 7. Replace the support bracket. 8. Replace the cover, see "Replacing the cover" on page 77 for details. 9. Reconnect the external cables and power cords; then turn on the attached devices and the computer. Internal drive installation Depending on the computer model, you might have one or more of the following drives installed. v Diskette v Hard disk v CD-ROM or DVD-ROM Internal drive bays: The tower model IntelliStation E Pro computer comes with an IDE CD-ROM or DVD-ROM drive in bay 1, a 3.5-in., 1.44 MB diskette drive in Installing options 69
-
 1
1 -
2
-
3
-
4
-
5
-
6
-
7
-
8
-
9
-
10
-
11
-
12
-
13
-
14
-
15
-
16
-
17
-
18
-
19
-
20
-
21
-
22
-
23
-
24
-
25
-
26
-
27
-
28
-
29
-
30
-
31
-
32
-
33
-
34
-
35
-
36
-
37
-
38
-
39
-
40
-
41
-
42
-
43
-
44
-
45
-
46
-
47
-
48
-
49
-
50
-
51
-
52
-
53
-
54
-
55
-
56
-
57
-
58
-
59
-
60
-
61
-
62
-
63
-
64
-
65
-
66
-
67
-
68
-
69
-
70
-
71
-
 72
72 -
 73
73 -
 74
74 -
 75
75 -
 76
76 -
 77
77 -
 78
78 -
 79
79 -
 80
80 -
 81
81 -
 82
82 -
83
-
84
-
85
-
86
-
87
-
88
-
89
-
90
-
91
-
92
-
93
-
94
-
95
-
96
-
97
-
98
-
99
-
100
-
101
-
102
-
103
-
104
-
105
-
106
-
107
-
108
-
109
-
110
-
111
-
112
-
113
-
114
-
115
-
116
-
117
-
118
-
119
-
120
-
121
-
122
-
123
-
124
-
125
-
126
-
127
-
128
-
129
-
130
-
131
-
132
-
133
-
134
-
135
-
136
-
137
-
138
-
139
-
140
-
141
-
142
-
143
-
144
-
145
-
146
-
147
-
148
-
149
-
150
-
151
-
152
-
153
-
154
-
155
-
156
-
157
-
158
-
159
-
160
-
161
-
162
-
163
-
164
-
165
-
166
-
167
-
168
-
169
-
170
-
171
-
172
-
173
-
174
-
175
-
176
 |
 |
