IBM 621410U Hardware Maintenance Manual - Page 95
FRU information (service only), Desktop model, Adapter retainer, Air baffle
 |
UPC - 087944665854
View all IBM 621410U manuals
Add to My Manuals
Save this manual to your list of manuals |
Page 95 highlights
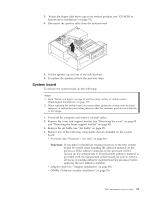
FRU information (service only) Desktop model 87 Adapter retainer 87 Air baffle 87 Fan 88 Power/LED switch 88 Power supply 89 Processor / fan sink 89 Speaker 90 System board 91 Tower model 92 Adapter fan 92 Adapter guide 93 Adapter retainer 93 Bezel 94 Bezel release latch 94 Fan 95 Handle cap 96 Hard drive cage 97 PCI extender board 97 Power/LED switch 98 Power supply 99 Processor / fan sink 100 Speaker 101 System board 102 Top/side cover 104 Field Replacement Units (FRUs) should be replaced by qualified service personnel only. Desktop model The following section contains information on removing components of the desktop model. Adapter retainer To remove the adapter retainer, do the following: Note: Read "Before you begin" on page 41 and the safety notices at "Safety notices (multi-lingual translations)" on page 135. 1. Power-off the computer and remove external cables. 2. Remove the cover and support bracket (see "Removing the cover" on page 45 and "Removing the frame support bracket" on page 46). 3. Remove the air baffle (see "Air baffle"). 4. Disconnect all adapter cards from the system board and remove them from the computer (see "Adapter installation" on page 48). 5. Pull the adapter retainer away from the chassis. 6. To install the adapter retainer, reverse the previous steps. Air baffle To remove the air baffle, do the following: 1. Power-off the computer and remove external cables. 2. Remove the cover and support bracket (see "Removing the cover" on page 45 and "Removing the frame support bracket" on page 46). 3. Grasp the air baffle on the top and bottom of the wide end and squeeze gently, then pull the baffle up and away from the back of the chassis. 4. When the baffle is free of the back of the chassis, lift it out of the workstation. © Copyright IBM Corp. 2001 87
-
 1
1 -
2
-
3
-
4
-
5
-
6
-
7
-
8
-
9
-
10
-
11
-
12
-
13
-
14
-
15
-
16
-
17
-
18
-
19
-
20
-
21
-
22
-
23
-
24
-
25
-
26
-
27
-
28
-
29
-
30
-
31
-
32
-
33
-
34
-
35
-
36
-
37
-
38
-
39
-
40
-
41
-
42
-
43
-
44
-
45
-
46
-
47
-
48
-
49
-
50
-
51
-
52
-
53
-
54
-
55
-
56
-
57
-
58
-
59
-
60
-
61
-
62
-
63
-
64
-
65
-
66
-
67
-
68
-
69
-
70
-
71
-
72
-
73
-
74
-
75
-
76
-
77
-
78
-
79
-
80
-
81
-
82
-
83
-
84
-
85
-
86
-
87
-
88
-
89
-
 90
90 -
 91
91 -
 92
92 -
 93
93 -
 94
94 -
 95
95 -
 96
96 -
 97
97 -
 98
98 -
 99
99 -
 100
100 -
101
-
102
-
103
-
104
-
105
-
106
-
107
-
108
-
109
-
110
-
111
-
112
-
113
-
114
-
115
-
116
-
117
-
118
-
119
-
120
-
121
-
122
-
123
-
124
-
125
-
126
-
127
-
128
-
129
-
130
-
131
-
132
-
133
-
134
-
135
-
136
-
137
-
138
-
139
-
140
-
141
-
142
-
143
-
144
-
145
-
146
-
147
-
148
-
149
-
150
-
151
-
152
-
153
-
154
-
155
-
156
-
157
-
158
-
159
-
160
-
161
-
162
-
163
-
164
-
165
-
166
-
167
-
168
-
169
-
170
-
171
-
172
-
173
-
174
-
175
-
176
 |
 |
