IBM 621410U Hardware Maintenance Manual - Page 63
Memory module installation, Attention
 |
UPC - 087944665854
View all IBM 621410U manuals
Add to My Manuals
Save this manual to your list of manuals |
Page 63 highlights
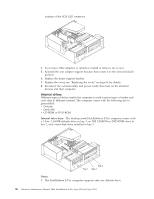
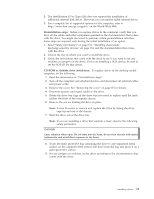
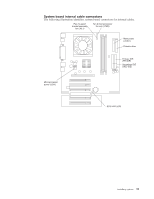
v If two IDE devices are on a single cable, and only one is a hard disk drive, the hard disk drive must be set as a primary device. v If you have only one IDE device on a cable, it must be set as a primary device. Memory module installation Adding memory to the computer is an easy way to make programs run faster. You can increase the amount of memory in the computer by installing memory modules. The IntelliStation E Pro computer uses industry-standard, dual inline memory modules (DIMMs). Note: The desktop model does not support installing memory in DIMM connector 3. Do the following to install a DIMM: Attention: When handling static-sensitive devices, take precautions to avoid damage from static electricity. For details on handling these devices, see "Handling electrostatic discharge-sensitive devices" on page 134. 1. Review the safety precautions listed in the "Safety information" on page 131. 2. Turn off the computer and all attached devices. Disconnect all external cables and power cords; then remove the cover. See "Removing the cover" on page 45 for details. 3. Lift the frame support bracket. See "Removing the frame support bracket" on page 46. 4. Touch the static-protective package containing the DIMM to any unpainted metal surface on the computer. Then remove the new DIMM from the package. 5. Gently open the retaining clip on each end of the DIMM slot. Turn the DIMM so that the pins align correctly with the connector. 6. Insert the DIMM into the connector. Firmly press the DIMM straight down into the connector by applying pressure on both ends of the DIMM simultaneously. The retaining clips snap into the locked position when the DIMM is firmly seated in the connector. DIMM connector 1 DIMM connector 2 7. If a gap exists between the DIMM and the retaining clips, the DIMM has not been correctly installed. Open the retaining clips, remove the DIMM, then reinsert it. 8. If you have other options to install or remove, do so now. Installing options 55
-
 1
1 -
2
-
3
-
4
-
5
-
6
-
7
-
8
-
9
-
10
-
11
-
12
-
13
-
14
-
15
-
16
-
17
-
18
-
19
-
20
-
21
-
22
-
23
-
24
-
25
-
26
-
27
-
28
-
29
-
30
-
31
-
32
-
33
-
34
-
35
-
36
-
37
-
38
-
39
-
40
-
41
-
42
-
43
-
44
-
45
-
46
-
47
-
48
-
49
-
50
-
51
-
52
-
53
-
54
-
55
-
56
-
57
-
 58
58 -
 59
59 -
 60
60 -
 61
61 -
 62
62 -
 63
63 -
 64
64 -
 65
65 -
 66
66 -
 67
67 -
 68
68 -
69
-
70
-
71
-
72
-
73
-
74
-
75
-
76
-
77
-
78
-
79
-
80
-
81
-
82
-
83
-
84
-
85
-
86
-
87
-
88
-
89
-
90
-
91
-
92
-
93
-
94
-
95
-
96
-
97
-
98
-
99
-
100
-
101
-
102
-
103
-
104
-
105
-
106
-
107
-
108
-
109
-
110
-
111
-
112
-
113
-
114
-
115
-
116
-
117
-
118
-
119
-
120
-
121
-
122
-
123
-
124
-
125
-
126
-
127
-
128
-
129
-
130
-
131
-
132
-
133
-
134
-
135
-
136
-
137
-
138
-
139
-
140
-
141
-
142
-
143
-
144
-
145
-
146
-
147
-
148
-
149
-
150
-
151
-
152
-
153
-
154
-
155
-
156
-
157
-
158
-
159
-
160
-
161
-
162
-
163
-
164
-
165
-
166
-
167
-
168
-
169
-
170
-
171
-
172
-
173
-
174
-
175
-
176
 |
 |
