Kyocera FS-9120DN FS-9120DN/9520DN Operation Guide Rev-2 - Page 20
Loading Paper into the MP (Multi- Purpose) Tray,
 |
View all Kyocera FS-9120DN manuals
Add to My Manuals
Save this manual to your list of manuals |
Page 20 highlights
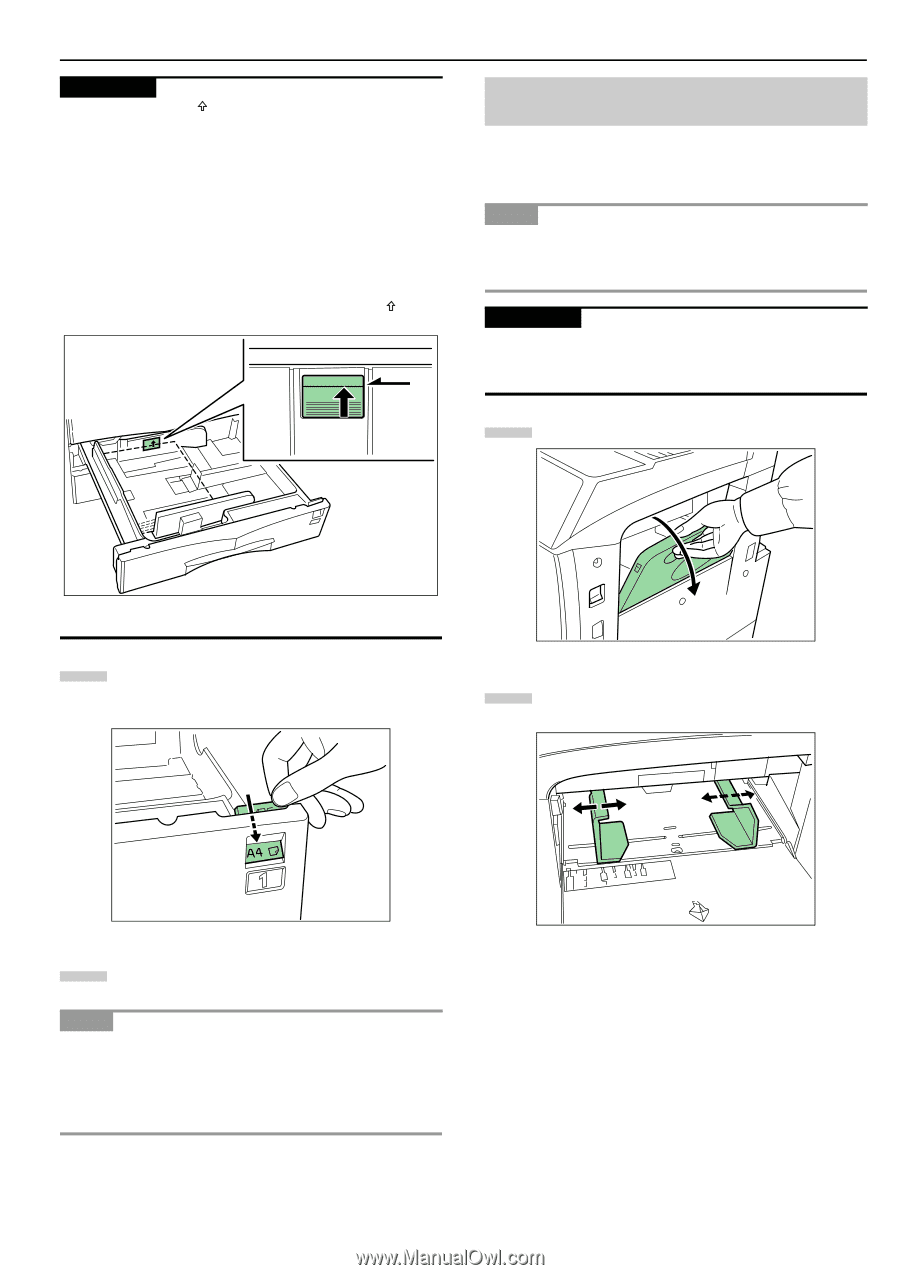
IMPORTANT • There is a sticker ( in the illustration) indicating paper capacity attached to the inside of the paper cassette. Do not load paper above this limit. • When loading paper into the paper cassette, make sure that the print side is facing upward. (The print side is the side facing upward when the package is opened.) • Check that the paper guide makes secure contact with the paper. If there is a gap, adjust the position of the paper guide. • If small-size paper jams occur frequently under high temperature and high humidity conditions, reduce the number of sheets to the level line indicated on the sticker . UPPER LEVEL Chapter 2 Handling Paper 4.2 Loading Paper into the MP (MultiPurpose) Tray Special paper as well as standard paper can be loaded into the MP tray. When printing onto transparencies or thick paper, be sure to use the MP tray. NOTE • The number of sheets of standard paper that can be loaded in the MP tray at a time is approximately 200. • When using transparencies, load a single sheet at a time. IMPORTANT When setting special paper, such as transparencies and thick paper, into the M tray, select the type of paper by referring to 3.Paper Type on page 2-5. 1 Open the MP tray. Figure 2-10 5 Set the supplied paper size plate so that the size of the paper loaded can be checked by looking at the front of the paper cassette. Figure 2-12 2 Adjust the insert guides to the size of the paper to be loaded. Figure 2-11 6 Gently push the paper cassette back in. NOTE Before leaving the printer in disuse for a prolonged period of time, remove the paper from the paper cassette(s) and seal it in its original packaging to protect from moisture. Also, when storing paper in a high temperature and high humidity environment, seal it in a moisture-proof bag. Figure 2-13 2-7
-
 1
1 -
2
-
3
-
4
-
5
-
6
-
7
-
8
-
9
-
10
-
11
-
12
-
13
-
14
-
 15
15 -
 16
16 -
 17
17 -
 18
18 -
 19
19 -
 20
20 -
 21
21 -
 22
22 -
 23
23 -
 24
24 -
 25
25 -
26
-
27
-
28
-
29
-
30
-
31
-
32
-
33
-
34
-
35
-
36
-
37
-
38
-
39
-
40
-
41
-
42
-
43
-
44
-
45
-
46
-
47
-
48
-
49
-
50
-
51
-
52
-
53
-
54
-
55
-
56
-
57
-
58
-
59
-
60
-
61
-
62
-
63
-
64
-
65
-
66
-
67
-
68
-
69
-
70
-
71
-
72
-
73
-
74
-
75
-
76
-
77
-
78
-
79
-
80
-
81
-
82
-
83
-
84
-
85
-
86
-
87
-
88
-
89
-
90
-
91
-
92
-
93
-
94
-
95
-
96
-
97
-
98
-
99
-
100
-
101
-
102
-
103
-
104
-
105
-
106
-
107
-
108
-
109
-
110
-
111
-
112
-
113
-
114
-
115
 |
 |