Kyocera FS-9120DN FS-9120DN/9520DN Operation Guide Rev-2 - Page 38
Changing the Maximum Number of Quick Copy/Proof-and- Hold Jobs
 |
View all Kyocera FS-9120DN manuals
Add to My Manuals
Save this manual to your list of manuals |
Page 38 highlights
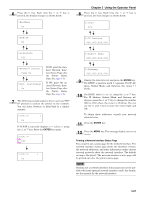
Changing the Maximum Number of Quick Copy/Proof-andHold Jobs This changes maximum number of Quick Copy/Proof-andHold jobs from 0 to 50. The default is 32. 1 Press the MENU key. 2 Press the or key repeatedly until e-MPS > appears. e-MPS > 3 Press the key. 4 Press the or key repeatedly until >e-MPS Configuration > appears. >e-MPS > Configuration 5 Press the key. 6 Press the or Copy appears. key repeatedly until >>Quick >>Quick Copy 32 7 Press the ENTER key. A blinking cursor (_) appears. >>Quick Copy 32 8 Press the or key to increase or decrease the value at the blinking cursor. The value can be set between 0 and 50. Use the and keys to move the cursor right and left. 9 When the desired maximum number of jobs is set, press the ENTER key. 10 Press the MENU key. The display returns to Ready. Chapter 3 Using the Operator Panel Maximum Space Assigned to Temporary Code Jobs This changes the hard disk space that holds temporary code jobs. You can change the maximum space from 0 to 9999 (megabytes). The actual maximum size depends on the size of free hard disk space, however. The default size is 1/6 of the total hard disk space, rounded off in units of 50 MB. For example, if the total hard disk space is 3.2 GB, the default size is 500 MB. 1 Press the MENU key. 2 Press the or key repeatedly until e-MPS > appears. e-MPS > 3 Press the key. 4 Press the or key repeatedly until >e-MPS Configuration > appears. >e-MPS > Configuration 5 Press the key. 6 Press the or key repeatedly until >>Temp. Code JOB Size appears. >>Temp. Code JOB Size 0500MB 7 To change the maximum disk space, press the ENTER key. A blinking cursor (_) appears. >>Temp. Code JOB Size 0500MB 8 Press the or key to increase or decrease, respectively, the value at the blinking cursor. Use the and keys to move the cursor right and left. 9 When the desired size is displayed, press the ENTER key. 10 Press the MENU key. The display returns to Ready. 3-17
-
 1
1 -
2
-
3
-
4
-
5
-
6
-
7
-
8
-
9
-
10
-
11
-
12
-
13
-
14
-
15
-
16
-
17
-
18
-
19
-
20
-
21
-
22
-
23
-
24
-
25
-
26
-
27
-
28
-
29
-
30
-
31
-
32
-
 33
33 -
 34
34 -
 35
35 -
 36
36 -
 37
37 -
 38
38 -
 39
39 -
 40
40 -
 41
41 -
 42
42 -
 43
43 -
44
-
45
-
46
-
47
-
48
-
49
-
50
-
51
-
52
-
53
-
54
-
55
-
56
-
57
-
58
-
59
-
60
-
61
-
62
-
63
-
64
-
65
-
66
-
67
-
68
-
69
-
70
-
71
-
72
-
73
-
74
-
75
-
76
-
77
-
78
-
79
-
80
-
81
-
82
-
83
-
84
-
85
-
86
-
87
-
88
-
89
-
90
-
91
-
92
-
93
-
94
-
95
-
96
-
97
-
98
-
99
-
100
-
101
-
102
-
103
-
104
-
105
-
106
-
107
-
108
-
109
-
110
-
111
-
112
-
113
-
114
-
115
 |
 |
