Kyocera FS-9120DN FS-9120DN/9520DN Operation Guide Rev-2 - Page 55
Deleting Data, Printing a List of Data Names, Hard Disk, >Delete Data, DataH001, >List
 |
View all Kyocera FS-9120DN manuals
Add to My Manuals
Save this manual to your list of manuals |
Page 55 highlights
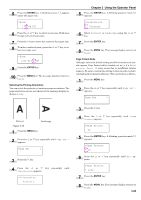
Chapter 3 Using the Operator Panel 9 Repeat above steps until you have transferred all data (files) that you want to write to the hard disk. Each time you finish writing data, a hard disk write information page is printed from the printer showing the information explained in step 8 above, but pertaining only to the data just written. To see all data contained in the hard disk at once, print a list of data names as explained. See Printing a List of Data Names on page 3-34. Deleting Data It is possible to use the printer to delete data from a hard disk one by one. To delete data from a hard disk, proceed as follows. Check that the hard disk contains data. Otherwise, the >Delete Data menu will not appear on the message display. 1 Press the MENU key. 2 Press the or key repeatedly until Hard Disk > appears. Hard Disk > 3 Press the key. 4 Press the or key repeatedly until >Delete Data appears. The data name also appears. >Delete Data DataH001 5 Press the ENTER key. A blinking question mark (?) appears before the data name. >Delete Data ?DataH001 6 Press the name. or key to display the desired data 7 Press the ENTER key. Processing appears and the data is deleted from the hard disk. The message display returns to Ready. 3-34 Printing a List of Data Names The printer prints a list of all data names (referred to as partitions) stored in a hard disk for reference. To print a list of data names for the hard disk, proceed as follows. 1 Press the MENU key. 2 Press the or key repeatedly until Hard Disk > appears. Hard Disk > 3 Press the key. 4 Press the or key repeatedly until >List of Partitions appears. >List of Partitions 5 Press the ENTER key. A question mark (?) appears. >List of Partitions ? 6 Press the ENTER key. Processing appears and the printing of the list starts. PARTITION LIST Device Information Partition Information Figure 3-14 The printout (example above) includes the following information; Device Name/Number: HARD DISK/0 is indicated for the hard disk. Capacity: The total capacity of the hard disk in bytes. Used Space: The total size of the data stored in the hard disk in bytes. Free Space: The size of the capacity remaining in the hard disk for storing further data, including the amount of memory that the printer uses for its system. Partition Name: The name of the written data assigned automatically by the printer.
-
 1
1 -
2
-
3
-
4
-
5
-
6
-
7
-
8
-
9
-
10
-
11
-
12
-
13
-
14
-
15
-
16
-
17
-
18
-
19
-
20
-
21
-
22
-
23
-
24
-
25
-
26
-
27
-
28
-
29
-
30
-
31
-
32
-
33
-
34
-
35
-
36
-
37
-
38
-
39
-
40
-
41
-
42
-
43
-
44
-
45
-
46
-
47
-
48
-
49
-
 50
50 -
 51
51 -
 52
52 -
 53
53 -
 54
54 -
 55
55 -
 56
56 -
 57
57 -
 58
58 -
 59
59 -
 60
60 -
61
-
62
-
63
-
64
-
65
-
66
-
67
-
68
-
69
-
70
-
71
-
72
-
73
-
74
-
75
-
76
-
77
-
78
-
79
-
80
-
81
-
82
-
83
-
84
-
85
-
86
-
87
-
88
-
89
-
90
-
91
-
92
-
93
-
94
-
95
-
96
-
97
-
98
-
99
-
100
-
101
-
102
-
103
-
104
-
105
-
106
-
107
-
108
-
109
-
110
-
111
-
112
-
113
-
114
-
115
 |
 |