Kyocera FS-9120DN FS-9120DN/9520DN Operation Guide Rev-2 - Page 78
Print Quality Problems, TROUBLESHOOTING
 |
View all Kyocera FS-9120DN manuals
Add to My Manuals
Save this manual to your list of manuals |
Page 78 highlights
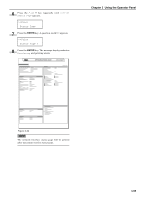
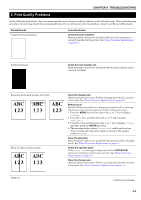
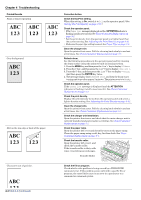
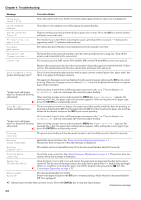
CHAPTER 4 TROUBLESHOOTING 2. Print Quality Problems As the following table shows, there are many possible causes of print quality problems, such as blank output. The troubleshooting procedure for each type of problem is explained below. If you still cannot solve the problem, contact your Kyocera Mita dealer. Printed Results Completely blank printout Corrective Action Check the toner container. Open the printer front cover and check that the toner container is correctly installed in the printer. See Toner Container Replacement on page 5-1. All-black printout Check the main charger unit. Open the printer front cover and check that the main charger unit is correctly installed. Dropouts, horizontal streaks, stray dots Black or white vertical streaks Table 4-2 Clean the charger wire. Open the printer front cover. Pull the cleaning knob slowly in and out a few times. See Toner Container Replacement on page 5-1. Refresh drum. See the following procedures in the operator panel and try cleaning the drum surface using the printer's built-in cleaning system. 1. Press the MENU key, and then press the or key to display >Others. 2. Press the key , and then press the or key to display >Service >. 3. Press the key, and then press the or key to display >>Drum. And then press the ENTER key twice. 4. The message display shows Please wait, and then the drum starts turning and stops after approx.3 minutes. The printer reverts to Ready. Clean the separator. Open the printer left cover 1 and clean the separator with a cleaning brush. See Toner Container Replacement on page 5-1. Check the operator panel. If the Toner low message is displayed and the ! ATTENTION indicator is flashing, install a new toner kit. See Toner Container Replacement on page 5-1. Clean the charger wire. Open the printer front cover. Pull the cleaning knob slowly in and out a few times. See Toner Container Replacement on page 5-1. (Continued on next page) 4-2
-
 1
1 -
2
-
3
-
4
-
5
-
6
-
7
-
8
-
9
-
10
-
11
-
12
-
13
-
14
-
15
-
16
-
17
-
18
-
19
-
20
-
21
-
22
-
23
-
24
-
25
-
26
-
27
-
28
-
29
-
30
-
31
-
32
-
33
-
34
-
35
-
36
-
37
-
38
-
39
-
40
-
41
-
42
-
43
-
44
-
45
-
46
-
47
-
48
-
49
-
50
-
51
-
52
-
53
-
54
-
55
-
56
-
57
-
58
-
59
-
60
-
61
-
62
-
63
-
64
-
65
-
66
-
67
-
68
-
69
-
70
-
71
-
72
-
 73
73 -
 74
74 -
 75
75 -
 76
76 -
 77
77 -
 78
78 -
 79
79 -
 80
80 -
 81
81 -
 82
82 -
 83
83 -
84
-
85
-
86
-
87
-
88
-
89
-
90
-
91
-
92
-
93
-
94
-
95
-
96
-
97
-
98
-
99
-
100
-
101
-
102
-
103
-
104
-
105
-
106
-
107
-
108
-
109
-
110
-
111
-
112
-
113
-
114
-
115
 |
 |