Kyocera FS-9120DN FS-9120DN/9520DN Operation Guide Rev-2 - Page 89
Maintenance, 1. Toner Container Replacement, 1.2 Replenishing Toner
 |
View all Kyocera FS-9120DN manuals
Add to My Manuals
Save this manual to your list of manuals |
Page 89 highlights
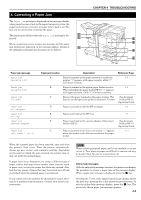
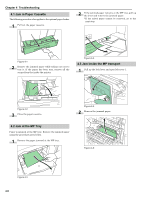
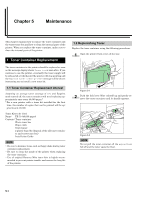
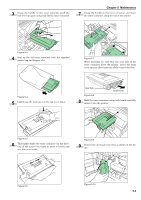
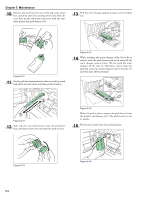
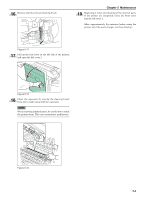
Chapter 5 Maintenance This chapter explains how to replace the toner container and the waste toner box and how to clean the internal parts of the printer. When you replace the toner container, make sure to clean the internal parts of the printer. 1. Toner Container Replacement The toner container in the printer should be replaced as soon as the message display shows Toner low or soon after. If you continue to use the printer, eventually the toner supply will be exhausted at which point the printer will stop printing and the Replace toner Clean printer message will be shown instructing you to install a new toner kit. 1.1 Toner Container Replacement Interval Assuming an average toner coverage of 5 % and Ecoprint mode turned off, the toner container will need replacing approximately once every 40,000 pages.* * For a new printer with a toner kit installed for the first time, the number of copies that can be printed will be approximately 20,000. Toner Kits to be Used Name: TK-70 (40,000 pages) Contents: Toner container Waste toner box Wiper cloth Grid cleaner 2 plastic bags (for disposal of the old toner container and waste toner box) Installation Guide NOTE • Be sure to distance items such as floppy disks during toner container replacement. • Be sure to clean the inside of the printer when replacing the toner container. • Use of original Kyocera Mita toner kits is highly recommended to prevent printer trouble and ensure the long life of the printer. 1.2 Replenishing Toner Replace the toner container using the following procedures. 1 Open the printer front cover all the way. Figure 5-1 2 Push the lock lever (blue colored) up and gently remove the toner container until its handle appears. Figure 5-2 NOTE Do not pull the toner container all the way as it can fall off and the toner spots the floor. 5-1
-
 1
1 -
2
-
3
-
4
-
5
-
6
-
7
-
8
-
9
-
10
-
11
-
12
-
13
-
14
-
15
-
16
-
17
-
18
-
19
-
20
-
21
-
22
-
23
-
24
-
25
-
26
-
27
-
28
-
29
-
30
-
31
-
32
-
33
-
34
-
35
-
36
-
37
-
38
-
39
-
40
-
41
-
42
-
43
-
44
-
45
-
46
-
47
-
48
-
49
-
50
-
51
-
52
-
53
-
54
-
55
-
56
-
57
-
58
-
59
-
60
-
61
-
62
-
63
-
64
-
65
-
66
-
67
-
68
-
69
-
70
-
71
-
72
-
73
-
74
-
75
-
76
-
77
-
78
-
79
-
80
-
81
-
82
-
83
-
 84
84 -
 85
85 -
 86
86 -
 87
87 -
 88
88 -
 89
89 -
 90
90 -
 91
91 -
 92
92 -
 93
93 -
 94
94 -
95
-
96
-
97
-
98
-
99
-
100
-
101
-
102
-
103
-
104
-
105
-
106
-
107
-
108
-
109
-
110
-
111
-
112
-
113
-
114
-
115
 |
 |