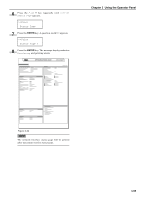
Kyocera FS-9120DN FS-9120DN/9520DN Operation Guide Rev-2 - Page 81
ENTER, CANCEL, Message, Corrective Action, Paper Handling > - fs toner
 |
View all Kyocera FS-9120DN manuals
Add to My Manuals
Save this manual to your list of manuals |
Page 81 highlights
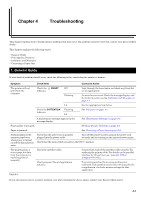
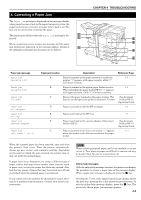
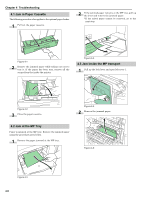
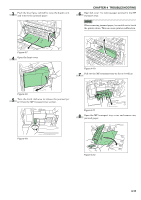
Chapter 4 Troubleshooting Message Corrective Action Close left cover 1 (-3) Close reverse adapter Duplex disabled Press GO Finisher tray 1(2) paper full Finisher path error Incorrect slot Please reinstall Install MK Close the printer left cover. If left cover of the option paper feeder is open, 2 or 3 is displayed. Close the reverse adapter cover of the option document finisher. Duplex printing cannot be performed due to paper size or type. Press the GO key and the printer will print on one side only. The finisher tray is full. When removing the paper, printing will be resumed, "1" indicates the upper tray, while "2" indicates the lower tray. The option document finisher is not installed correctly. Install it correctly. The hard disk or the network interface card has been installed in the wrong slot. Turn off the printer and reinstalled in the correct slot. The maintenance kit (MK-702 for FS-9120DN, MK-703 for FS-9520DN) needs to be replaced. Replace the maintenance kit since the total number of printed pages has reached 500,000. Call for service. The maintenance kit includes a drum unit, developer unit and so on. Load Cassette 1(to4) (paper size)/(paper type)* There is data for printing that matches with a paper cassette setting (paper size, paper type), but there is no paper in the paper cassette. Set paper into the paper source as displayed on the operator panel, and press the GO key to restart printing. However, the paper source numbers (3 to 4) are only displayed when there is an option paper feeder installed. Or, if you want to print from a different paper source press the or key to display Use *(paper size) and (paper alternative? and you can change the source for paper feeding. type) are displayed flashing alternately. After selecting a paper source and pressing the MENU key, Paper Handling > appears. By pressing the key, the paper type settings menu appears. After setting the correct paper type, ;Òpress the ENTER key and printing starts. Load MP tray (paper size)/(paper type) There is no paper cassette set (paper size, paper type) that matches with the data for printing, so printing is done from the MP tray. Set paper into the MP tray that matches the paper size and type shown on the display and press the GO key to restart printing. Or, if you want to print from a different paper source press the or key to display Use alternative? and you can change the source for paper feeding. *(paper size) and (paper type) are displayed flashing After selecting a paper source and pressing the MENU key, Paper Handling > appears. By alternately. pressing the key, the paper type settings menu appears. After setting the correct paper type, ;Òpress the ENTER key and printing starts. Missing chad box The punch unit chad box of the document finisher is not installed correctly. Install it correctly. Missing toner container Install the toner container. See Toner Container Replacement on page 5-1. The printer does not operate when this message is displayed. Missing stapler unit The stapler unit is not installed correctly in the document finisher. Install it correctly. Missing waste toner box Install the waste toner box. See Toner Container Replacement on page 5-1. The printer does not operate when this message is displayed. Paper jam Open the front cover or left cover and correct the paper jam (or paper mis-feeding in the paper cassette). The location of the paper jam is also indicated in place of the #'s. Online help messages which are useful for correcting the paper jam will be displayed by pressing the ? key. (See ;ÒCorrecting a Paper Jam on page 4-8.) Remove paper Press GO The document finisher tray is full. Remove the paper and press the GO key to resume printing. (Only when the document finisher DF-73 is equipped) ;Ò:Alarm buzzer sounds when an error occurs. Press the CANCEL key to stop the alarm buzzer. (Continued on next page) 4-5
-
 1
1 -
2
-
3
-
4
-
5
-
6
-
7
-
8
-
9
-
10
-
11
-
12
-
13
-
14
-
15
-
16
-
17
-
18
-
19
-
20
-
21
-
22
-
23
-
24
-
25
-
26
-
27
-
28
-
29
-
30
-
31
-
32
-
33
-
34
-
35
-
36
-
37
-
38
-
39
-
40
-
41
-
42
-
43
-
44
-
45
-
46
-
47
-
48
-
49
-
50
-
51
-
52
-
53
-
54
-
55
-
56
-
57
-
58
-
59
-
60
-
61
-
62
-
63
-
64
-
65
-
66
-
67
-
68
-
69
-
70
-
71
-
72
-
73
-
74
-
75
-
 76
76 -
 77
77 -
 78
78 -
 79
79 -
 80
80 -
 81
81 -
 82
82 -
 83
83 -
 84
84 -
 85
85 -
 86
86 -
87
-
88
-
89
-
90
-
91
-
92
-
93
-
94
-
95
-
96
-
97
-
98
-
99
-
100
-
101
-
102
-
103
-
104
-
105
-
106
-
107
-
108
-
109
-
110
-
111
-
112
-
113
-
114
-
115
 |
 |