Lexmark X7550 User's Guide (Mac) - Page 111
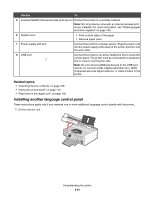
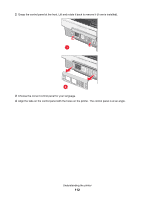
Installing another language control panel
 |
View all Lexmark X7550 manuals
Add to My Manuals
Save this manual to your list of manuals |
Page 111 highlights
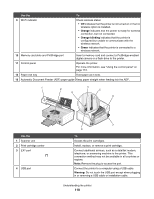
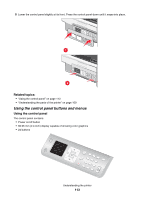
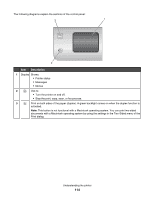
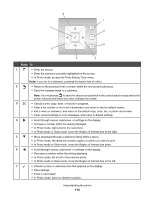
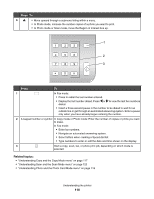
Use the To 5 Lexmark N2050 (internal wireless print server) Connect the printer to a wireless network. Note: Not all products come with an internal wireless print server installed. For more information, see "Ordering paper and other supplies" on page 150. 6 Duplex cover • Print on both sides of the paper • Remove paper jams. 7 Power supply with port Connect the printer to a power source. Plug the power cord into the power supply at the back of the printer and then into the wall outlet. 8 LINE port Connect the printer to an active telephone line to send and receive faxes. The printer must be connected to a telephone line to receive incoming fax calls. Note: Do not connect additional devices to the LINE port, and do not connect a DSL (digital subscriber line), ISDN (integrated services digital network), or cable modem to the printer. Related topics: • "Checking the box contents" on page 108 • "Using the control panel" on page 113 • "Paper jam in the duplex unit" on page 192 Installing another language control panel These instructions apply only if you received one or more additional language control panels with the printer. 1 Lift the scanner unit. Understanding the printer 111
-
 1
1 -
2
-
3
-
4
-
5
-
6
-
7
-
8
-
9
-
10
-
11
-
12
-
13
-
14
-
15
-
16
-
17
-
18
-
19
-
20
-
21
-
22
-
23
-
24
-
25
-
26
-
27
-
28
-
29
-
30
-
31
-
32
-
33
-
34
-
35
-
36
-
37
-
38
-
39
-
40
-
41
-
42
-
43
-
44
-
45
-
46
-
47
-
48
-
49
-
50
-
51
-
52
-
53
-
54
-
55
-
56
-
57
-
58
-
59
-
60
-
61
-
62
-
63
-
64
-
65
-
66
-
67
-
68
-
69
-
70
-
71
-
72
-
73
-
74
-
75
-
76
-
77
-
78
-
79
-
80
-
81
-
82
-
83
-
84
-
85
-
86
-
87
-
88
-
89
-
90
-
91
-
92
-
93
-
94
-
95
-
96
-
97
-
98
-
99
-
100
-
101
-
102
-
103
-
104
-
105
-
 106
106 -
 107
107 -
 108
108 -
 109
109 -
 110
110 -
 111
111 -
 112
112 -
 113
113 -
 114
114 -
 115
115 -
 116
116 -
117
-
118
-
119
-
120
-
121
-
122
-
123
-
124
-
125
-
126
-
127
-
128
-
129
-
130
-
131
-
132
-
133
-
134
-
135
-
136
-
137
-
138
-
139
-
140
-
141
-
142
-
143
-
144
-
145
-
146
-
147
-
148
-
149
-
150
-
151
-
152
-
153
-
154
-
155
-
156
-
157
-
158
-
159
-
160
-
161
-
162
-
163
-
164
-
165
-
166
-
167
-
168
-
169
-
170
-
171
-
172
-
173
-
174
-
175
-
176
-
177
-
178
-
179
-
180
-
181
-
182
-
183
-
184
-
185
-
186
-
187
-
188
-
189
-
190
-
191
-
192
-
193
-
194
-
195
-
196
-
197
-
198
-
199
-
200
-
201
-
202
-
203
-
204
-
205
-
206
-
207
-
208
-
209
-
210
-
211
-
212
-
213
-
214
-
215
-
216
-
217
-
218
-
219
-
220
-
221
-
222
-
223
-
224
-
225
-
226
-
227
 |
 |