Lexmark X7550 User's Guide (Mac) - Page 117
Understanding Copy and the Copy Mode menu, Copy Mode, Copies
 |
View all Lexmark X7550 manuals
Add to My Manuals
Save this manual to your list of manuals |
Page 117 highlights
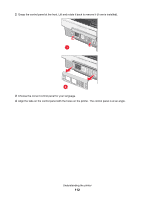
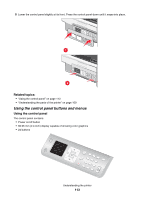
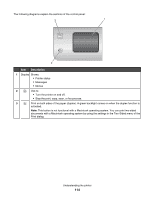
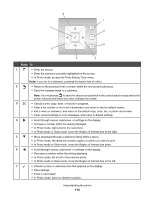
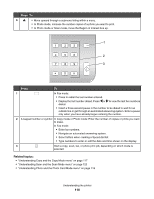
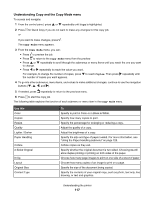
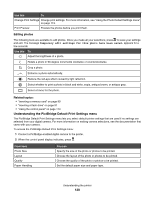
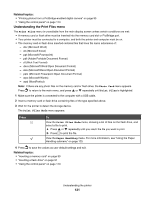
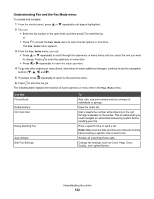
Understanding Copy and the Copy Mode menu To access and navigate: 1 From the control panel, press or repeatedly until Copy is highlighted. 2 Press for Quick Copy if you do not want to make any changes for this copy job. or If you want to make changes, press . The Copy Mode menu appears. 3 From the Copy Mode menu, you can: • Press to preview the job. • Press to return to the Copy Mode menu from the preview. • Press or repeatedly to scroll through the submenus or menu items until you reach the one you want to change. • Press or repeatedly to reach the value you want. For example, to change the number of copies, press to reach Copies. Then press repeatedly until the number of copies you want appears. 4 To go into other submenus, menu items, and values to make additional changes, continue to use the navigation buttons ( , , , and ). 5 If needed, press repeatedly to return to the previous menu. 6 Press to start the copy job. The following table explains the function of each submenu or menu item in the Copy Mode menu. Use this Color Copies Resize Quality Lighter / Darker Paper Handling Collate 2-Sided Original N-Up Layout Original Size Content Type To Specify to print in Color or in Black & White. Specify how many copies to print. Specify the percentage for enlarging or reducing a copy. Adjust the quality of a copy. Adjust the brightness of a copy. Specify the size and type of paper loaded. For more information, see "Using the Paper Handling submenu" on page 125. Collate copies as they exit. Specify whether the original document is two-sided. Choosing On will allow duplex printing or printing on both sides of the paper. Choose how many page images to print on one side of a sheet of paper. Choose how many copies of an image to print on a page. Specify the size of the document being copied. Specify the contents of your original copy, such as photo, text only, line drawing, or text and graphics. Understanding the printer 117
-
 1
1 -
2
-
3
-
4
-
5
-
6
-
7
-
8
-
9
-
10
-
11
-
12
-
13
-
14
-
15
-
16
-
17
-
18
-
19
-
20
-
21
-
22
-
23
-
24
-
25
-
26
-
27
-
28
-
29
-
30
-
31
-
32
-
33
-
34
-
35
-
36
-
37
-
38
-
39
-
40
-
41
-
42
-
43
-
44
-
45
-
46
-
47
-
48
-
49
-
50
-
51
-
52
-
53
-
54
-
55
-
56
-
57
-
58
-
59
-
60
-
61
-
62
-
63
-
64
-
65
-
66
-
67
-
68
-
69
-
70
-
71
-
72
-
73
-
74
-
75
-
76
-
77
-
78
-
79
-
80
-
81
-
82
-
83
-
84
-
85
-
86
-
87
-
88
-
89
-
90
-
91
-
92
-
93
-
94
-
95
-
96
-
97
-
98
-
99
-
100
-
101
-
102
-
103
-
104
-
105
-
106
-
107
-
108
-
109
-
110
-
111
-
 112
112 -
 113
113 -
 114
114 -
 115
115 -
 116
116 -
 117
117 -
 118
118 -
 119
119 -
 120
120 -
 121
121 -
 122
122 -
123
-
124
-
125
-
126
-
127
-
128
-
129
-
130
-
131
-
132
-
133
-
134
-
135
-
136
-
137
-
138
-
139
-
140
-
141
-
142
-
143
-
144
-
145
-
146
-
147
-
148
-
149
-
150
-
151
-
152
-
153
-
154
-
155
-
156
-
157
-
158
-
159
-
160
-
161
-
162
-
163
-
164
-
165
-
166
-
167
-
168
-
169
-
170
-
171
-
172
-
173
-
174
-
175
-
176
-
177
-
178
-
179
-
180
-
181
-
182
-
183
-
184
-
185
-
186
-
187
-
188
-
189
-
190
-
191
-
192
-
193
-
194
-
195
-
196
-
197
-
198
-
199
-
200
-
201
-
202
-
203
-
204
-
205
-
206
-
207
-
208
-
209
-
210
-
211
-
212
-
213
-
214
-
215
-
216
-
217
-
218
-
219
-
220
-
221
-
222
-
223
-
224
-
225
-
226
-
227
 |
 |
