| Section |
Page |
| Contents |
3 |
| Safety information |
5 |
| Networking the printer |
6 |
| General networking |
6 |
| Networking overview |
6 |
| Common home network configurations |
6 |
| Finding the MAC address |
8 |
| Printing a network setup page |
9 |
| Finding a printer/print server located on remote subnets |
9 |
| Wireless networking |
9 |
| IP addresses |
9 |
| Finding the signal strength |
10 |
| Sharing the printer on a network |
10 |
| Types of wireless networks |
10 |
| Using a wireless network connection |
11 |
| Changing wireless settings after installation |
12 |
| Tips for using network adapters |
12 |
| Know your security keys |
12 |
| Networking the printer |
13 |
| Why do I need an installation cable? |
13 |
| Installing the printer on a network |
13 |
| Installing the printer on additional network computers |
13 |
| Selecting a network printer |
13 |
| Why do I need to disconnect the installation cable? |
14 |
| What do the Wi-Fi indicator lights mean? |
14 |
| Advanced wireless setup |
15 |
| Creating an ad hoc wireless network using Mac |
15 |
| Adding a printer to an existing ad hoc wireless network using Mac |
15 |
| Installing an internal wireless print server |
16 |
| Printing |
18 |
| Getting started |
18 |
| Loading paper |
18 |
| Using the automatic paper type sensor |
18 |
| Loading envelopes |
19 |
| Loading labels |
19 |
| Loading greeting cards, index cards, photo cards, and postcards |
20 |
| Loading transparencies |
20 |
| Loading iron-on transfers |
20 |
| Loading custom-size paper |
21 |
| Loading banner paper |
21 |
| Choosing compatible specialty paper types |
22 |
| Learning about the All-In-One software print options |
22 |
| Choosing a paper size |
22 |
| Choosing a paper type |
22 |
| Choosing a print quality |
23 |
| Collating copies using the computer |
23 |
| Sharpening an image |
23 |
| Resetting All-In-One software settings to defaults |
23 |
| Performing printing and related tasks |
24 |
| Printing a document |
24 |
| Printing photos |
24 |
| Printing borderless photos |
25 |
| Printing cards |
25 |
| Printing envelopes |
26 |
| Printing iron-on transfers |
27 |
| Printing transparencies |
27 |
| Printing a banner |
28 |
| Printing multiple pages on one sheet |
29 |
| Printing color images in black and white |
29 |
| Printing multiple copies of a stored document |
29 |
| Printing the last page first (reverse page order) |
30 |
| Printing document files from a memory card or flash drive |
30 |
| Assembling a booklet |
31 |
| Printing on both sides of the paper (duplexing) |
31 |
| Printing a test page using the computer |
32 |
| Managing print jobs |
33 |
| Pausing print jobs |
33 |
| Canceling a print job |
33 |
| Resuming print jobs |
33 |
| Copying |
34 |
| Getting started |
34 |
| Loading paper |
34 |
| Loading original documents on the scanner glass |
34 |
| Loading original documents into the Automatic Document Feeder |
36 |
| Using the automatic paper type sensor |
37 |
| Performing copying and related tasks |
37 |
| Making a copy |
37 |
| Making a color or black-and-white copy |
37 |
| Adjusting the brightness of a copy |
38 |
| Copying photos |
38 |
| Adjusting copy quality |
39 |
| Collating copies using the control panel |
39 |
| Repeating an image on one page |
40 |
| Enlarging or reducing an image |
41 |
| Copying on both sides of the paper (duplexing) |
41 |
| Copying multiple pages on one sheet (N-Up) |
42 |
| Canceling a copy job |
43 |
| Changing the default copy settings |
43 |
| Scanning |
44 |
| Getting started |
44 |
| Loading original documents on the scanner glass |
44 |
| Loading original documents into the Automatic Document Feeder |
45 |
| Learning about the All-In-One Center scan options |
46 |
| Choosing where to send scanned images |
46 |
| Editing the Customize list |
46 |
| Adjusting color settings when scanning |
47 |
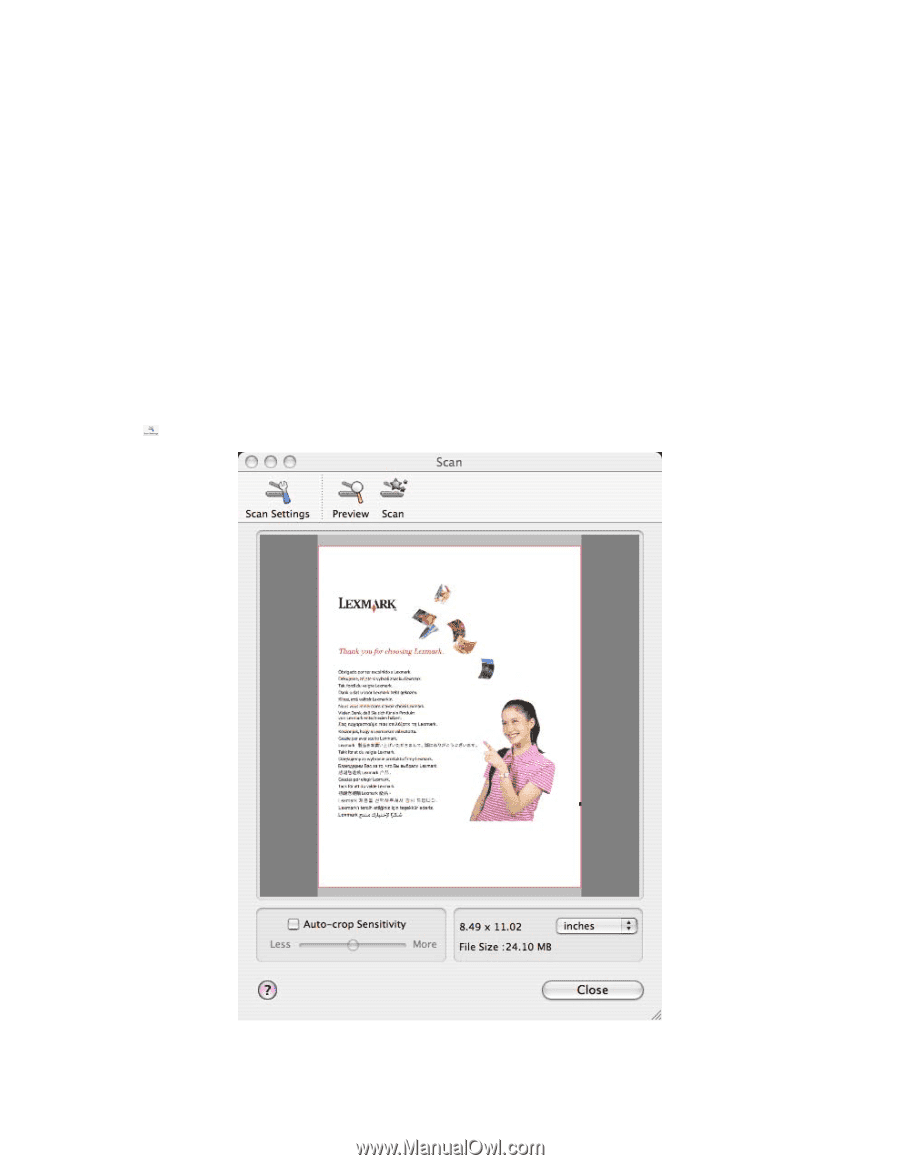
| Customizing scan settings from the Scan dialog |
48 |
| Cropping photos using the software |
50 |
| Adjusting the brightness of an image |
50 |
| Sharpening an image |
50 |
| Selecting the All-In-One Center Preferences setting |
51 |
| Resetting All-In-One software settings to defaults |
51 |
| Performing scanning and related tasks |
52 |
| Scanning a document |
52 |
| Making a color or black-and-white scan |
52 |
| Scanning multiple pages using the scanner glass |
53 |
| Scanning a text-only document |
54 |
| Scanning a text and graphics document |
54 |
| Scanning an item for Web page viewing |
54 |
| Scanning images for editing |
55 |
| Scanning a portion of an image |
55 |
| Scanning clear images from magazines or newspapers |
56 |
| Scanning text for editing |
56 |
| Scanning documents or images for e-mailing |
56 |
| Saving a scanned image |
57 |
| Canceling a scan job |
57 |
| Changing the default scan settings |
58 |
| Scanning over a network |
58 |
| Setting a network printer to scan |
58 |
| Selecting printers that can scan to your computer |
59 |
| Scanning to a computer over a network using the control panel |
59 |
| Faxing |
61 |
| Getting started |
61 |
| Choosing a fax connection |
61 |
| Setting the printer to use the Fax feature without a computer |
62 |
| Using an RJ11 adapter |
62 |
| Connecting directly to a telephone wall jack |
65 |
| Connecting directly to a telephone wall jack in Germany |
65 |
| Connecting to a telephone |
67 |
| Connecting to an answering machine |
68 |
| Connecting to a computer with a modem |
69 |
| Using a digital phone service |
70 |
| Loading paper |
71 |
| Loading original documents on the scanner glass |
71 |
| Loading original documents into the Automatic Document Feeder |
73 |
| Sending a fax |
74 |
| Entering a fax number |
74 |
| Sending a fax using the control panel |
76 |
| Sending a broadcast fax at a scheduled time |
76 |
| Sending a fax while listening to a call (On Hook Dial) |
77 |
| Receiving a fax |
78 |
| Receiving a fax automatically |
78 |
| Receiving a fax with an answering machine |
78 |
| Receiving a fax manually |
78 |
| Receiving a two-sided fax |
79 |
| Setting Auto Answer to On |
79 |
| Using Caller ID |
80 |
| Customizing dial settings |
80 |
| Using the Phone Book |
80 |
| Setting up Speed Dial using the computer |
81 |
| Adding contacts from the Address Book |
82 |
| Setting up a dialing prefix |
82 |
| Setting up to fax while behind a PBX |
82 |
| Setting the distinctive ring |
83 |
| Setting the number of rings before receiving a fax automatically |
83 |
| Customizing fax information |
84 |
| Creating a fax cover page using the control panel |
84 |
| Setting up a fax footer |
84 |
| Managing fax jobs |
84 |
| Forwarding faxes |
84 |
| Printing fax activity reports |
85 |
| Setting up a fax footer |
85 |
| Blocking junk faxes |
86 |
| Blocking unwanted changes to fax settings |
87 |
| Customizing settings using the Fax Setup Utility |
87 |
| Working with photos |
90 |
| Connecting photo storage devices |
90 |
| Inserting a memory card |
90 |
| Inserting a flash drive |
91 |
| Removing a memory card or flash drive |
92 |
| Working with photos using the control panel |
92 |
| Printing a photo or selected photos |
92 |
| Printing all photos from a memory device |
93 |
| Printing photos stored on a memory device using the proof sheet |
94 |
| Printing photos from a PictBridge-enabled digital camera |
95 |
| Printing photos from a digital camera using DPOF |
96 |
| Editing photos using the control panel |
97 |
| Transferring photos from a memory card to a flash drive |
98 |
| Transferring photos from a memory device to the computer using the control panel |
98 |
| Viewing a slideshow of photos on the control panel display |
99 |
| Working with photos using the computer |
99 |
| Printing cards |
99 |
| Printing borderless photos |
100 |
| Printing color images in black and white |
101 |
| Scanning images for editing |
101 |
| Scanning documents or images for e-mailing |
102 |
| Scanning multiple pages using the scanner glass |
102 |
| Saving a scanned image |
103 |
| Adjusting color settings when scanning |
103 |
| Adjusting the brightness of an image |
104 |
| Cropping photos using the software |
104 |
| Enhancing photo print quality using the software |
105 |
| Enlarging or reducing an image |
105 |
| Sharpening an image |
106 |
| Transferring photos from a memory device to the computer over a wireless network |
106 |
| Understanding the printer |
108 |
| Understanding the printer parts |
108 |
| Checking the box contents |
108 |
| Understanding the parts of the printer |
109 |
| Installing another language control panel |
111 |
| Using the control panel buttons and menus |
113 |
| Understanding the software |
132 |
| Installing the printer software |
132 |
| Removing the printer software |
132 |
| Using the Printer Selection dialog |
133 |
| Using the Printer Setup Complete dialog |
133 |
| Using the Page Setup dialog |
133 |
| Using the Print dialog |
134 |
| Using Printer Services |
137 |
| Using the All-In-One Center |
138 |
| Using the Network Card Reader |
140 |
| Using the Fax Setup Utility |
142 |
| Using the Utility |
142 |
| Maintaining the printer |
144 |
| Print cartridges |
144 |
| Installing print cartridges |
144 |
| Removing a used print cartridge |
145 |
| Aligning print cartridges |
146 |
| Cleaning the print cartridge nozzles |
146 |
| Wiping the print cartridge nozzles and contacts |
147 |
| Preserving the print cartridges |
148 |
| Improving print quality |
148 |
| Check paper |
148 |
| Check print cartridges |
148 |
| Cleaning the scanner glass |
148 |
| Cleaning the exterior of the printer |
149 |
| Refilling print cartridges |
149 |
| Using genuine Lexmark print cartridges |
149 |
| Ordering print cartridges |
149 |
| Ordering paper and other supplies |
150 |
| Finding information about the printer |
151 |
| Contacting Customer Support |
154 |
| Troubleshooting |
155 |
| Setup troubleshooting |
155 |
| Incorrect language appears on the display |
155 |
| Power button is not lit |
155 |
| Cable is not connected, is loose, or is damaged |
156 |
| Software does not install |
156 |
| Printer does not appear in the Printer Selection dialog |
157 |
| Page does not print |
158 |
| Test page does not print |
159 |
| Cannot print from digital camera using PictBridge |
160 |
| Printer is not able to communicate with the computer |
161 |
| Checking the print cartridges |
161 |
| Wireless troubleshooting |
161 |
| How do I find out what type of security my network is using? |
161 |
| Check your security keys |
162 |
| Printer is configured correctly, but cannot be found on the network |
162 |
| Wi-Fi indicator light is not lit |
162 |
| Wireless printer is no longer working |
163 |
| Resetting an internal wireless print server to factory default settings |
165 |
| Network printer does not show up in the printer selection list during installation |
165 |
| Printer cannot connect to the wireless network |
166 |
| Wi-Fi indicator light is orange |
167 |
| Wi-Fi indicator light is blinking orange during installation |
168 |
| Wireless Setup Assistant cannot communicate with the printer during installation |
169 |
| Wireless network printer does not print |
170 |
| Changing wireless settings after installation |
171 |
| Checking your network name |
171 |
| Ping the access point |
171 |
| Ping the printer |
172 |
| Run the Wireless Setup Assistant |
172 |
| Print troubleshooting |
172 |
| Improving print quality |
172 |
| Poor text and graphic quality |
173 |
| Poor quality at the edges of the page |
174 |
| Print speed is slow |
175 |
| Partial document or photo prints |
175 |
| Photo smudges or scratches |
175 |
| Partial 4 x 6 in. (10 x 15 cm) photo prints when using a PictBridge-enabled digital camera |
175 |
| Glossy photo paper or transparencies stick together |
176 |
| Page prints with different fonts |
176 |
| Print is too dark or smudged |
176 |
| Vertical straight lines are not smooth |
177 |
| White lines appear in graphics or solid black areas |
177 |
| Colors on printout are faded or differ from colors on the screen |
178 |
| Printer is plugged in but does not print |
178 |
| Cannot print from digital camera using PictBridge |
178 |
| Cannot print documents from a memory card or flash drive |
179 |
| Duplex unit does not operate correctly |
179 |
| Checking printer readiness |
180 |
| Checking printer ports |
181 |
| Copy troubleshooting |
181 |
| Copier does not respond |
181 |
| Scanner unit does not close |
181 |
| Poor copy quality |
182 |
| Partial document or photo copies |
182 |
| Copied item does not match the original item |
183 |
| Scan troubleshooting |
183 |
| Scanner does not respond |
183 |
| Scan was not successful |
184 |
| Scanning takes too long or freezes the computer |
185 |
| Poor scanned image quality |
185 |
| Scanner unit does not close |
185 |
| Partial document or photo scans |
186 |
| Cannot scan to an application |
186 |
| Cannot scan to a computer over a network |
186 |
| Fax troubleshooting |
186 |
| Cannot send or receive a fax |
186 |
| Can send but not receive faxes |
188 |
| Can receive but not send faxes |
189 |
| Printer receives a blank fax |
190 |
| Received fax has poor print quality |
190 |
| Caller ID information is not displayed |
191 |
| Jams and misfeeds troubleshooting |
191 |
| Paper jam in the printer |
191 |
| Paper jam in the paper support |
191 |
| Paper jam in the Automatic Document Feeder (ADF) |
191 |
| Paper jam in the duplex unit |
192 |
| Paper or specialty media misfeeds |
193 |
| Printer does not feed paper, envelopes, or specialty media |
193 |
| Banner paper jams |
194 |
| Paper continues to jam |
194 |
| Memory card and PictBridge troubleshooting |
195 |
| Memory card cannot be inserted |
195 |
| Nothing happens when memory card is inserted |
195 |
| Cannot print from digital camera using PictBridge |
196 |
| Cannot print documents from a memory card or flash drive |
196 |
| Photos do not transfer from a memory card across a wireless network |
197 |
| Error messages |
197 |
| Alignment Error |
197 |
| Black Ink Low / Color Ink Low / Photo Ink Low |
198 |
| Cartridge Error (1102, 1203, 1204, or 120F) |
198 |
| Clear Carrier Jam |
199 |
| Cover Open |
200 |
| Paper Out |
200 |
| Paper Jam |
200 |
| Printer Carrier Stall |
200 |
| Left Cartridge Missing / Right Cartridge Missing |
200 |
| Left Cartridge Incorrect / Right Cartridge Incorrect |
201 |
| Error 1104 |
201 |
| Paper Size/Type error |
201 |
| Paper Mismatch |
201 |
| Proof Sheet Error |
201 |
| Print File Error |
202 |
| No valid photo image files detected |
202 |
| Paper or Photo Size error |
202 |
| PictBridge Communication Error |
202 |
| Invalid Device |
202 |
| There is a problem reading the memory card. |
202 |
| Fax-related error messages |
203 |
| Resetting factory default settings |
206 |
| Removing and reinstalling the software |
207 |
| Notices |
208 |
| Recycling Lexmark products |
208 |
| Edition notice |
208 |
| UNITED STATES GOVERNMENT RIGHTS |
208 |
| Trademarks |
208 |
| Conventions |
209 |
| Product information |
209 |
| Federal Communications Commission (FCC) compliance information statement |
209 |
| Exposure to radio frequency radiation |
210 |
| Japanese VCCI notice |
210 |
| Korean MIC statement |
210 |
| Industry Canada notice |
211 |
| European Community (EC) directives conformity |
211 |
| European EC directives conformity statement for radio products |
212 |
| Noise emission levels |
213 |
| Waste from Electrical and Electronic Equipment (WEEE) directive |
214 |
| Product disposal |
214 |
| Temperature information |
214 |
| Information for Chinese RoHS program |
214 |
| Federal Communications Commission (FCC) compliance information statement |
215 |
| Notice to users of the Canadian telephone network |
216 |
| Notice to users of the New Zealand telephone network |
217 |
| South Africa telecommunications notice |
217 |
| Verwendung dieses Produkts in Deutschland |
217 |
| ENERGY STAR |
218 |
| Power consumption |
218 |
| Product power consumption |
218 |
| Power Saver |
219 |
| Off mode |
219 |
| Total energy usage |
219 |
| LEXMARK LICENSE AGREEMENTS |
219 |
| Statement of Limited Warranty |
222 |

 1
1 43
43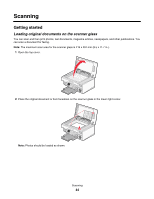 44
44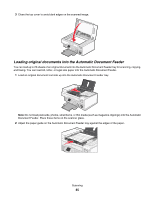 45
45 46
46 47
47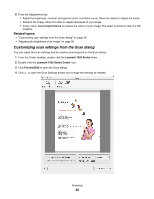 48
48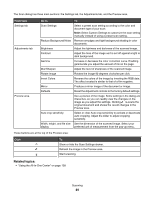 49
49 50
50 51
51 52
52 53
53