Lexmark X7550 User's Guide (Mac) - Page 128
Using the Ringing and Answering submenu, Using the Fax Printing submenu
 |
View all Lexmark X7550 manuals
Add to My Manuals
Save this manual to your list of manuals |
Page 128 highlights
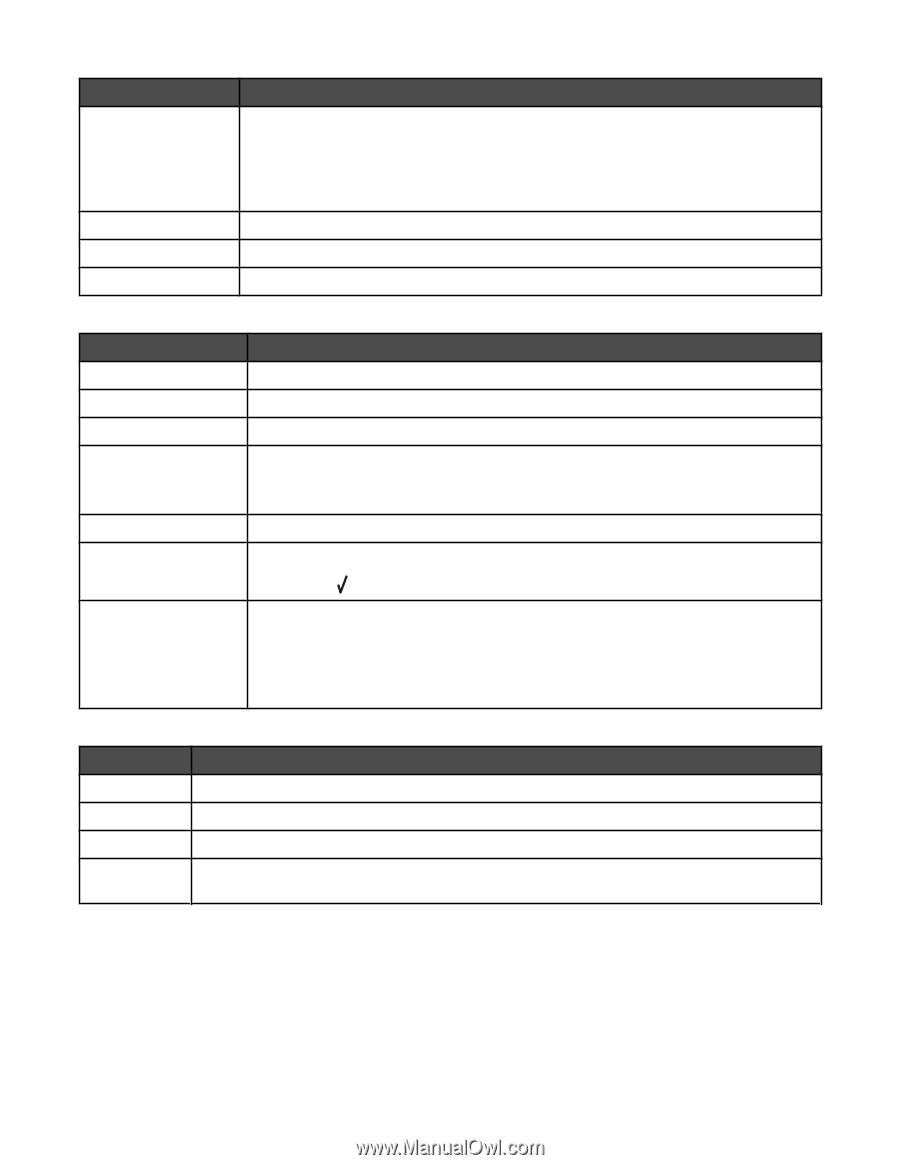
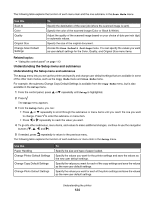
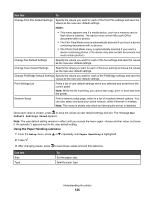
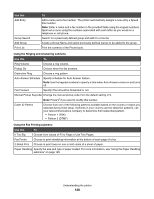
Use this Add Entry Group Search Add Group Print List To Add a name and a fax number. The printer automatically assigns a new entry a Speed Dial number. Note: Enter a name and a fax number in the provided fields using the keypad numbers. Spell out a name using the numbers associated with each letter as you would on a telephone or cell phone. Search for a previously defined group and add it to a fax list. Create a Group Name and select previously defined names to be added to the group. Print the contents of the Phone book. Using the Ringing and Answering submenu Use this To Ring Volume Choose a ring volume. Pickup On Choose when the fax answers. Distinctive Ring Choose a ring pattern. Auto Answer Schedule Specify schedule for Auto Answer feature. Note: Use the keypad numbers to specify a time when Auto Answer comes on and turns off. Fax Forward Specify if fax should be forwarded or not. Manual Pickup Keycode Change the manual pickup code from the default setting of 9. Note: Press if you want to modify this number. Caller ID Pattern Choose from one of the following patterns available based on the country or region you selected during initial setup. If phones in your country use two detection patterns, call your telecommunications company to determine their subscribed pattern. • Pattern 1 (FSK) • Pattern 2 (DTMF) Using the Fax Printing submenu Use this To If Too Big Choose from values of Fit to Page or Use Two Pages. Fax Footer Choose to print identifying information at the bottom of each page of a fax. 2-Sided Print Choose to print faxes on one or both sides of a sheet of paper. Paper Handling Specify the size and type of paper loaded. For more information, see "Using the Paper Handling submenu" on page 125. Understanding the printer 128
-
 1
1 -
2
-
3
-
4
-
5
-
6
-
7
-
8
-
9
-
10
-
11
-
12
-
13
-
14
-
15
-
16
-
17
-
18
-
19
-
20
-
21
-
22
-
23
-
24
-
25
-
26
-
27
-
28
-
29
-
30
-
31
-
32
-
33
-
34
-
35
-
36
-
37
-
38
-
39
-
40
-
41
-
42
-
43
-
44
-
45
-
46
-
47
-
48
-
49
-
50
-
51
-
52
-
53
-
54
-
55
-
56
-
57
-
58
-
59
-
60
-
61
-
62
-
63
-
64
-
65
-
66
-
67
-
68
-
69
-
70
-
71
-
72
-
73
-
74
-
75
-
76
-
77
-
78
-
79
-
80
-
81
-
82
-
83
-
84
-
85
-
86
-
87
-
88
-
89
-
90
-
91
-
92
-
93
-
94
-
95
-
96
-
97
-
98
-
99
-
100
-
101
-
102
-
103
-
104
-
105
-
106
-
107
-
108
-
109
-
110
-
111
-
112
-
113
-
114
-
115
-
116
-
117
-
118
-
119
-
120
-
121
-
122
-
 123
123 -
 124
124 -
 125
125 -
 126
126 -
 127
127 -
 128
128 -
 129
129 -
 130
130 -
 131
131 -
 132
132 -
 133
133 -
134
-
135
-
136
-
137
-
138
-
139
-
140
-
141
-
142
-
143
-
144
-
145
-
146
-
147
-
148
-
149
-
150
-
151
-
152
-
153
-
154
-
155
-
156
-
157
-
158
-
159
-
160
-
161
-
162
-
163
-
164
-
165
-
166
-
167
-
168
-
169
-
170
-
171
-
172
-
173
-
174
-
175
-
176
-
177
-
178
-
179
-
180
-
181
-
182
-
183
-
184
-
185
-
186
-
187
-
188
-
189
-
190
-
191
-
192
-
193
-
194
-
195
-
196
-
197
-
198
-
199
-
200
-
201
-
202
-
203
-
204
-
205
-
206
-
207
-
208
-
209
-
210
-
211
-
212
-
213
-
214
-
215
-
216
-
217
-
218
-
219
-
220
-
221
-
222
-
223
-
224
-
225
-
226
-
227
 |
 |