Lexmark X7550 User's Guide (Mac) - Page 32
Printing a test using the computer, Printing on both sides of the paper duplexing manually
 |
View all Lexmark X7550 manuals
Add to My Manuals
Save this manual to your list of manuals |
Page 32 highlights
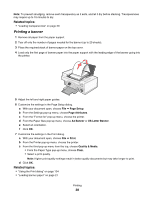
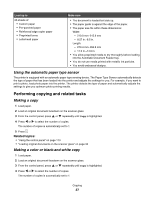
• For Short-edged binding, pages are bound along the short edge of the page (left edge for landscape, top edge for portrait). 2 1 6 Click Print. Related topics: • "Duplex unit does not operate correctly" on page 179 • "Paper jam in the duplex unit" on page 192 Printing on both sides of the paper (duplexing) manually Note: If you are using letter- or A4-size plain paper, use automatic duplexing. For more information, see "Printing on both sides of the paper (duplexing) automatically" on page 31. 1 With a document open, click File Œ Print. 2 From the third pop-up menu from the top, choose Paper Handling. 3 From the Print menu, select Odd numbered pages. 4 Click Print. 5 After printing the first set of pages, flip the stack of printouts. Load the stack of pages back into the paper support, with the blank side of the pages facing you. 6 Repeat steps 1 and 2. 7 From the Print menu, select Even numbered pages. 8 Click Print. Printing a test page using the computer 1 Load plain paper. 2 From the Finder desktop, double-click the Lexmark 7500 Series folder. 3 Double-click the Lexmark 7500 Series Utility icon. 4 From the Maintenance tab, click Print Test Page. A page prints. If the test page did not print at all or has quality problems, attend to any error messages that appear on the screen. Related topics: • "Using the Utility" on page 142 • "Test page does not print" on page 159 Printing 32
-
 1
1 -
2
-
3
-
4
-
5
-
6
-
7
-
8
-
9
-
10
-
11
-
12
-
13
-
14
-
15
-
16
-
17
-
18
-
19
-
20
-
21
-
22
-
23
-
24
-
25
-
26
-
 27
27 -
 28
28 -
 29
29 -
 30
30 -
 31
31 -
 32
32 -
 33
33 -
 34
34 -
 35
35 -
 36
36 -
 37
37 -
38
-
39
-
40
-
41
-
42
-
43
-
44
-
45
-
46
-
47
-
48
-
49
-
50
-
51
-
52
-
53
-
54
-
55
-
56
-
57
-
58
-
59
-
60
-
61
-
62
-
63
-
64
-
65
-
66
-
67
-
68
-
69
-
70
-
71
-
72
-
73
-
74
-
75
-
76
-
77
-
78
-
79
-
80
-
81
-
82
-
83
-
84
-
85
-
86
-
87
-
88
-
89
-
90
-
91
-
92
-
93
-
94
-
95
-
96
-
97
-
98
-
99
-
100
-
101
-
102
-
103
-
104
-
105
-
106
-
107
-
108
-
109
-
110
-
111
-
112
-
113
-
114
-
115
-
116
-
117
-
118
-
119
-
120
-
121
-
122
-
123
-
124
-
125
-
126
-
127
-
128
-
129
-
130
-
131
-
132
-
133
-
134
-
135
-
136
-
137
-
138
-
139
-
140
-
141
-
142
-
143
-
144
-
145
-
146
-
147
-
148
-
149
-
150
-
151
-
152
-
153
-
154
-
155
-
156
-
157
-
158
-
159
-
160
-
161
-
162
-
163
-
164
-
165
-
166
-
167
-
168
-
169
-
170
-
171
-
172
-
173
-
174
-
175
-
176
-
177
-
178
-
179
-
180
-
181
-
182
-
183
-
184
-
185
-
186
-
187
-
188
-
189
-
190
-
191
-
192
-
193
-
194
-
195
-
196
-
197
-
198
-
199
-
200
-
201
-
202
-
203
-
204
-
205
-
206
-
207
-
208
-
209
-
210
-
211
-
212
-
213
-
214
-
215
-
216
-
217
-
218
-
219
-
220
-
221
-
222
-
223
-
224
-
225
-
226
-
227
 |
 |
