Lexmark X7550 User's Guide (Mac) - Page 124
Understanding the Setup menu and submenus, Related topics
 |
View all Lexmark X7550 manuals
Add to My Manuals
Save this manual to your list of manuals |
Page 124 highlights
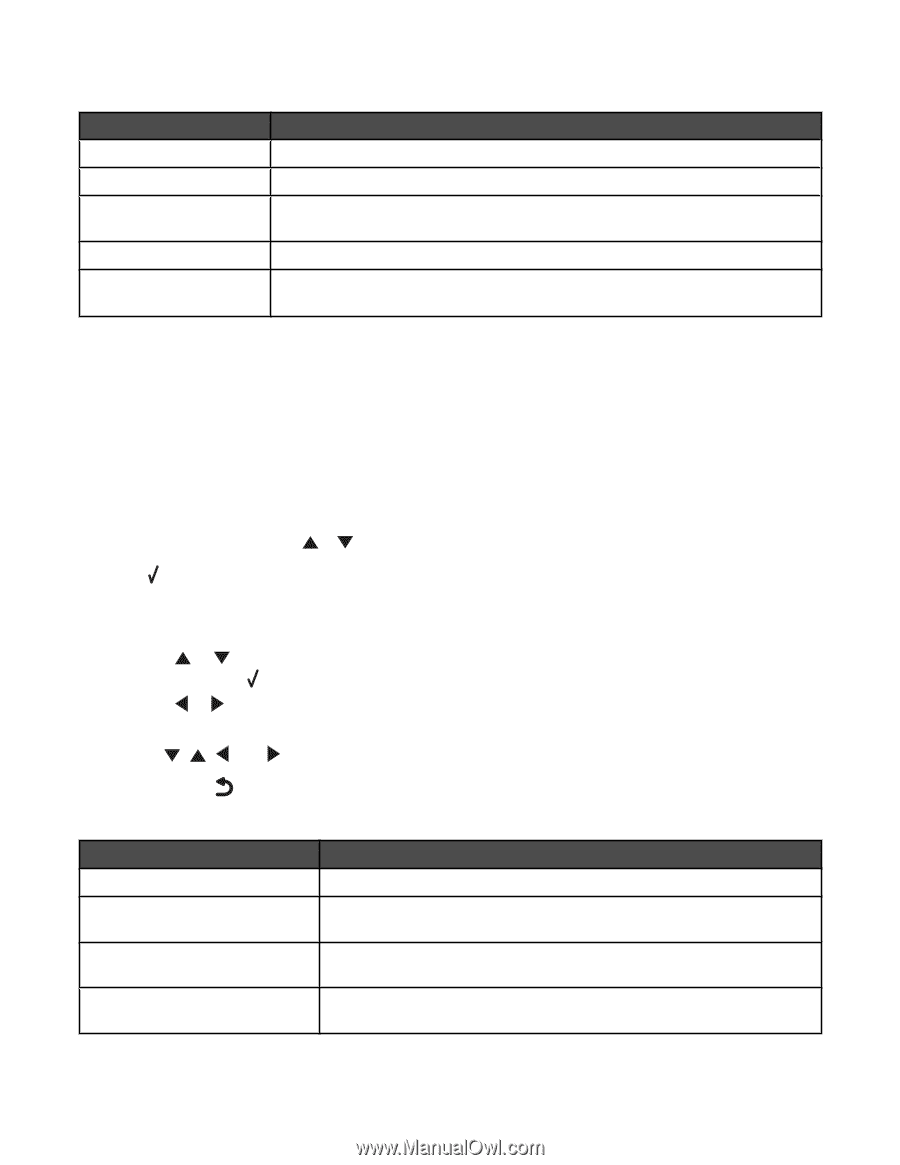
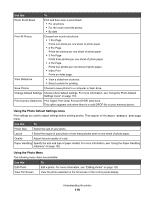
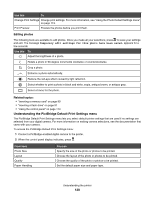
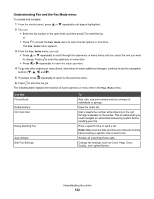
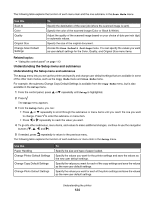
The following table explains the function of each menu item and the one submenu in the Scan Mode menu. Use this Scan to Color Quality Original Size Change Scan Default Settings To Specify the destination of the scan job (where the scanned image is sent). Specify the color of the scanned image (Color or Black & White). Adjust the quality of the scanned image based on your choice of dots per inch (dpi) or automatic values. Specify the size of the original document. Access the Scan Default Settings menu. You can specify the values you want as user default settings for the Color, Quality, and Original Size menu items. Related topics: • "Using the control panel" on page 113 Understanding the Setup menu and submenus Understanding the Setup menu and submenus The Setup menu lets you set up the printer and specify and change user default settings that are available in some of the other main menus, such as the Copy Mode menu and Scan Mode menu. For example, the submenu Change Copy Default Settings is available from the Copy Mode menu, but is also available in the Setup menu. 1 From the control panel, press or repeatedly until Setup is highlighted. 2 Press . The Setup menu appears. 3 From the Setup menu, you can: • Press or repeatedly to scroll through the submenus or menu items until you reach the one you want to change. Press to enter the submenu or menu item. • Press or repeatedly to reach the value you want. 4 To go into other submenus, menu items, and values to make additional changes, continue to use the navigation buttons ( , , , and ). 5 If needed, press repeatedly to return to the previous menu. The following table explains the function of each submenu or menu item in the Setup menu. Use this Paper Handling Change Printer Default Settings Change Copy Default Settings Change Photo Default Settings To Specify the size and type of paper loaded. Specify the values you want for the printer settings and save the values as the new user default settings. Specify the values you want for each of the copy settings and save the values as the new user default settings. Specify the values you want for each of the photo settings and save the values as the new user default settings. Understanding the printer 124
-
 1
1 -
2
-
3
-
4
-
5
-
6
-
7
-
8
-
9
-
10
-
11
-
12
-
13
-
14
-
15
-
16
-
17
-
18
-
19
-
20
-
21
-
22
-
23
-
24
-
25
-
26
-
27
-
28
-
29
-
30
-
31
-
32
-
33
-
34
-
35
-
36
-
37
-
38
-
39
-
40
-
41
-
42
-
43
-
44
-
45
-
46
-
47
-
48
-
49
-
50
-
51
-
52
-
53
-
54
-
55
-
56
-
57
-
58
-
59
-
60
-
61
-
62
-
63
-
64
-
65
-
66
-
67
-
68
-
69
-
70
-
71
-
72
-
73
-
74
-
75
-
76
-
77
-
78
-
79
-
80
-
81
-
82
-
83
-
84
-
85
-
86
-
87
-
88
-
89
-
90
-
91
-
92
-
93
-
94
-
95
-
96
-
97
-
98
-
99
-
100
-
101
-
102
-
103
-
104
-
105
-
106
-
107
-
108
-
109
-
110
-
111
-
112
-
113
-
114
-
115
-
116
-
117
-
118
-
 119
119 -
 120
120 -
 121
121 -
 122
122 -
 123
123 -
 124
124 -
 125
125 -
 126
126 -
 127
127 -
 128
128 -
 129
129 -
130
-
131
-
132
-
133
-
134
-
135
-
136
-
137
-
138
-
139
-
140
-
141
-
142
-
143
-
144
-
145
-
146
-
147
-
148
-
149
-
150
-
151
-
152
-
153
-
154
-
155
-
156
-
157
-
158
-
159
-
160
-
161
-
162
-
163
-
164
-
165
-
166
-
167
-
168
-
169
-
170
-
171
-
172
-
173
-
174
-
175
-
176
-
177
-
178
-
179
-
180
-
181
-
182
-
183
-
184
-
185
-
186
-
187
-
188
-
189
-
190
-
191
-
192
-
193
-
194
-
195
-
196
-
197
-
198
-
199
-
200
-
201
-
202
-
203
-
204
-
205
-
206
-
207
-
208
-
209
-
210
-
211
-
212
-
213
-
214
-
215
-
216
-
217
-
218
-
219
-
220
-
221
-
222
-
223
-
224
-
225
-
226
-
227
 |
 |