Lexmark X7550 User's Guide (Mac) - Page 142
Using the Fax Setup Utility, Using the Utility, Lexmark 7500 Series, Fax Setup Utility, Save Settings
 |
View all Lexmark X7550 manuals
Add to My Manuals
Save this manual to your list of manuals |
Page 142 highlights
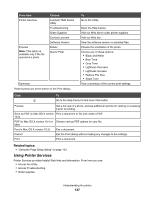
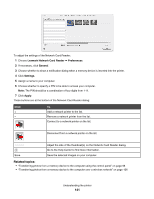
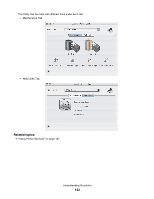
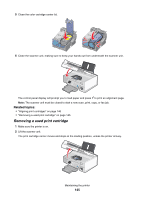
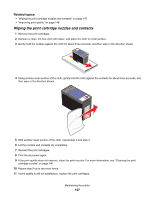
Using the Fax Setup Utility Use this utility to adjust how faxes are sent and received. When you save the settings, they apply to every fax you send or receive. You can also use this utility to create and edit the Speed Dial list. 1 From the Finder desktop, double-click the Lexmark 7500 Series folder. 2 Double-click the Fax Setup Utility icon. 3 From the Device menu, select your printer. Customize your settings as needed. Note: For a list of available options, see "Customizing settings using the Fax Setup Utility" on page 87. 4 Click Save Settings after you finish customizing the settings. 5 Close the Fax Setup Utility. Using the Utility The Utility is the central source for printer maintenance and helpful Web links. From here you can: • Install the print cartridges. • Print a test page. • Print an alignment page. • Clean the print cartridge nozzles. • Order ink or supplies. • Register your printer. • Contact Customer Support. • Check for special offers. There are two ways to open the Utility: • From the Finder desktop, double-click the Lexmark 7500 Series folder. Double-click the Lexmark 7500 Series Utility icon. • From an application: For Mac OS X version 10.3 or later: 1 With a document open, click File Œ Print. 2 From the third pop-up menu from the top, choose Printer Services. 3 Click Lexmark 7500 Series Utility. For Mac OS X version 10.4 or later: 1 With a document open, click File Œ Print. 2 Click Advanced. 3 From the third pop-up menu from the top, choose Printer Services. 4 Click Lexmark 7500 Series Utility. Understanding the printer 142
-
 1
1 -
2
-
3
-
4
-
5
-
6
-
7
-
8
-
9
-
10
-
11
-
12
-
13
-
14
-
15
-
16
-
17
-
18
-
19
-
20
-
21
-
22
-
23
-
24
-
25
-
26
-
27
-
28
-
29
-
30
-
31
-
32
-
33
-
34
-
35
-
36
-
37
-
38
-
39
-
40
-
41
-
42
-
43
-
44
-
45
-
46
-
47
-
48
-
49
-
50
-
51
-
52
-
53
-
54
-
55
-
56
-
57
-
58
-
59
-
60
-
61
-
62
-
63
-
64
-
65
-
66
-
67
-
68
-
69
-
70
-
71
-
72
-
73
-
74
-
75
-
76
-
77
-
78
-
79
-
80
-
81
-
82
-
83
-
84
-
85
-
86
-
87
-
88
-
89
-
90
-
91
-
92
-
93
-
94
-
95
-
96
-
97
-
98
-
99
-
100
-
101
-
102
-
103
-
104
-
105
-
106
-
107
-
108
-
109
-
110
-
111
-
112
-
113
-
114
-
115
-
116
-
117
-
118
-
119
-
120
-
121
-
122
-
123
-
124
-
125
-
126
-
127
-
128
-
129
-
130
-
131
-
132
-
133
-
134
-
135
-
136
-
 137
137 -
 138
138 -
 139
139 -
 140
140 -
 141
141 -
 142
142 -
 143
143 -
 144
144 -
 145
145 -
 146
146 -
 147
147 -
148
-
149
-
150
-
151
-
152
-
153
-
154
-
155
-
156
-
157
-
158
-
159
-
160
-
161
-
162
-
163
-
164
-
165
-
166
-
167
-
168
-
169
-
170
-
171
-
172
-
173
-
174
-
175
-
176
-
177
-
178
-
179
-
180
-
181
-
182
-
183
-
184
-
185
-
186
-
187
-
188
-
189
-
190
-
191
-
192
-
193
-
194
-
195
-
196
-
197
-
198
-
199
-
200
-
201
-
202
-
203
-
204
-
205
-
206
-
207
-
208
-
209
-
210
-
211
-
212
-
213
-
214
-
215
-
216
-
217
-
218
-
219
-
220
-
221
-
222
-
223
-
224
-
225
-
226
-
227
 |
 |