Lexmark X7550 User's Guide (Mac) - Page 126
Using the Change Printer Default Settings submenu, Setup, Change Printer Default Settings
 |
View all Lexmark X7550 manuals
Add to My Manuals
Save this manual to your list of manuals |
Page 126 highlights
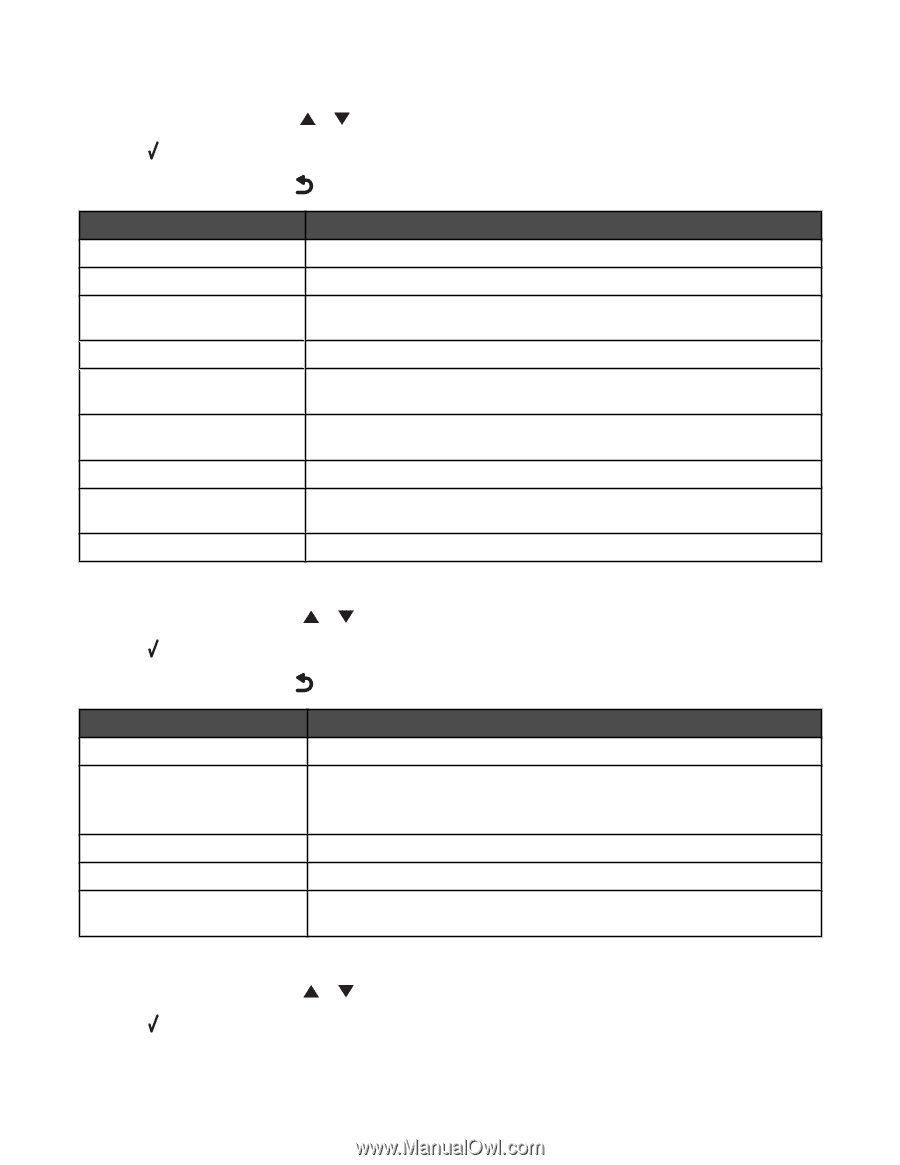
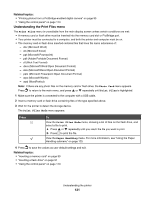
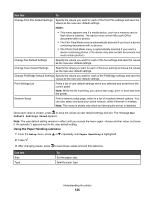
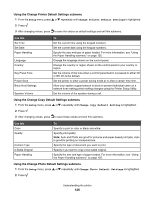
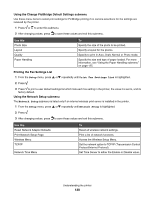
Using the Change Printer Default Settings submenu 1 From the Setup menu, press or repeatedly until Change Printer Default Settings is highlighted. 2 Press . 3 After changing values, press to save the values as default settings and exit this submenu. Use this Set Time Set Date Paper Handling Language Country Key Press Tone Power Save Block Host Settings Speaker Volume To Set the current time using the keypad numbers. Set the current date using the keypad numbers. Specify the size and type of paper loaded. For more information, see "Using the Paper Handling submenu" on page 125. Change the language shown on the control panel. Change the country or region shown on the control panel to your country or region. Set the volume of the tone when a control panel button is pressed to either On or Off. On is the default. Set the printer to enter a power saving mode at or after a certain time limit. Allow your system support person to block to prevent individual users on a network from making printer setting changes using the Printer Setup Utility. Set the volume of the speaker during a call. Using the Change Copy Default Settings submenu 1 From the Setup menu, press or repeatedly until Change Copy Default Setting is highlighted. 2 Press . 3 After changing values, press to save these values and exit this submenu. Use this Color Quality Content Type 2-Sided Original Paper Handling To Specify to print in color or black and white. Specify print quality. Note: Auto and Photo are good for pictures and paper-based print jobs. Auto is good for printing on transparencies. Specify the type of document you want to print. Specify if you want to copy a two-sided original. Specify the size and type of paper loaded. For more information, see "Using the Paper Handling submenu" on page 125. Using the Change Photo Default Settings submenu 1 From the Setup menu, press or repeatedly until Change Photo Default Settings is highlighted. 2 Press . Understanding the printer 126
-
 1
1 -
2
-
3
-
4
-
5
-
6
-
7
-
8
-
9
-
10
-
11
-
12
-
13
-
14
-
15
-
16
-
17
-
18
-
19
-
20
-
21
-
22
-
23
-
24
-
25
-
26
-
27
-
28
-
29
-
30
-
31
-
32
-
33
-
34
-
35
-
36
-
37
-
38
-
39
-
40
-
41
-
42
-
43
-
44
-
45
-
46
-
47
-
48
-
49
-
50
-
51
-
52
-
53
-
54
-
55
-
56
-
57
-
58
-
59
-
60
-
61
-
62
-
63
-
64
-
65
-
66
-
67
-
68
-
69
-
70
-
71
-
72
-
73
-
74
-
75
-
76
-
77
-
78
-
79
-
80
-
81
-
82
-
83
-
84
-
85
-
86
-
87
-
88
-
89
-
90
-
91
-
92
-
93
-
94
-
95
-
96
-
97
-
98
-
99
-
100
-
101
-
102
-
103
-
104
-
105
-
106
-
107
-
108
-
109
-
110
-
111
-
112
-
113
-
114
-
115
-
116
-
117
-
118
-
119
-
120
-
 121
121 -
 122
122 -
 123
123 -
 124
124 -
 125
125 -
 126
126 -
 127
127 -
 128
128 -
 129
129 -
 130
130 -
 131
131 -
132
-
133
-
134
-
135
-
136
-
137
-
138
-
139
-
140
-
141
-
142
-
143
-
144
-
145
-
146
-
147
-
148
-
149
-
150
-
151
-
152
-
153
-
154
-
155
-
156
-
157
-
158
-
159
-
160
-
161
-
162
-
163
-
164
-
165
-
166
-
167
-
168
-
169
-
170
-
171
-
172
-
173
-
174
-
175
-
176
-
177
-
178
-
179
-
180
-
181
-
182
-
183
-
184
-
185
-
186
-
187
-
188
-
189
-
190
-
191
-
192
-
193
-
194
-
195
-
196
-
197
-
198
-
199
-
200
-
201
-
202
-
203
-
204
-
205
-
206
-
207
-
208
-
209
-
210
-
211
-
212
-
213
-
214
-
215
-
216
-
217
-
218
-
219
-
220
-
221
-
222
-
223
-
224
-
225
-
226
-
227
 |
 |