Lexmark X7550 User's Guide (Mac) - Page 140
Using the Network Card Reader, Lexmark 7500 Series, Lexmark Network Card Reader, Library, Printers
 |
View all Lexmark X7550 manuals
Add to My Manuals
Save this manual to your list of manuals |
Page 140 highlights
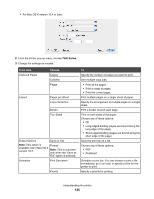
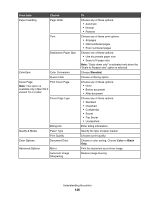
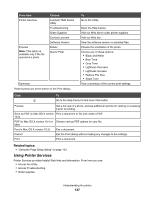
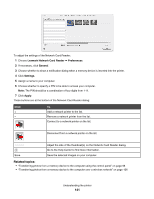
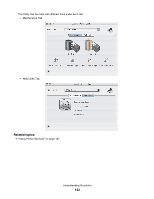
From here Prompt to name each page Defaults Preview/Edit Scan You can Enter a filename for every page or item scanned. Revert to factory default settings. Open the Scan dialog to view the image, and adjust the scan settings. Start scanning. Click to go to the Help Center for more information. Related topics: • "Scanning" on page 44 • "Working with photos using the computer" on page 99 Using the Network Card Reader When you have a memory device inserted into the printer, the Network Card Reader software lets you connect to a network printer, display thumbnails of the photos or images on the memory device, and transfer the images to the computer. There are three ways to open the Network Card Reader: • From the Finder desktop, double-click the Lexmark 7500 Series folder. Double-click the Lexmark Network Card Reader icon. • Go to the Mac OS X drive where the printer software was installed. Choose Library Œ Printers Œ Lexmark Œ Lexmark 7500 Series folder. Double-click the Lexmark Network Card Reader icon. • Insert a memory card or flash drive into the printer. 1 After the memory device is detected, press . 2 Press repeatedly until Save Photos is highlighted. 3 Press . 4 Press or until Computer appears. 5 Press . If there is more than one computer connected to the network, you will be asked to select the computer that you want to use. a Press or to select a computer. b Press . If you set a PIN during network setup and are being asked for it: 1 Enter the PIN using the and to select a digit location and the and to select a value for that digit. 2 Press . c Press to begin saving photos to the computer. The Network Card Reader dialog appears on the computer screen. Understanding the printer 140
-
 1
1 -
2
-
3
-
4
-
5
-
6
-
7
-
8
-
9
-
10
-
11
-
12
-
13
-
14
-
15
-
16
-
17
-
18
-
19
-
20
-
21
-
22
-
23
-
24
-
25
-
26
-
27
-
28
-
29
-
30
-
31
-
32
-
33
-
34
-
35
-
36
-
37
-
38
-
39
-
40
-
41
-
42
-
43
-
44
-
45
-
46
-
47
-
48
-
49
-
50
-
51
-
52
-
53
-
54
-
55
-
56
-
57
-
58
-
59
-
60
-
61
-
62
-
63
-
64
-
65
-
66
-
67
-
68
-
69
-
70
-
71
-
72
-
73
-
74
-
75
-
76
-
77
-
78
-
79
-
80
-
81
-
82
-
83
-
84
-
85
-
86
-
87
-
88
-
89
-
90
-
91
-
92
-
93
-
94
-
95
-
96
-
97
-
98
-
99
-
100
-
101
-
102
-
103
-
104
-
105
-
106
-
107
-
108
-
109
-
110
-
111
-
112
-
113
-
114
-
115
-
116
-
117
-
118
-
119
-
120
-
121
-
122
-
123
-
124
-
125
-
126
-
127
-
128
-
129
-
130
-
131
-
132
-
133
-
134
-
 135
135 -
 136
136 -
 137
137 -
 138
138 -
 139
139 -
 140
140 -
 141
141 -
 142
142 -
 143
143 -
 144
144 -
 145
145 -
146
-
147
-
148
-
149
-
150
-
151
-
152
-
153
-
154
-
155
-
156
-
157
-
158
-
159
-
160
-
161
-
162
-
163
-
164
-
165
-
166
-
167
-
168
-
169
-
170
-
171
-
172
-
173
-
174
-
175
-
176
-
177
-
178
-
179
-
180
-
181
-
182
-
183
-
184
-
185
-
186
-
187
-
188
-
189
-
190
-
191
-
192
-
193
-
194
-
195
-
196
-
197
-
198
-
199
-
200
-
201
-
202
-
203
-
204
-
205
-
206
-
207
-
208
-
209
-
210
-
211
-
212
-
213
-
214
-
215
-
216
-
217
-
218
-
219
-
220
-
221
-
222
-
223
-
224
-
225
-
226
-
227
 |
 |