Netgear DGND3300v2 User Manual - Page 117
Configuring the WAN Setup Options, Use a Dynamic DNS Service, Use Wildcards, Apply, Setup - dmz
 |
View all Netgear DGND3300v2 manuals
Add to My Manuals
Save this manual to your list of manuals |
Page 117 highlights
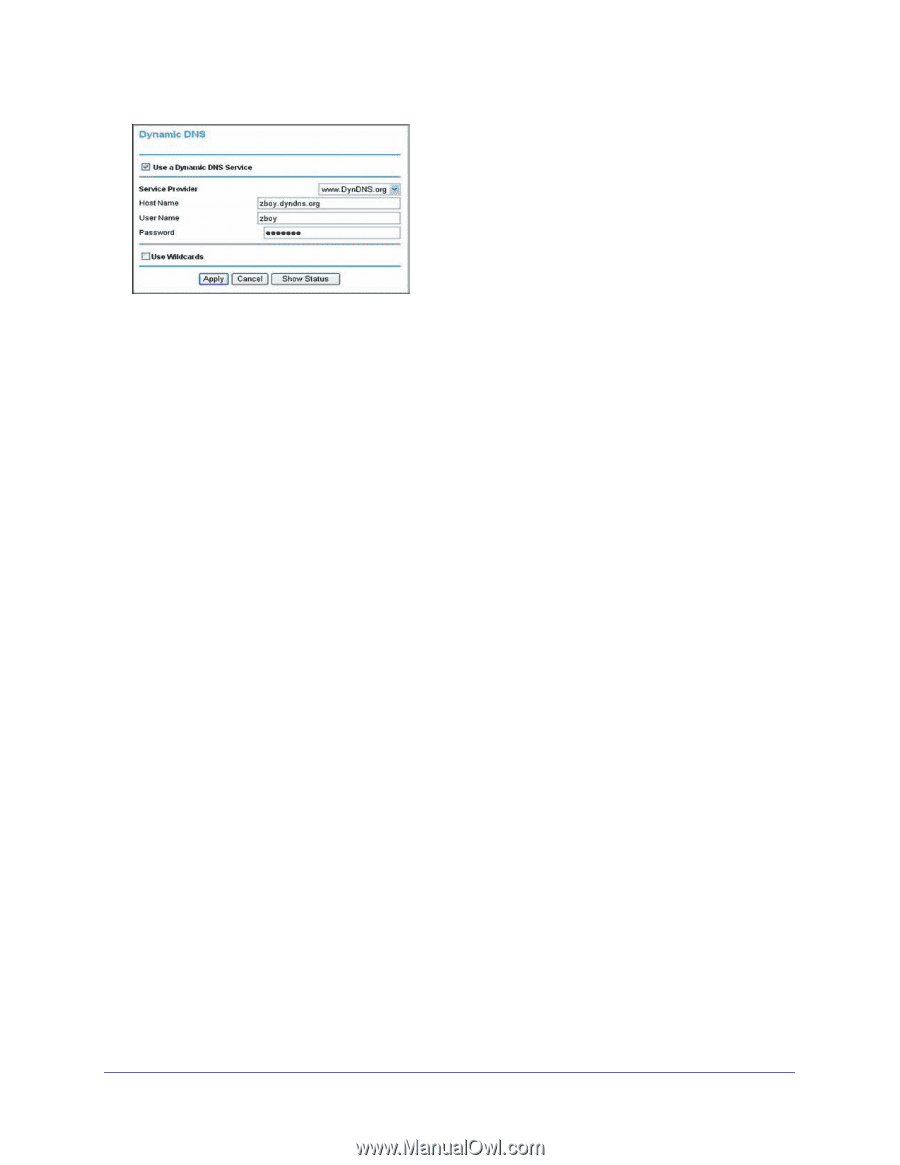
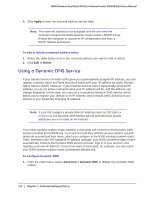
N300 Wireless Dual Band ADSL2+ Modem Router DGND3300v2 User Manual Figure 56. 2. Register for an account with one of the Dynamic DNS service providers whose names appear in the Service Provider list. For example, for DynDNS.org, select www.dyndns.org. 3. Select the Use a Dynamic DNS Service check box. 4. Select the name of your Dynamic DNS service provider. 5. Type the host name (or domain name) that your Dynamic DNS service provider gave you. 6. Type the user name for your Dynamic DNS account. This is the name that you use to log in to your account, not your host name. 7. Type the password (or key) for your Dynamic DNS account. 8. If your Dynamic DNS provider allows the use of wildcards in resolving your URL, you can select the Use Wildcards check box to activate this feature. For example, the wildcard feature causes *.yourhost.dyndns.org to be aliased to the same IP address as yourhost.dyndns.org. 9. Click Apply to save your configuration. Configuring the WAN Setup Options The WAN Setup screen lets you configure a DMZ (demilitarized zone) server, change the Maximum Transmit Unit (MTU) size, and enable the N300 wireless modem router to respond to a ping on the WAN (Internet) port. From the main menu, under Advanced, click WAN Setup to view the WAN Setup screen. Chapter 7. Advanced Settings (Part 1) | 117
-
 1
1 -
2
-
3
-
4
-
5
-
6
-
7
-
8
-
9
-
10
-
11
-
12
-
13
-
14
-
15
-
16
-
17
-
18
-
19
-
20
-
21
-
22
-
23
-
24
-
25
-
26
-
27
-
28
-
29
-
30
-
31
-
32
-
33
-
34
-
35
-
36
-
37
-
38
-
39
-
40
-
41
-
42
-
43
-
44
-
45
-
46
-
47
-
48
-
49
-
50
-
51
-
52
-
53
-
54
-
55
-
56
-
57
-
58
-
59
-
60
-
61
-
62
-
63
-
64
-
65
-
66
-
67
-
68
-
69
-
70
-
71
-
72
-
73
-
74
-
75
-
76
-
77
-
78
-
79
-
80
-
81
-
82
-
83
-
84
-
85
-
86
-
87
-
88
-
89
-
90
-
91
-
92
-
93
-
94
-
95
-
96
-
97
-
98
-
99
-
100
-
101
-
102
-
103
-
104
-
105
-
106
-
107
-
108
-
109
-
110
-
111
-
 112
112 -
 113
113 -
 114
114 -
 115
115 -
 116
116 -
 117
117 -
 118
118 -
 119
119 -
 120
120 -
 121
121 -
 122
122 -
123
-
124
-
125
-
126
-
127
-
128
-
129
-
130
-
131
-
132
-
133
-
134
-
135
-
136
-
137
-
138
-
139
-
140
-
141
-
142
-
143
-
144
-
145
-
146
-
147
-
148
-
149
-
150
-
151
-
152
-
153
-
154
-
155
-
156
-
157
-
158
-
159
-
160
-
161
-
162
-
163
-
164
-
165
-
166
-
167
-
168
-
169
-
170
-
171
-
172
-
173
-
174
-
175
-
176
-
177
 |
 |