Netgear DGND3300v2 User Manual - Page 38
Firewall Rules, Add Keyword, Delete, Keyword, Apply, Security > Firewall Rules - how to fix a
 |
View all Netgear DGND3300v2 manuals
Add to My Manuals
Save this manual to your list of manuals |
Page 38 highlights
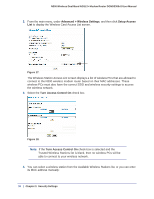
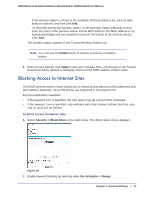
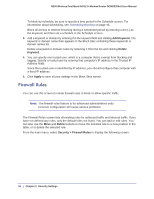
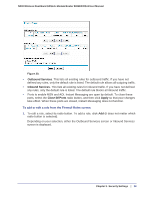
N300 Wireless Dual Band ADSL2+ Modem Router DGND3300v2 User Manual To block by schedule, be sure to specify a time period in the Schedule screen. For information about scheduling, see Scheduling Blocking on page 45. Block all access to Internet browsing during a scheduled period by entering a dot (.) as the keyword, and then set a schedule in the Schedule screen. 3. Add a keyword or domain by entering it in the keyword field and clicking Add Keyword. The keyword or domain name then appears in the Block sites containing these keywords or domain names list. Delete a keyword or domain name by selecting it from the list and clicking Delete Keyword. 4. You can specify one trusted user, which is a computer that is exempt from blocking and logging. Specify a trusted user by entering that computer's IP address in the Trusted IP Address fields. Since the trusted user is identified by IP address, you should configure that computer with a fixed IP address. 5. Click Apply to save all your settings in the Block Sites screen. Firewall Rules You can use this screen to create firewall rules to block or allow specific traffic. Note: The firewall rules feature is for advanced administrators only! Incorrect configuration will cause serious problems. The Firewall Rules screen lists all existing rules for outbound traffic and inbound traffic. If you have not defined any rules, only the default rules are listed. You can add or edit rules. You can also use the Move and Delete buttons to move the selected rule to a new position in the table, or to delete the selected rule. From the main menu, select Security > Firewall Rules to display the following screen: 38 | Chapter 3. Security Settings
-
 1
1 -
2
-
3
-
4
-
5
-
6
-
7
-
8
-
9
-
10
-
11
-
12
-
13
-
14
-
15
-
16
-
17
-
18
-
19
-
20
-
21
-
22
-
23
-
24
-
25
-
26
-
27
-
28
-
29
-
30
-
31
-
32
-
 33
33 -
 34
34 -
 35
35 -
 36
36 -
 37
37 -
 38
38 -
 39
39 -
 40
40 -
 41
41 -
 42
42 -
 43
43 -
44
-
45
-
46
-
47
-
48
-
49
-
50
-
51
-
52
-
53
-
54
-
55
-
56
-
57
-
58
-
59
-
60
-
61
-
62
-
63
-
64
-
65
-
66
-
67
-
68
-
69
-
70
-
71
-
72
-
73
-
74
-
75
-
76
-
77
-
78
-
79
-
80
-
81
-
82
-
83
-
84
-
85
-
86
-
87
-
88
-
89
-
90
-
91
-
92
-
93
-
94
-
95
-
96
-
97
-
98
-
99
-
100
-
101
-
102
-
103
-
104
-
105
-
106
-
107
-
108
-
109
-
110
-
111
-
112
-
113
-
114
-
115
-
116
-
117
-
118
-
119
-
120
-
121
-
122
-
123
-
124
-
125
-
126
-
127
-
128
-
129
-
130
-
131
-
132
-
133
-
134
-
135
-
136
-
137
-
138
-
139
-
140
-
141
-
142
-
143
-
144
-
145
-
146
-
147
-
148
-
149
-
150
-
151
-
152
-
153
-
154
-
155
-
156
-
157
-
158
-
159
-
160
-
161
-
162
-
163
-
164
-
165
-
166
-
167
-
168
-
169
-
170
-
171
-
172
-
173
-
174
-
175
-
176
-
177
 |
 |