Netgear DGND3300v2 User Manual - Page 74
Accessing the Router’s USB Drive Remotely Using FTP - dropping connection
 |
View all Netgear DGND3300v2 manuals
Add to My Manuals
Save this manual to your list of manuals |
Page 74 highlights
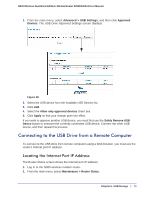
N300 Wireless Dual Band ADSL2+ Modem Router DGND3300v2 User Manual 3. Record the IP address that is listed for the Internet port. This is the IP address you can use to connect to the router remotely. Accessing the Router's USB Drive Remotely Using FTP You can connect to the router's USB drive using a Web browser: 1. Connect to the router by typing ftp:// and the Internet port IP address in the address field of Internet Explorer or Netscape® Navigator, for example: ftp://10.1.65.4 If you are using Dynamic DNS, you can type the DNS name rather than the IP address. 2. Type the account name and password that has access rights to the USB drive. 3. The directories of the USB drive that your account has access to display, for example, share/partition1/directory1. You can now read and copy files from the USB directory. Connecting to the USB Drive with Microsoft Network Settings You can access the USB drive from local computers on your home or office network using Microsoft Network settings. You must be running Microsoft Windows 2000, XP, or older versions of Windows with Microsoft networking enabled. You can use normal Explorer operations such as drag and drop, file open, or cut and paste files from: • Microsoft Windows Start menu, Run option • Windows Explorer • Network Neighborhood or My Network Places Enabling File and Printer Sharing Each computer's network properties must be set to enable network communication with the USB drive. File and Printer Sharing for Microsoft Networks must be enabled, as described in the following sections. Note: In Windows 2000 and Windows XP, File and Printer Sharing is enabled by default. Configuring Windows 98SE and Windows ME The easiest way to get to your network properties is to go to your desktop, right-click Network Neighborhood and then click from the main menu,. File and Printer Sharing for Microsoft Network should be listed. If it is not, click Add and follow the installation prompts. 74 | Chapter 5. USB Storage
-
 1
1 -
2
-
3
-
4
-
5
-
6
-
7
-
8
-
9
-
10
-
11
-
12
-
13
-
14
-
15
-
16
-
17
-
18
-
19
-
20
-
21
-
22
-
23
-
24
-
25
-
26
-
27
-
28
-
29
-
30
-
31
-
32
-
33
-
34
-
35
-
36
-
37
-
38
-
39
-
40
-
41
-
42
-
43
-
44
-
45
-
46
-
47
-
48
-
49
-
50
-
51
-
52
-
53
-
54
-
55
-
56
-
57
-
58
-
59
-
60
-
61
-
62
-
63
-
64
-
65
-
66
-
67
-
68
-
 69
69 -
 70
70 -
 71
71 -
 72
72 -
 73
73 -
 74
74 -
 75
75 -
 76
76 -
 77
77 -
 78
78 -
 79
79 -
80
-
81
-
82
-
83
-
84
-
85
-
86
-
87
-
88
-
89
-
90
-
91
-
92
-
93
-
94
-
95
-
96
-
97
-
98
-
99
-
100
-
101
-
102
-
103
-
104
-
105
-
106
-
107
-
108
-
109
-
110
-
111
-
112
-
113
-
114
-
115
-
116
-
117
-
118
-
119
-
120
-
121
-
122
-
123
-
124
-
125
-
126
-
127
-
128
-
129
-
130
-
131
-
132
-
133
-
134
-
135
-
136
-
137
-
138
-
139
-
140
-
141
-
142
-
143
-
144
-
145
-
146
-
147
-
148
-
149
-
150
-
151
-
152
-
153
-
154
-
155
-
156
-
157
-
158
-
159
-
160
-
161
-
162
-
163
-
164
-
165
-
166
-
167
-
168
-
169
-
170
-
171
-
172
-
173
-
174
-
175
-
176
-
177
 |
 |