Netgear DGND3300v2 User Manual - Page 161
Secure, IP Subnet
 |
View all Netgear DGND3300v2 manuals
Add to My Manuals
Save this manual to your list of manuals |
Page 161 highlights
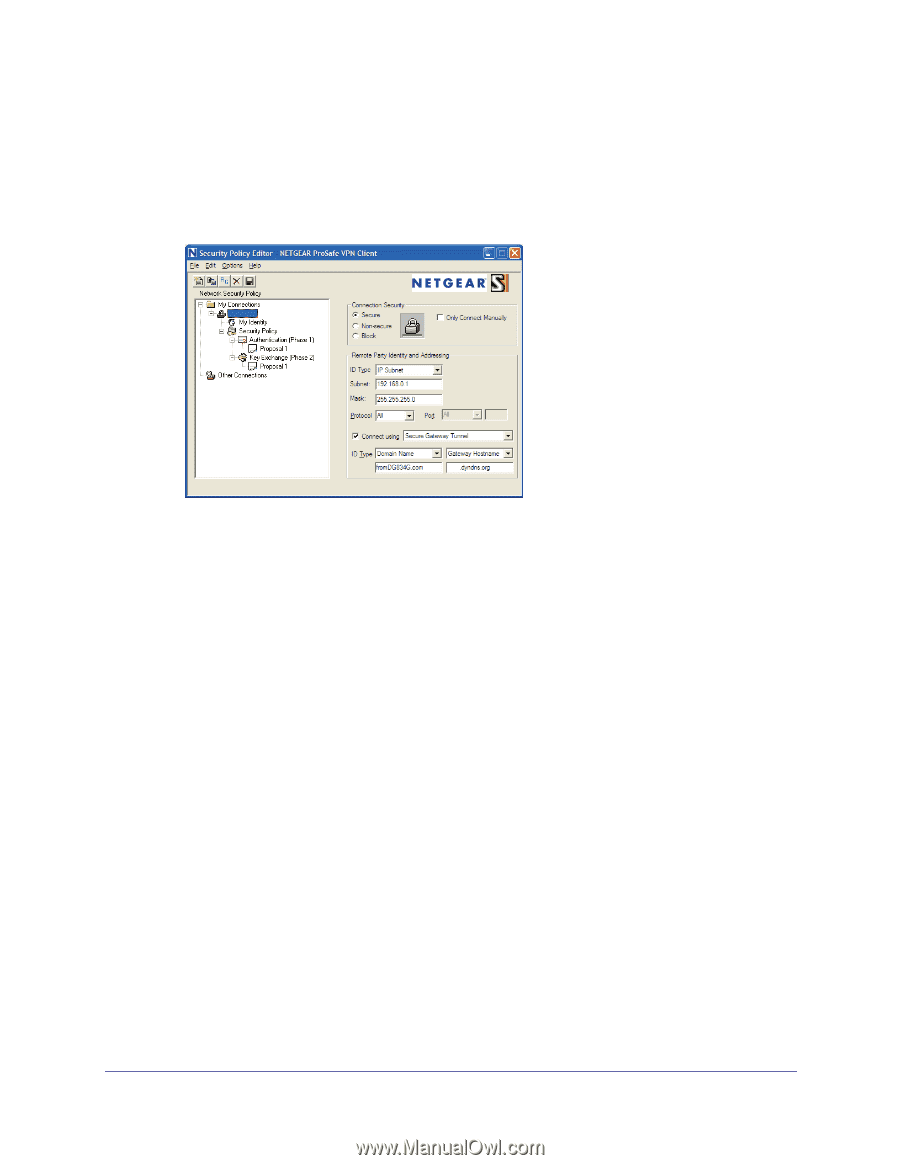
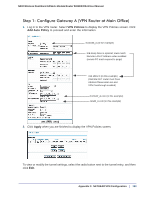
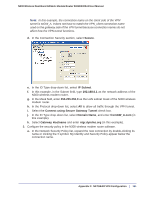
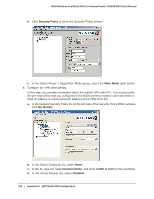
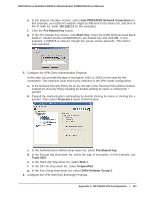
N300 Wireless Dual Band ADSL2+ Modem Router DGND3300v2 User Manual Note: In this example, the connection name on the client side of the VPN tunnel is toGW_A. It does not have to match the VPN_client connection name used on the gateway side of the VPN tunnel because connection names do not affect how the VPN tunnel functions. d. In the Connection Security section, select Secure. toGW_A e. In the ID Type drop-down list, select IP Subnet. f. In this example, in the Subnet field, type 192.168.0.1 as the network address of the N300 wireless modem router. g. In the Mask field, enter 255.255.255.0 as the LAN subnet mask of the N300 wireless modem router. h. In the Protocol drop-down list, select All to allow all traffic through the VPN tunnel. i. Select the Connect using Secure Gateway Tunnel check box. j. In the ID Type drop-down list, select Domain Name, and enter fromGW_A.com (in this example). k. Select Gateway Hostname and enter ntgr.dyndns.org (in this example). 3. Configure the security policy in the N300 wireless modem router software. a. In the Network Security Policy list, expand the new connection by double-clicking its name or clicking the + symbol. My Identity and Security Policy appear below the connection name. Appendix C. NETGEAR VPN Configuration | 161
-
 1
1 -
2
-
3
-
4
-
5
-
6
-
7
-
8
-
9
-
10
-
11
-
12
-
13
-
14
-
15
-
16
-
17
-
18
-
19
-
20
-
21
-
22
-
23
-
24
-
25
-
26
-
27
-
28
-
29
-
30
-
31
-
32
-
33
-
34
-
35
-
36
-
37
-
38
-
39
-
40
-
41
-
42
-
43
-
44
-
45
-
46
-
47
-
48
-
49
-
50
-
51
-
52
-
53
-
54
-
55
-
56
-
57
-
58
-
59
-
60
-
61
-
62
-
63
-
64
-
65
-
66
-
67
-
68
-
69
-
70
-
71
-
72
-
73
-
74
-
75
-
76
-
77
-
78
-
79
-
80
-
81
-
82
-
83
-
84
-
85
-
86
-
87
-
88
-
89
-
90
-
91
-
92
-
93
-
94
-
95
-
96
-
97
-
98
-
99
-
100
-
101
-
102
-
103
-
104
-
105
-
106
-
107
-
108
-
109
-
110
-
111
-
112
-
113
-
114
-
115
-
116
-
117
-
118
-
119
-
120
-
121
-
122
-
123
-
124
-
125
-
126
-
127
-
128
-
129
-
130
-
131
-
132
-
133
-
134
-
135
-
136
-
137
-
138
-
139
-
140
-
141
-
142
-
143
-
144
-
145
-
146
-
147
-
148
-
149
-
150
-
151
-
152
-
153
-
154
-
155
-
 156
156 -
 157
157 -
 158
158 -
 159
159 -
 160
160 -
 161
161 -
 162
162 -
 163
163 -
 164
164 -
 165
165 -
 166
166 -
167
-
168
-
169
-
170
-
171
-
172
-
173
-
174
-
175
-
176
-
177
 |
 |