Netgear GS110TP GS108T/ GS110TP Smart Switch Software Administration Manual - Page 210
FLASH Log Configuration, Clear, Refresh, Cancel, Monitoring, Logs tab, and then, click the FLASH Log
 |
UPC - 606449069129
View all Netgear GS110TP manuals
Add to My Manuals
Save this manual to your list of manuals |
Page 210 highlights
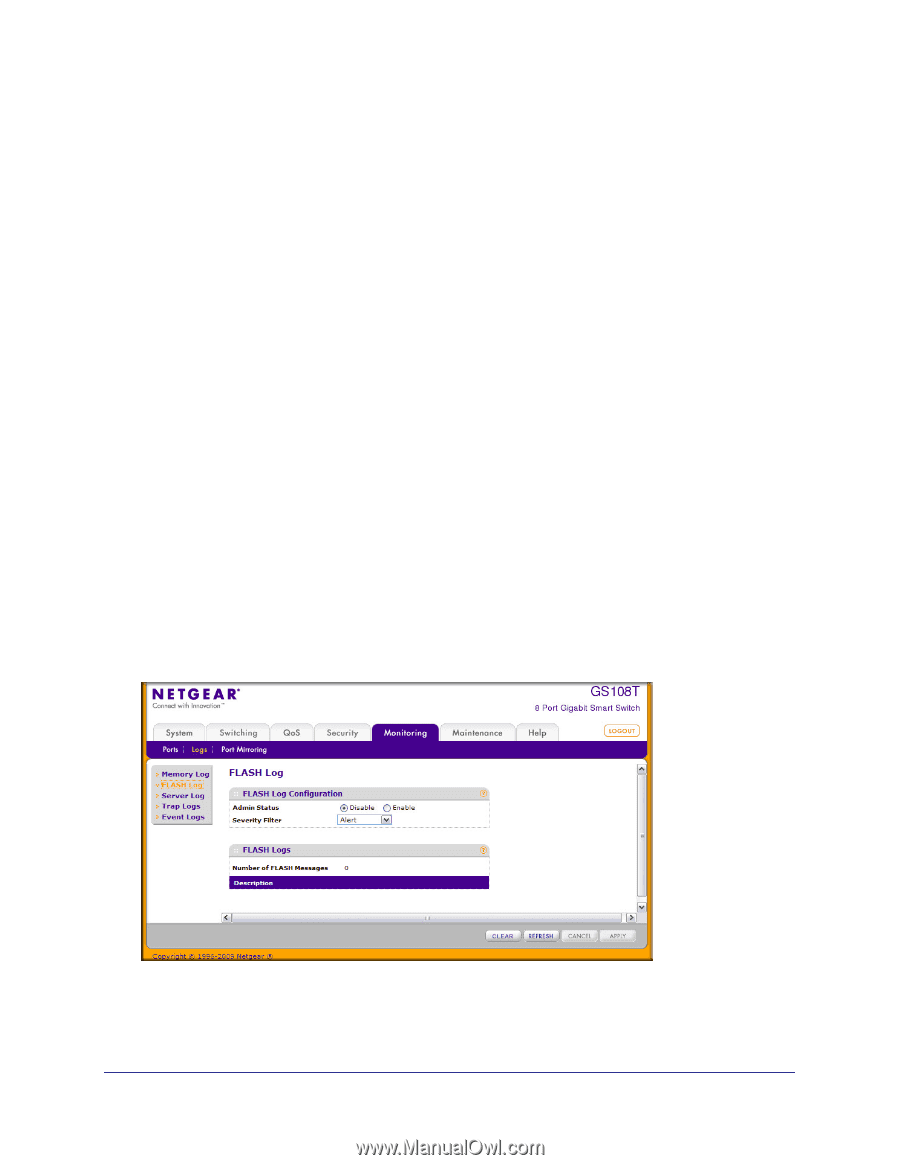
GS108T and GS110TP Smart Switch Software Administration Manual Use the buttons at the bottom of the page to perform the following actions: • Click Clear to clear the messages out of the buffered log in the memory. • Click Refresh to update the page with the latest messages in the log. • Click Cancel to cancel the configuration on the screen and reset the data on the screen to the latest value of the switch. FLASH Log Configuration The FLASH log is a log that is stored in persistent storage, which means that the log messages are retained across a switch reboot. • The first log type is the system startup log. The system startup log stores the first N messages received after system reboot. This log always has the log full operation attribute set to stop on full and can store up to 32 messages. • The second log type is the system operation log. The system operation log stores the last N messages received during system operation. This log always has the log full operation attribute set to overwrite. This log can store up to 1000 messages. Either the system startup log or the system operation log stores a message received by the log subsystem that meets the storage criteria, but not both. On system startup, if the startup log is configured, it stores messages up to its limit. The operation log, if configured, then begins to store the messages. Use the FLASH Log Configuration page to enable or disable persistent logging and to set the severity filter. To access the FLASH Log Configuration page, click the Monitoring Logs tab, and then click the FLASH Log link. 210 | Chapter 6: Monitoring the System
-
 1
1 -
2
-
3
-
4
-
5
-
6
-
7
-
8
-
9
-
10
-
11
-
12
-
13
-
14
-
15
-
16
-
17
-
18
-
19
-
20
-
21
-
22
-
23
-
24
-
25
-
26
-
27
-
28
-
29
-
30
-
31
-
32
-
33
-
34
-
35
-
36
-
37
-
38
-
39
-
40
-
41
-
42
-
43
-
44
-
45
-
46
-
47
-
48
-
49
-
50
-
51
-
52
-
53
-
54
-
55
-
56
-
57
-
58
-
59
-
60
-
61
-
62
-
63
-
64
-
65
-
66
-
67
-
68
-
69
-
70
-
71
-
72
-
73
-
74
-
75
-
76
-
77
-
78
-
79
-
80
-
81
-
82
-
83
-
84
-
85
-
86
-
87
-
88
-
89
-
90
-
91
-
92
-
93
-
94
-
95
-
96
-
97
-
98
-
99
-
100
-
101
-
102
-
103
-
104
-
105
-
106
-
107
-
108
-
109
-
110
-
111
-
112
-
113
-
114
-
115
-
116
-
117
-
118
-
119
-
120
-
121
-
122
-
123
-
124
-
125
-
126
-
127
-
128
-
129
-
130
-
131
-
132
-
133
-
134
-
135
-
136
-
137
-
138
-
139
-
140
-
141
-
142
-
143
-
144
-
145
-
146
-
147
-
148
-
149
-
150
-
151
-
152
-
153
-
154
-
155
-
156
-
157
-
158
-
159
-
160
-
161
-
162
-
163
-
164
-
165
-
166
-
167
-
168
-
169
-
170
-
171
-
172
-
173
-
174
-
175
-
176
-
177
-
178
-
179
-
180
-
181
-
182
-
183
-
184
-
185
-
186
-
187
-
188
-
189
-
190
-
191
-
192
-
193
-
194
-
195
-
196
-
197
-
198
-
199
-
200
-
201
-
202
-
203
-
204
-
 205
205 -
 206
206 -
 207
207 -
 208
208 -
 209
209 -
 210
210 -
 211
211 -
 212
212 -
 213
213 -
 214
214 -
 215
215 -
216
-
217
-
218
-
219
-
220
-
221
-
222
-
223
-
224
-
225
-
226
-
227
-
228
-
229
-
230
-
231
-
232
-
233
-
234
-
235
-
236
-
237
-
238
-
239
-
240
-
241
-
242
-
243
-
244
-
245
-
246
-
247
-
248
-
249
-
250
-
251
-
252
-
253
-
254
-
255
-
256
-
257
-
258
-
259
-
260
-
261
-
262
-
263
-
264
-
265
-
266
-
267
-
268
-
269
 |
 |