Netgear GS110TP GS108T/ GS110TP Smart Switch Software Administration Manual - Page 222
Upload File From Switch, Maintenance, Upload, File Upload, File Type, Text Configuration, Error Log
 |
UPC - 606449069129
View all Netgear GS110TP manuals
Add to My Manuals
Save this manual to your list of manuals |
Page 222 highlights
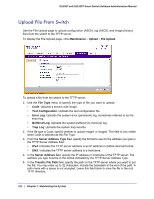
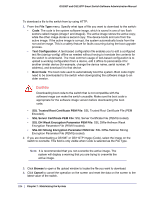
GS108T and GS110TP Smart Switch Software Administration Manual Upload File From Switch Use the File Upload page to upload configuration (ASCII), log (ASCII), and image (binary) files from the switch to the TFTP server. To display the File Upload page, click Maintenance Upload File Upload. To upload a file from the switch to the TFTP server: 1. Use the File Type menu to specify the type of file you want to upload: • Code: Uploads a stored code image. • Text Configuration: Uploads the text configuration file. • Error Log: Uploads the system error (persistent) log, sometimes referred to as the event log. • Buffered Log: Uploads the system buffered (in-memory) log. • Trap Log: Uploads the system trap records. 2. If the file type is Code, specify whether to upload image1 or image2. This field is only visible when Code is selected as the File Type. 3. From the Server Address Type filed, specify the format to use for the address you type in the TFTP Server Address field: • IPv4. Indicates the TFTP server address is an IP address in dotted-decimal format. • DNS. Indicates the TFTP server address is a hostname. 4. In the Server Address field, specify the IP address or hostname of the TFTP server. The address you type must be in the format indicated by the TFTP Server Address Type. 5. In the Transfer File Path field, specify the path on the TFTP server where you want to put the file. You may enter up to 32 characters. Include the backslash at the end of the path. A path name with a space is not accepted. Leave this field blank to save the file to the root TFTP directory. 222 | Chapter 7: Maintaining the System
-
 1
1 -
2
-
3
-
4
-
5
-
6
-
7
-
8
-
9
-
10
-
11
-
12
-
13
-
14
-
15
-
16
-
17
-
18
-
19
-
20
-
21
-
22
-
23
-
24
-
25
-
26
-
27
-
28
-
29
-
30
-
31
-
32
-
33
-
34
-
35
-
36
-
37
-
38
-
39
-
40
-
41
-
42
-
43
-
44
-
45
-
46
-
47
-
48
-
49
-
50
-
51
-
52
-
53
-
54
-
55
-
56
-
57
-
58
-
59
-
60
-
61
-
62
-
63
-
64
-
65
-
66
-
67
-
68
-
69
-
70
-
71
-
72
-
73
-
74
-
75
-
76
-
77
-
78
-
79
-
80
-
81
-
82
-
83
-
84
-
85
-
86
-
87
-
88
-
89
-
90
-
91
-
92
-
93
-
94
-
95
-
96
-
97
-
98
-
99
-
100
-
101
-
102
-
103
-
104
-
105
-
106
-
107
-
108
-
109
-
110
-
111
-
112
-
113
-
114
-
115
-
116
-
117
-
118
-
119
-
120
-
121
-
122
-
123
-
124
-
125
-
126
-
127
-
128
-
129
-
130
-
131
-
132
-
133
-
134
-
135
-
136
-
137
-
138
-
139
-
140
-
141
-
142
-
143
-
144
-
145
-
146
-
147
-
148
-
149
-
150
-
151
-
152
-
153
-
154
-
155
-
156
-
157
-
158
-
159
-
160
-
161
-
162
-
163
-
164
-
165
-
166
-
167
-
168
-
169
-
170
-
171
-
172
-
173
-
174
-
175
-
176
-
177
-
178
-
179
-
180
-
181
-
182
-
183
-
184
-
185
-
186
-
187
-
188
-
189
-
190
-
191
-
192
-
193
-
194
-
195
-
196
-
197
-
198
-
199
-
200
-
201
-
202
-
203
-
204
-
205
-
206
-
207
-
208
-
209
-
210
-
211
-
212
-
213
-
214
-
215
-
216
-
 217
217 -
 218
218 -
 219
219 -
 220
220 -
 221
221 -
 222
222 -
 223
223 -
 224
224 -
 225
225 -
 226
226 -
 227
227 -
228
-
229
-
230
-
231
-
232
-
233
-
234
-
235
-
236
-
237
-
238
-
239
-
240
-
241
-
242
-
243
-
244
-
245
-
246
-
247
-
248
-
249
-
250
-
251
-
252
-
253
-
254
-
255
-
256
-
257
-
258
-
259
-
260
-
261
-
262
-
263
-
264
-
265
-
266
-
267
-
268
-
269
 |
 |
