Toshiba Qosmio G30 PQG31C-HD202EF Users Manual Canada; English - Page 90
Points to note about the Fingerprint Utility, Set Up Procedure, Fingerprint Registration
 |
View all Toshiba Qosmio G30 PQG31C-HD202EF manuals
Add to My Manuals
Save this manual to your list of manuals |
Page 90 highlights
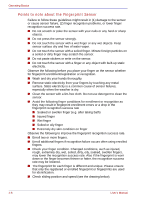
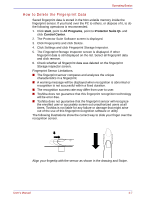
Operating Basics Points to note about the Fingerprint Utility Backups for saved fingerprint data and saved information in the PasswordBank can be performed in Import or Export User Data under Fingerprint Software Management. However, encrypted files cannot be backuped within Mysafe with this function. Recommended is backing up encrypted files to external media with standard methods such as copying files. If Windows XP's file encryption function EFS (Encryption File System) is used to encrypt a file, the file cannot be further encrypted using the encryption function of this software. In the help file, it is stated that this software's Password Bank function can be used for the Internet and general applications. However, the Internet Password Bank function in the fingerprint utility provided in this computer can only be used with IE (Internet Explorer). Set Up Procedure Please use the following procedure when first using fingerprint authentication. Fingerprint Registration Enroll the required authentication data using the "User Enrollment" Wizard. ■ The fingerprint authentication uses the same Windows logon ID and password. If the Windows logon password has not been setup, please do so before registration. ■ Up to 21 fingerprint patterns can be registered on this sensor. 1. Click start, point to All Programs, point to Protector Suite QL and click User Enrollment Wizard. You can also start User Enrollment Wizard using the following method. ■ Click the Protector Suite QL icon in the Task Bar. ■ Swipe your finger across the Fingerprint Sensor. 2. Click Next. 3. The User's Password screen is displayed. Ensure the same Windows logon username is displayed before entering a password into the Enter your password field. Click Next. 4. The Hints for Fingerprint Enrollment screen is displayed. Confirm the message and that there is a checkmark in Run Interactive Tutorial, and click Next. 5. The Correct Swipe Procedure screen is displayed. Confirm the message and click Next. 6. The Scanning Practice screen is displayed. You can practice swiping your finger When you have finished practicing swiping your finger, click Next. 4-8 User's Manual
-
 1
1 -
2
-
3
-
4
-
5
-
6
-
7
-
8
-
9
-
10
-
11
-
12
-
13
-
14
-
15
-
16
-
17
-
18
-
19
-
20
-
21
-
22
-
23
-
24
-
25
-
26
-
27
-
28
-
29
-
30
-
31
-
32
-
33
-
34
-
35
-
36
-
37
-
38
-
39
-
40
-
41
-
42
-
43
-
44
-
45
-
46
-
47
-
48
-
49
-
50
-
51
-
52
-
53
-
54
-
55
-
56
-
57
-
58
-
59
-
60
-
61
-
62
-
63
-
64
-
65
-
66
-
67
-
68
-
69
-
70
-
71
-
72
-
73
-
74
-
75
-
76
-
77
-
78
-
79
-
80
-
81
-
82
-
83
-
84
-
 85
85 -
 86
86 -
 87
87 -
 88
88 -
 89
89 -
 90
90 -
 91
91 -
 92
92 -
 93
93 -
 94
94 -
 95
95 -
96
-
97
-
98
-
99
-
100
-
101
-
102
-
103
-
104
-
105
-
106
-
107
-
108
-
109
-
110
-
111
-
112
-
113
-
114
-
115
-
116
-
117
-
118
-
119
-
120
-
121
-
122
-
123
-
124
-
125
-
126
-
127
-
128
-
129
-
130
-
131
-
132
-
133
-
134
-
135
-
136
-
137
-
138
-
139
-
140
-
141
-
142
-
143
-
144
-
145
-
146
-
147
-
148
-
149
-
150
-
151
-
152
-
153
-
154
-
155
-
156
-
157
-
158
-
159
-
160
-
161
-
162
-
163
-
164
-
165
-
166
-
167
-
168
-
169
-
170
-
171
-
172
-
173
-
174
-
175
-
176
-
177
-
178
-
179
-
180
-
181
-
182
-
183
-
184
-
185
-
186
-
187
-
188
-
189
-
190
-
191
-
192
-
193
-
194
-
195
-
196
-
197
-
198
-
199
-
200
-
201
-
202
-
203
-
204
-
205
-
206
-
207
-
208
-
209
-
210
-
211
-
212
-
213
-
214
-
215
-
216
-
217
-
218
-
219
-
220
-
221
-
222
-
223
-
224
-
225
-
226
-
227
-
228
-
229
-
230
-
231
-
232
-
233
-
234
-
235
-
236
-
237
-
238
-
239
-
240
-
241
-
242
-
243
-
244
-
245
-
246
-
247
-
248
-
249
-
250
-
251
-
252
-
253
-
254
-
255
-
256
-
257
-
258
-
259
-
260
-
261
-
262
-
263
-
264
-
265
-
266
-
267
-
268
-
269
-
270
-
271
-
272
-
273
-
274
-
275
-
276
-
277
-
278
-
279
-
280
-
281
-
282
-
283
-
284
-
285
-
286
-
287
-
288
-
289
-
290
-
291
-
292
-
293
-
294
-
295
-
296
-
297
-
298
-
299
-
300
-
301
-
302
-
303
-
304
-
305
-
306
-
307
-
308
-
309
-
310
-
311
-
312
-
313
-
314
-
315
-
316
-
317
-
318
 |
 |