Yamaha AW2816 Owner's Manual - Page 11
Installing an internal hard disk, About the internal hard disk, Installation - hard drive
 |
View all Yamaha AW2816 manuals
Add to My Manuals
Save this manual to your list of manuals |
Page 11 highlights
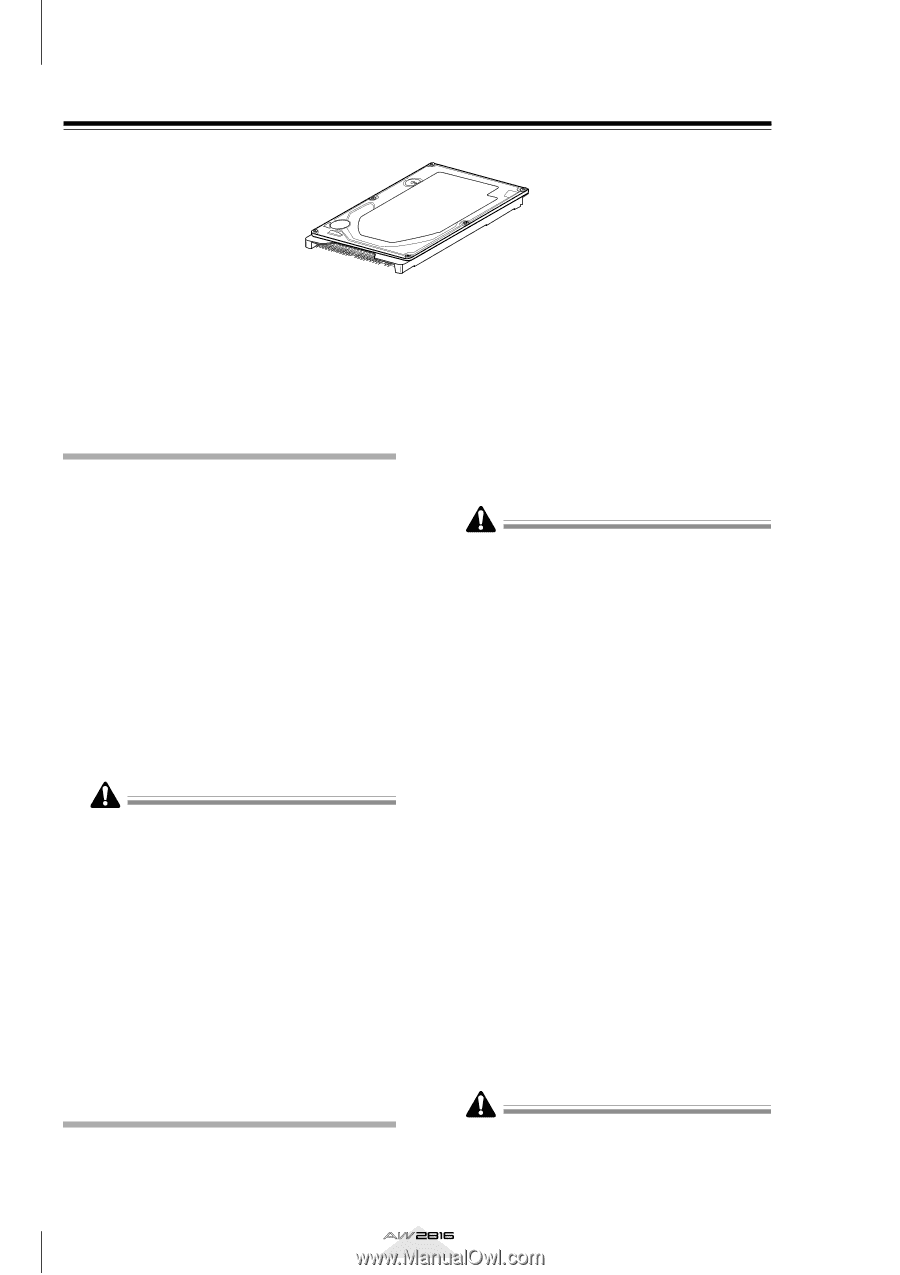
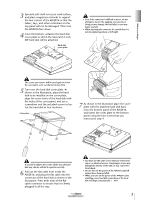
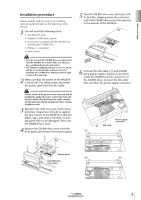
Before you begin Installing an internal hard disk You must install a hard disk in the AW2816 before using it. If you attempt to use the AW2816 without installing a hard disk, the recorder section and mixer section will fail to operate correctly, and the AW2816 will be damaged as well. About the internal hard disk On the AW2816, all data necessary for reproducing a composition (mixer settings, recorder settings, audio data etc.) is stored on the hard disk as a "song." An internal hard disk is installed by attaching it to the inside of the hard disk cover plate located on the bottom panel of the AW2816. Hard disks with the following specifications can be used. • Type: IDE 2.5 inch (attachment location conforms to SFF-8201) • Thickness: no particular limitation • Capacity: no particular limitation (however, the AW2816 can use a maximum capacity of 64 GB) • Models known to work: consult your local Yamaha distributor or refer to the website at the following URL. • By "models known to work," we mean commercially available models that Yamaha has obtained, installed in the AW2816, and successfully tested by means of various operational tests. However, we cannot take into account slight differences in performance that may occur due to the manufacturing tolerances of each manufacturer. • Hard disks are precision devices. Strong physical shock, magnetism, static electricity, or excessive current etc. can damage the data on a hard disk. You must use media such as an external SCSI device or CD-RW to backup your important musical data. • Please be aware that Yamaha Corporation will accept no responsibility for any damages, neither direct nor indirect, resulting from the use of any of the above hard disks. Installation Please read and observe the cautions on installing optional equipment listed at the beginning of this manual. The following steps describe the procedure by which the 2.5 inch IDE hard disk is attached to the hard disk cover plate located on the bottom of the AW2816 for installation. • Hard disks are precision devices. Do not subject them to physical shock or static electricity, etc. • Do not place a hard disk nearby devices that produce a strong magnetic field, or in locations of extreme cold, heat, or moisture. • Before you handle a hard disk, touch your hand to a grounded metallic object to release any static charge that may be present in your body or clothing. If you fail to do so, static electricity may damage the hard disk. • Never attempt to disassemble a hard disk or apply excessive force to it. • In order to install the internal hard disk, you will need to turn the AW2816 upside down. Please make sure that your work surface is spacious enough. • The AW2816 is shipped with four screws for attaching a 2.5 inch hard disk, and four screws for attaching a CD-RW drive, making a total of eight included screws of the same type. 1 You will need the following items. • The AW2816 itself • A 2.5 inch IDE hard disk (sold separately) for installation • Four screws included with the AW2816 for attaching the 2.5 inch hard disk • A philips (+) screwdriver • Work surface 2 Make sure that the power of the AW2816 is turned off. For safety's sake, disconnect the power cable from the AC outlet. Always switch off the power for the main unit and all peripherals, unplug the power cord for the main unit from the outlet, then disconnect the cables connecting the main unit with the peripherals before starting installation work. 2 Operation section
-
 1
1 -
2
-
3
-
4
-
5
-
 6
6 -
 7
7 -
 8
8 -
 9
9 -
 10
10 -
 11
11 -
 12
12 -
 13
13 -
 14
14 -
 15
15 -
 16
16 -
17
-
18
-
19
-
20
-
21
-
22
-
23
-
24
-
25
-
26
-
27
-
28
-
29
-
30
-
31
-
32
-
33
-
34
-
35
-
36
-
37
-
38
-
39
-
40
-
41
-
42
-
43
-
44
-
45
-
46
-
47
-
48
-
49
-
50
-
51
-
52
-
53
-
54
-
55
-
56
-
57
-
58
-
59
-
60
-
61
-
62
-
63
-
64
-
65
-
66
-
67
-
68
-
69
-
70
-
71
-
72
-
73
-
74
-
75
-
76
-
77
-
78
-
79
-
80
-
81
-
82
-
83
-
84
-
85
-
86
-
87
-
88
-
89
-
90
-
91
-
92
-
93
-
94
-
95
-
96
-
97
-
98
-
99
-
100
-
101
-
102
-
103
-
104
-
105
-
106
-
107
-
108
-
109
-
110
-
111
-
112
-
113
-
114
-
115
-
116
-
117
-
118
-
119
-
120
-
121
-
122
-
123
-
124
-
125
-
126
-
127
-
128
-
129
-
130
-
131
-
132
-
133
-
134
-
135
-
136
-
137
-
138
-
139
-
140
-
141
-
142
-
143
-
144
-
145
-
146
-
147
-
148
-
149
-
150
-
151
-
152
-
153
-
154
-
155
-
156
-
157
-
158
-
159
-
160
-
161
-
162
-
163
-
164
-
165
-
166
-
167
-
168
-
169
-
170
-
171
-
172
-
173
-
174
-
175
-
176
-
177
-
178
-
179
-
180
-
181
-
182
-
183
-
184
-
185
-
186
-
187
-
188
-
189
-
190
-
191
-
192
-
193
-
194
-
195
-
196
-
197
-
198
-
199
-
200
-
201
-
202
-
203
-
204
-
205
-
206
-
207
-
208
-
209
-
210
-
211
-
212
-
213
-
214
-
215
-
216
-
217
-
218
-
219
-
220
-
221
-
222
-
223
-
224
-
225
-
226
-
227
-
228
-
229
-
230
-
231
-
232
-
233
-
234
-
235
-
236
-
237
-
238
-
239
-
240
-
241
-
242
-
243
-
244
-
245
-
246
-
247
-
248
-
249
-
250
-
251
-
252
-
253
-
254
-
255
-
256
-
257
-
258
-
259
-
260
-
261
-
262
-
263
-
264
-
265
-
266
-
267
-
268
-
269
-
270
-
271
-
272
-
273
-
274
-
275
-
276
-
277
-
278
-
279
-
280
-
281
-
282
-
283
-
284
-
285
-
286
-
287
-
288
-
289
-
290
-
291
-
292
-
293
-
294
-
295
-
296
-
297
-
298
-
299
-
300
-
301
-
302
-
303
-
304
-
305
-
306
-
307
-
308
-
309
-
310
-
311
-
312
-
313
-
314
-
315
-
316
-
317
-
318
-
319
-
320
-
321
-
322
-
323
-
324
-
325
-
326
-
327
-
328
-
329
-
330
-
331
-
332
-
333
-
334
-
335
-
336
-
337
-
338
-
339
-
340
-
341
-
342
-
343
-
344
-
345
-
346
-
347
-
348
-
349
-
350
-
351
-
352
-
353
-
354
-
355
-
356
-
357
-
358
-
359
-
360
-
361
-
362
-
363
-
364
-
365
-
366
-
367
-
368
-
369
-
370
-
371
-
372
-
373
-
374
-
375
-
376
-
377
-
378
-
379
-
380
-
381
-
382
-
383
-
384
-
385
-
386
-
387
-
388
-
389
-
390
-
391
-
392
-
393
-
394
-
395
-
396
-
397
-
398
-
399
-
400
-
401
-
402
-
403
-
404
-
405
-
406
-
407
-
408
-
409
-
410
-
411
-
412
-
413
-
414
-
415
-
416
-
417
-
418
-
419
-
420
 |
 |