Yamaha AW2816 Owner's Manual - Page 214
Assigning MIDI messages to the, ON] keys, s MIDI OUT
 |
View all Yamaha AW2816 manuals
Add to My Manuals
Save this manual to your list of manuals |
Page 214 highlights
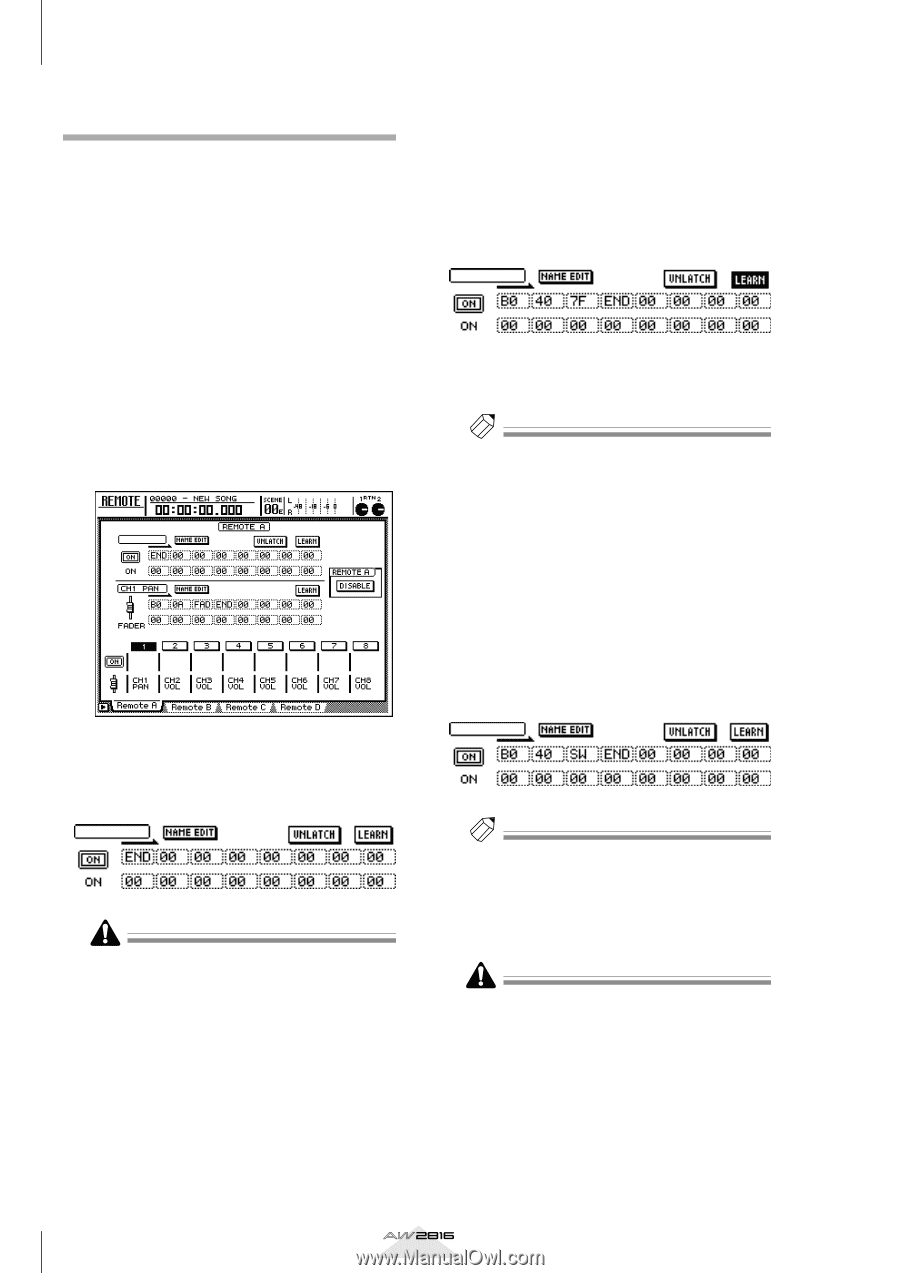
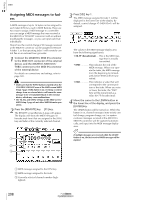
Chapter MIDI 13 Assigning MIDI messages to the [ON] keys As an example, here's how you can use a sustain pedal connected to a MIDI sequencer to assign Hold On (control change #64 with a value of 127) and Hold Off (control change #64 with a value of 0) messages to the Remote A [ON] key 1. 1 Connect the AW2816's MIDI IN connector to the MIDI OUT connector of a synthesizer to which a sustain pedal is connected, and connect the AW2816's MIDI OUT/ THRU connector to the MIDI IN connector of the external device. For details on connections and settings, refer to page 189. 2 Press the [REMOTE] key ¡ [F1] key. The REMOTE screen REMOTE A page will appear. 5 Press the sustain pedal connected to your MIDI synthesizer. A control change #64 with a value of 127 (7F in hexadecimal; Hold On message) will be input in the MIDI message display area. For this message, the right digit (first place) of the first byte is the MIDI channel number, the second byte is the control number, and the third byte is the actual value. 6 Turn off the LEARN button, and release the sustain pedal. Tip! If you release the sustain pedal before turning the LEARN button off, a control change #64 with a value of 0 (hexadecimal 00) will be input (Hold Off) in the MIDI message display area. However even in this case, the following procedure will not be affected. 7 Move the cursor to the third byte, and use the [DATA/JOG] dial to change the value to "SW." The byte whose value is set to "SW" will be transmitted as a value of 127 (hexadecimal 7F) when the [ON] key changes to On, and as a value of 0 (hexadecimal 00) when the [ON] key changes to Off. In this example, the data will be output as a Hold On/Off message. 3 Press [SEL] key 1. The upper line in the display will show the MIDI message currently assigned to [ON] key 1. With the default settings, no MIDI message is assigned to [ON] key 1 in the Remote A page. In such cases, a value of "END" will be input at the first byte to indicate the end of the MIDI message. 4 Move the cursor to the LEARN button in the upper line of the display, and press the [ENTER] key to turn the button on. Tip! • The MIDI message to be assigned can also be specified one byte at a time, using the procedure of step 7. In this case, you will need to input the "END" value at the end of the MIDI message. • If you want to transmit a specific MIDI message each time the [ON] key is pressed, you do not need to input the "SW" value. If you input the MIDI message one byte at a time, it is possible that you may input an invalid MIDI message by accident. Be aware that if this occurs, operating a fader or [ON] key will send this MIDI message from the MIDI OUT connector or TO HOST connector, possibly causing the connected external device to malfunction. 210 Operation section
-
 1
1 -
2
-
3
-
4
-
5
-
6
-
7
-
8
-
9
-
10
-
11
-
12
-
13
-
14
-
15
-
16
-
17
-
18
-
19
-
20
-
21
-
22
-
23
-
24
-
25
-
26
-
27
-
28
-
29
-
30
-
31
-
32
-
33
-
34
-
35
-
36
-
37
-
38
-
39
-
40
-
41
-
42
-
43
-
44
-
45
-
46
-
47
-
48
-
49
-
50
-
51
-
52
-
53
-
54
-
55
-
56
-
57
-
58
-
59
-
60
-
61
-
62
-
63
-
64
-
65
-
66
-
67
-
68
-
69
-
70
-
71
-
72
-
73
-
74
-
75
-
76
-
77
-
78
-
79
-
80
-
81
-
82
-
83
-
84
-
85
-
86
-
87
-
88
-
89
-
90
-
91
-
92
-
93
-
94
-
95
-
96
-
97
-
98
-
99
-
100
-
101
-
102
-
103
-
104
-
105
-
106
-
107
-
108
-
109
-
110
-
111
-
112
-
113
-
114
-
115
-
116
-
117
-
118
-
119
-
120
-
121
-
122
-
123
-
124
-
125
-
126
-
127
-
128
-
129
-
130
-
131
-
132
-
133
-
134
-
135
-
136
-
137
-
138
-
139
-
140
-
141
-
142
-
143
-
144
-
145
-
146
-
147
-
148
-
149
-
150
-
151
-
152
-
153
-
154
-
155
-
156
-
157
-
158
-
159
-
160
-
161
-
162
-
163
-
164
-
165
-
166
-
167
-
168
-
169
-
170
-
171
-
172
-
173
-
174
-
175
-
176
-
177
-
178
-
179
-
180
-
181
-
182
-
183
-
184
-
185
-
186
-
187
-
188
-
189
-
190
-
191
-
192
-
193
-
194
-
195
-
196
-
197
-
198
-
199
-
200
-
201
-
202
-
203
-
204
-
205
-
206
-
207
-
208
-
 209
209 -
 210
210 -
 211
211 -
 212
212 -
 213
213 -
 214
214 -
 215
215 -
 216
216 -
 217
217 -
 218
218 -
 219
219 -
220
-
221
-
222
-
223
-
224
-
225
-
226
-
227
-
228
-
229
-
230
-
231
-
232
-
233
-
234
-
235
-
236
-
237
-
238
-
239
-
240
-
241
-
242
-
243
-
244
-
245
-
246
-
247
-
248
-
249
-
250
-
251
-
252
-
253
-
254
-
255
-
256
-
257
-
258
-
259
-
260
-
261
-
262
-
263
-
264
-
265
-
266
-
267
-
268
-
269
-
270
-
271
-
272
-
273
-
274
-
275
-
276
-
277
-
278
-
279
-
280
-
281
-
282
-
283
-
284
-
285
-
286
-
287
-
288
-
289
-
290
-
291
-
292
-
293
-
294
-
295
-
296
-
297
-
298
-
299
-
300
-
301
-
302
-
303
-
304
-
305
-
306
-
307
-
308
-
309
-
310
-
311
-
312
-
313
-
314
-
315
-
316
-
317
-
318
-
319
-
320
-
321
-
322
-
323
-
324
-
325
-
326
-
327
-
328
-
329
-
330
-
331
-
332
-
333
-
334
-
335
-
336
-
337
-
338
-
339
-
340
-
341
-
342
-
343
-
344
-
345
-
346
-
347
-
348
-
349
-
350
-
351
-
352
-
353
-
354
-
355
-
356
-
357
-
358
-
359
-
360
-
361
-
362
-
363
-
364
-
365
-
366
-
367
-
368
-
369
-
370
-
371
-
372
-
373
-
374
-
375
-
376
-
377
-
378
-
379
-
380
-
381
-
382
-
383
-
384
-
385
-
386
-
387
-
388
-
389
-
390
-
391
-
392
-
393
-
394
-
395
-
396
-
397
-
398
-
399
-
400
-
401
-
402
-
403
-
404
-
405
-
406
-
407
-
408
-
409
-
410
-
411
-
412
-
413
-
414
-
415
-
416
-
417
-
418
-
419
-
420
 |
 |