Yamaha AW2816 Owner's Manual - Page 20
Please observe the following points, Turning the power on, Setting the internal clock - battery replacement
 |
View all Yamaha AW2816 manuals
Add to My Manuals
Save this manual to your list of manuals |
Page 20 highlights
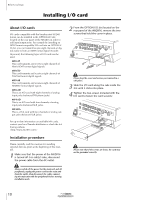
Before you begin Please observe the following points This section explains how to turn the power of the AW2816 on and off, and how to set the internal clock. Turning the power on When turning on the power of a system that includes the AW2816, each device must be turned on in the following order. 1 Any storage devices connected to the SCSI connector of the AW2816, and external tone generators connected to the input/output jacks B The AW2816 itself C The monitor system connected to the output jacks or the AW2816 Setting the internal clock When the AW2816 is shipped from the factory, the internal clock is set to Japan time. When you save a song you created on the AW2816, the date and time will be stored according to this internal clock. Use the following procedure to set the date and time of the internal clock after replacing the internal battery, or if you need to set the clock for any other reason. 1 Press the [UTILITY] key ¡ [F4] key. The following screen will appear. Following the opening screen, the following screen will appear in the display of the AW2816. • If the AW2816 is powered-on when a SCSI-connected external device is turned off, it may not start up correctly. • Do not turn off the power of a SCSI-connected device while the AW2816 is in use. • Before turning the power on, check that the power cable plug is firmly connected to the AW2816 and to the AC outlet. If the power is accidentally disconnected (turned off) while the AW2816 is in use, the AW2816 itself and/or the hard disk may be damaged. The first time the power is turned on after a new internal hard disk is installed in the AW2816, the display will indicate "Format OK? [Y (Enter)/N (Any)]." If you press the [ENTER] key at this time, the hard disk will be formatted automatically, and the screen shown above will appear when formatting has been completed. Never turn off the power of the AW2816 while formatting is in progress. Doing so may damage the hard disk itself. 2 Use the CURSOR [ ] key to move the cursor (the blinking area in the display) to the Y (year) field in the CLOCK area, and turn the [DATA/JOG] dial to set the year. The clock field will begin blinking. 3 In the same way, input the M (month), D (date), h (hour), m (minute), and s (second) fields. The W (weekday) field will be set automatically according to the date. 4 When you have input all of the values, use the CURSOR keys to move the cursor to the SET button, and press the [ENTER] key. The CLOCK area will stop blinking, and the new date and time will take effect. If you decide not to change the date and time, move the cursor to the RESET button and press the [ENTER] key. Tip! The internal clock continues to operate even when the power of the AW2816 is turned off. Once you have set the clock, you will not need to reset it unless you change the battery. Operation section 11
-
 1
1 -
2
-
3
-
4
-
5
-
6
-
7
-
8
-
9
-
10
-
11
-
12
-
13
-
14
-
 15
15 -
 16
16 -
 17
17 -
 18
18 -
 19
19 -
 20
20 -
 21
21 -
 22
22 -
 23
23 -
 24
24 -
 25
25 -
26
-
27
-
28
-
29
-
30
-
31
-
32
-
33
-
34
-
35
-
36
-
37
-
38
-
39
-
40
-
41
-
42
-
43
-
44
-
45
-
46
-
47
-
48
-
49
-
50
-
51
-
52
-
53
-
54
-
55
-
56
-
57
-
58
-
59
-
60
-
61
-
62
-
63
-
64
-
65
-
66
-
67
-
68
-
69
-
70
-
71
-
72
-
73
-
74
-
75
-
76
-
77
-
78
-
79
-
80
-
81
-
82
-
83
-
84
-
85
-
86
-
87
-
88
-
89
-
90
-
91
-
92
-
93
-
94
-
95
-
96
-
97
-
98
-
99
-
100
-
101
-
102
-
103
-
104
-
105
-
106
-
107
-
108
-
109
-
110
-
111
-
112
-
113
-
114
-
115
-
116
-
117
-
118
-
119
-
120
-
121
-
122
-
123
-
124
-
125
-
126
-
127
-
128
-
129
-
130
-
131
-
132
-
133
-
134
-
135
-
136
-
137
-
138
-
139
-
140
-
141
-
142
-
143
-
144
-
145
-
146
-
147
-
148
-
149
-
150
-
151
-
152
-
153
-
154
-
155
-
156
-
157
-
158
-
159
-
160
-
161
-
162
-
163
-
164
-
165
-
166
-
167
-
168
-
169
-
170
-
171
-
172
-
173
-
174
-
175
-
176
-
177
-
178
-
179
-
180
-
181
-
182
-
183
-
184
-
185
-
186
-
187
-
188
-
189
-
190
-
191
-
192
-
193
-
194
-
195
-
196
-
197
-
198
-
199
-
200
-
201
-
202
-
203
-
204
-
205
-
206
-
207
-
208
-
209
-
210
-
211
-
212
-
213
-
214
-
215
-
216
-
217
-
218
-
219
-
220
-
221
-
222
-
223
-
224
-
225
-
226
-
227
-
228
-
229
-
230
-
231
-
232
-
233
-
234
-
235
-
236
-
237
-
238
-
239
-
240
-
241
-
242
-
243
-
244
-
245
-
246
-
247
-
248
-
249
-
250
-
251
-
252
-
253
-
254
-
255
-
256
-
257
-
258
-
259
-
260
-
261
-
262
-
263
-
264
-
265
-
266
-
267
-
268
-
269
-
270
-
271
-
272
-
273
-
274
-
275
-
276
-
277
-
278
-
279
-
280
-
281
-
282
-
283
-
284
-
285
-
286
-
287
-
288
-
289
-
290
-
291
-
292
-
293
-
294
-
295
-
296
-
297
-
298
-
299
-
300
-
301
-
302
-
303
-
304
-
305
-
306
-
307
-
308
-
309
-
310
-
311
-
312
-
313
-
314
-
315
-
316
-
317
-
318
-
319
-
320
-
321
-
322
-
323
-
324
-
325
-
326
-
327
-
328
-
329
-
330
-
331
-
332
-
333
-
334
-
335
-
336
-
337
-
338
-
339
-
340
-
341
-
342
-
343
-
344
-
345
-
346
-
347
-
348
-
349
-
350
-
351
-
352
-
353
-
354
-
355
-
356
-
357
-
358
-
359
-
360
-
361
-
362
-
363
-
364
-
365
-
366
-
367
-
368
-
369
-
370
-
371
-
372
-
373
-
374
-
375
-
376
-
377
-
378
-
379
-
380
-
381
-
382
-
383
-
384
-
385
-
386
-
387
-
388
-
389
-
390
-
391
-
392
-
393
-
394
-
395
-
396
-
397
-
398
-
399
-
400
-
401
-
402
-
403
-
404
-
405
-
406
-
407
-
408
-
409
-
410
-
411
-
412
-
413
-
414
-
415
-
416
-
417
-
418
-
419
-
420
 |
 |
