Yamaha AW2816 Owner's Manual - Page 173
Exporting tracks to WAV, If you selected the TRACK menu
 |
View all Yamaha AW2816 manuals
Add to My Manuals
Save this manual to your list of manuals |
Page 173 highlights
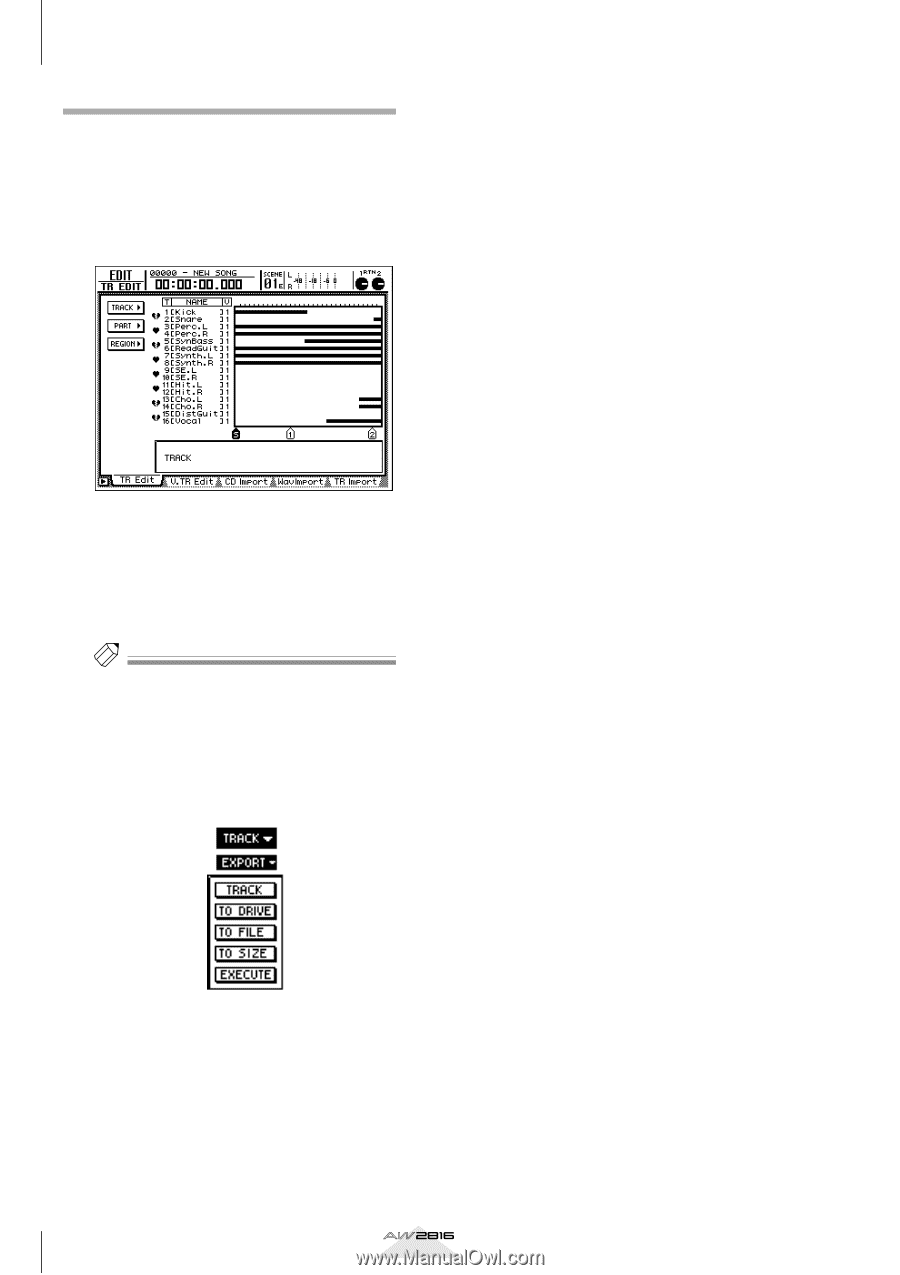
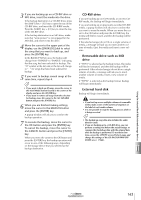
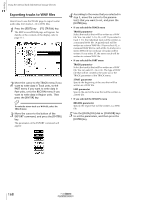
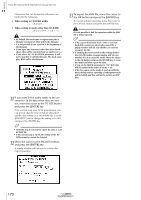
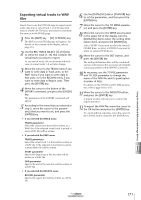
Chapter Using the internal hard disk/external storage devices 11 Exporting tracks to WAV files Here's how to use the TR Edit page to export (write) audio data from tracks 1-16 to WAV files. 1 Press the [EDIT] key ¡ [F1] (TR Edit) key. The EDIT screen/TR Edit page will appear. For details on the contents of the display, refer to page 111. 2 Move the cursor to the TRACK menu if you want to write data in Track units, to the PART menu if you want to write data in Part units, or to the REGION menu if you want to write data in Region units. Then press the [ENTER] key. Tip! To write the stereo track as a WAV file, select the TRACK menu. 3 Move the cursor to the button of the EXPORT command, and press the [ENTER] key. The parameters of the EXPORT command will appear. 4 According to the menu that you selected in step 3, move the cursor to the parameter(s) that you want to set, and press the [ENTER] key. • If you selected the TRACK menu TRACK parameter Select the track(s) that will be written as a WAV file. You can select 1-16, AL, or ST. If you select a track 1-16, the individual track will be written as a monaural WAV file. (A paired track will be written as a stereo WAV file.) If you select AL, a monaural WAV file for each of the 16 tracks (or a stereo WAV file for each pair of tracks) will be written. If you select ST, the stereo track will be written to a stereo WAV file. • If you selected the PART menu TRACK parameter Select the track(s) that will be written as a WAV file. You can select 1-16 or AL. The type of WAV file that will be created is the same as for the TRACK parameter of the TRACK menu. START parameter Specify the beginning of the area that will be written as a WAV file. END parameter Specify the end of the area that will be written as a WAV file. • If you selected the REGION menu REGION parameter Specify the region that will be written as a WAV file. 5 Use the [DATA/JOG] dial or [CURSOR] keys to set the parameters, and then press the [ENTER] key. 168 Operation section
-
 1
1 -
2
-
3
-
4
-
5
-
6
-
7
-
8
-
9
-
10
-
11
-
12
-
13
-
14
-
15
-
16
-
17
-
18
-
19
-
20
-
21
-
22
-
23
-
24
-
25
-
26
-
27
-
28
-
29
-
30
-
31
-
32
-
33
-
34
-
35
-
36
-
37
-
38
-
39
-
40
-
41
-
42
-
43
-
44
-
45
-
46
-
47
-
48
-
49
-
50
-
51
-
52
-
53
-
54
-
55
-
56
-
57
-
58
-
59
-
60
-
61
-
62
-
63
-
64
-
65
-
66
-
67
-
68
-
69
-
70
-
71
-
72
-
73
-
74
-
75
-
76
-
77
-
78
-
79
-
80
-
81
-
82
-
83
-
84
-
85
-
86
-
87
-
88
-
89
-
90
-
91
-
92
-
93
-
94
-
95
-
96
-
97
-
98
-
99
-
100
-
101
-
102
-
103
-
104
-
105
-
106
-
107
-
108
-
109
-
110
-
111
-
112
-
113
-
114
-
115
-
116
-
117
-
118
-
119
-
120
-
121
-
122
-
123
-
124
-
125
-
126
-
127
-
128
-
129
-
130
-
131
-
132
-
133
-
134
-
135
-
136
-
137
-
138
-
139
-
140
-
141
-
142
-
143
-
144
-
145
-
146
-
147
-
148
-
149
-
150
-
151
-
152
-
153
-
154
-
155
-
156
-
157
-
158
-
159
-
160
-
161
-
162
-
163
-
164
-
165
-
166
-
167
-
 168
168 -
 169
169 -
 170
170 -
 171
171 -
 172
172 -
 173
173 -
 174
174 -
 175
175 -
 176
176 -
 177
177 -
 178
178 -
179
-
180
-
181
-
182
-
183
-
184
-
185
-
186
-
187
-
188
-
189
-
190
-
191
-
192
-
193
-
194
-
195
-
196
-
197
-
198
-
199
-
200
-
201
-
202
-
203
-
204
-
205
-
206
-
207
-
208
-
209
-
210
-
211
-
212
-
213
-
214
-
215
-
216
-
217
-
218
-
219
-
220
-
221
-
222
-
223
-
224
-
225
-
226
-
227
-
228
-
229
-
230
-
231
-
232
-
233
-
234
-
235
-
236
-
237
-
238
-
239
-
240
-
241
-
242
-
243
-
244
-
245
-
246
-
247
-
248
-
249
-
250
-
251
-
252
-
253
-
254
-
255
-
256
-
257
-
258
-
259
-
260
-
261
-
262
-
263
-
264
-
265
-
266
-
267
-
268
-
269
-
270
-
271
-
272
-
273
-
274
-
275
-
276
-
277
-
278
-
279
-
280
-
281
-
282
-
283
-
284
-
285
-
286
-
287
-
288
-
289
-
290
-
291
-
292
-
293
-
294
-
295
-
296
-
297
-
298
-
299
-
300
-
301
-
302
-
303
-
304
-
305
-
306
-
307
-
308
-
309
-
310
-
311
-
312
-
313
-
314
-
315
-
316
-
317
-
318
-
319
-
320
-
321
-
322
-
323
-
324
-
325
-
326
-
327
-
328
-
329
-
330
-
331
-
332
-
333
-
334
-
335
-
336
-
337
-
338
-
339
-
340
-
341
-
342
-
343
-
344
-
345
-
346
-
347
-
348
-
349
-
350
-
351
-
352
-
353
-
354
-
355
-
356
-
357
-
358
-
359
-
360
-
361
-
362
-
363
-
364
-
365
-
366
-
367
-
368
-
369
-
370
-
371
-
372
-
373
-
374
-
375
-
376
-
377
-
378
-
379
-
380
-
381
-
382
-
383
-
384
-
385
-
386
-
387
-
388
-
389
-
390
-
391
-
392
-
393
-
394
-
395
-
396
-
397
-
398
-
399
-
400
-
401
-
402
-
403
-
404
-
405
-
406
-
407
-
408
-
409
-
410
-
411
-
412
-
413
-
414
-
415
-
416
-
417
-
418
-
419
-
420
 |
 |