Yamaha AW2816 Owner's Manual - Page 177
Loading a WAV file into a track (Importing a WAV file
 |
View all Yamaha AW2816 manuals
Add to My Manuals
Save this manual to your list of manuals |
Page 177 highlights
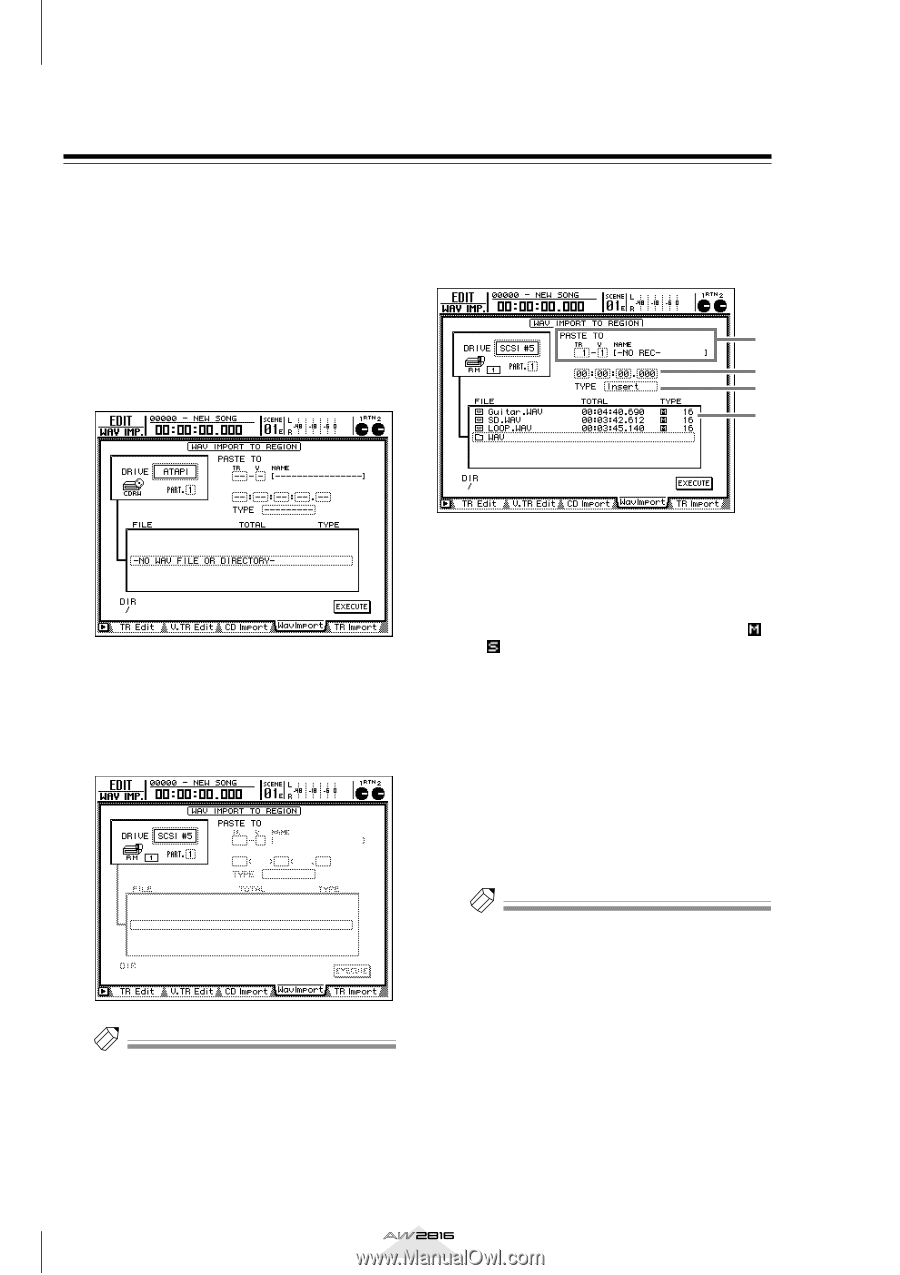
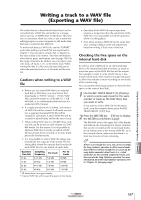
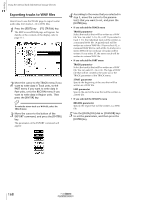
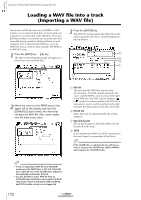
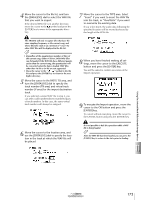
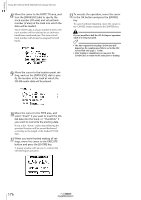
Chapter Using the internal hard disk/external storage devices 11 Loading a WAV file into a track (Importing a WAV file) Here's how a WAV file stored on CD-R/RW or MO media or on an external hard disk can be loaded and assigned to an audio track of the AW2816. For example this provides a convenient way for audio data that was edited using waveform editing software on your computer to be returned to the AW2816, or to use WAV files from a commercially-available CD-ROM in an AW2816 song. 1 Press the [EDIT] key ¡ [F4] key. The EDIT screen/WavImport page will appear, in which you can load WAV files. 3 Press the [ENTER] key. The AW2816 will recognize the WAV files of the media inserted in the drive, and will display the files as follows. 2 3 4 1 2 Move the cursor to the DRIVE area in the upper left of the display, and turn the [DATA/JOG] dial to select the drive that contains the WAV file. Also, insert media into the load source drive. 1 File list This area lists the WAV files stored on the selected drive. The FILE column shows the filename, and the TOTAL column shows the length of the WAV file. The TYPE column displays a or symbol to indicate whether the WAV file is monaural or stereo, and the number at the right indicates the quantization (16/24 bit) of the file. B PASTE TO Select the track to which the WAV file will be assigned. C Specified point Specify the location at which the WAV file will be placed in the track. D TYPE Select whether the WAV file will be inserted into the track (Insert) or overwritten (OverWrite). Tip! If the CD-RW drive is selected, the tray will close as soon as you press the [ENTER] key, and the AW2816 will recognize the CD-R/RW media. Tip! • If you are importing a WAV file from CD-R/RW media, press the [SHIFT] key + [F2] (CD UNLOAD) key to open the tray of the CD-RW drive, and insert the media that contains the WAV file. • It is also possible to load a WAV file from an ISO9660 format CD-ROM or mixed mode CD-ROM (data track). However, Macintosh (HFS) CD-ROMs and CD Extra data sections are not supported. 172 Operation section
-
 1
1 -
2
-
3
-
4
-
5
-
6
-
7
-
8
-
9
-
10
-
11
-
12
-
13
-
14
-
15
-
16
-
17
-
18
-
19
-
20
-
21
-
22
-
23
-
24
-
25
-
26
-
27
-
28
-
29
-
30
-
31
-
32
-
33
-
34
-
35
-
36
-
37
-
38
-
39
-
40
-
41
-
42
-
43
-
44
-
45
-
46
-
47
-
48
-
49
-
50
-
51
-
52
-
53
-
54
-
55
-
56
-
57
-
58
-
59
-
60
-
61
-
62
-
63
-
64
-
65
-
66
-
67
-
68
-
69
-
70
-
71
-
72
-
73
-
74
-
75
-
76
-
77
-
78
-
79
-
80
-
81
-
82
-
83
-
84
-
85
-
86
-
87
-
88
-
89
-
90
-
91
-
92
-
93
-
94
-
95
-
96
-
97
-
98
-
99
-
100
-
101
-
102
-
103
-
104
-
105
-
106
-
107
-
108
-
109
-
110
-
111
-
112
-
113
-
114
-
115
-
116
-
117
-
118
-
119
-
120
-
121
-
122
-
123
-
124
-
125
-
126
-
127
-
128
-
129
-
130
-
131
-
132
-
133
-
134
-
135
-
136
-
137
-
138
-
139
-
140
-
141
-
142
-
143
-
144
-
145
-
146
-
147
-
148
-
149
-
150
-
151
-
152
-
153
-
154
-
155
-
156
-
157
-
158
-
159
-
160
-
161
-
162
-
163
-
164
-
165
-
166
-
167
-
168
-
169
-
170
-
171
-
 172
172 -
 173
173 -
 174
174 -
 175
175 -
 176
176 -
 177
177 -
 178
178 -
 179
179 -
 180
180 -
 181
181 -
 182
182 -
183
-
184
-
185
-
186
-
187
-
188
-
189
-
190
-
191
-
192
-
193
-
194
-
195
-
196
-
197
-
198
-
199
-
200
-
201
-
202
-
203
-
204
-
205
-
206
-
207
-
208
-
209
-
210
-
211
-
212
-
213
-
214
-
215
-
216
-
217
-
218
-
219
-
220
-
221
-
222
-
223
-
224
-
225
-
226
-
227
-
228
-
229
-
230
-
231
-
232
-
233
-
234
-
235
-
236
-
237
-
238
-
239
-
240
-
241
-
242
-
243
-
244
-
245
-
246
-
247
-
248
-
249
-
250
-
251
-
252
-
253
-
254
-
255
-
256
-
257
-
258
-
259
-
260
-
261
-
262
-
263
-
264
-
265
-
266
-
267
-
268
-
269
-
270
-
271
-
272
-
273
-
274
-
275
-
276
-
277
-
278
-
279
-
280
-
281
-
282
-
283
-
284
-
285
-
286
-
287
-
288
-
289
-
290
-
291
-
292
-
293
-
294
-
295
-
296
-
297
-
298
-
299
-
300
-
301
-
302
-
303
-
304
-
305
-
306
-
307
-
308
-
309
-
310
-
311
-
312
-
313
-
314
-
315
-
316
-
317
-
318
-
319
-
320
-
321
-
322
-
323
-
324
-
325
-
326
-
327
-
328
-
329
-
330
-
331
-
332
-
333
-
334
-
335
-
336
-
337
-
338
-
339
-
340
-
341
-
342
-
343
-
344
-
345
-
346
-
347
-
348
-
349
-
350
-
351
-
352
-
353
-
354
-
355
-
356
-
357
-
358
-
359
-
360
-
361
-
362
-
363
-
364
-
365
-
366
-
367
-
368
-
369
-
370
-
371
-
372
-
373
-
374
-
375
-
376
-
377
-
378
-
379
-
380
-
381
-
382
-
383
-
384
-
385
-
386
-
387
-
388
-
389
-
390
-
391
-
392
-
393
-
394
-
395
-
396
-
397
-
398
-
399
-
400
-
401
-
402
-
403
-
404
-
405
-
406
-
407
-
408
-
409
-
410
-
411
-
412
-
413
-
414
-
415
-
416
-
417
-
418
-
419
-
420
 |
 |