Yamaha AW2816 Owner's Manual - Page 69
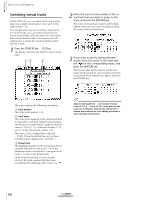
Press the REC TRACK SELECT [ST] key., the TRACK [CUE] key.
 |
View all Yamaha AW2816 manuals
Add to My Manuals
Save this manual to your list of manuals |
Page 69 highlights
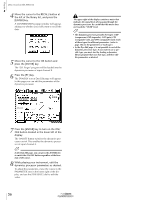
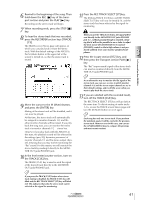
6 Rewind to the beginning of the song. Then hold down the REC [ ] key of the transport section and press the PLAY [ ] key. Recording on the stereo track will begin. 7 When recording ends, press the STOP [ ] key. 8 To hear the stereo track that was recorded, press the RECORDER section keys [TRACK] ¡ [F3]. The TRACK screen Stereo page will appear, in which you can play back or erase the stereo track. With the default settings of the AW2816, the M (Mute) button in the upper left of the screen is turned on, so that the stereo track is muted. 9 Move the cursor to the M (Mute) button, and press the [ENTER] key. Muting of the stereo track will be disabled, and it can now be played. At this time, the stereo track will automatically be assigned to monitor channels 1/2, and the other monitor channels will be muted. If you play back the song now, you can monitor the stereo track via monitor channels 1/2 ¡ stereo bus. However if you play back with the AW2816 in this state, the playback sound will be affected by the settings (pan, EQ, dynamics processor) of monitor channels 1/2 and the stereo output channel, meaning that you may not be monitoring the "flat" sound. For this reason, we will monitor the stereo track by sending it directly to the MONITOR OUT jacks/PHONES jack. 10 In the level meter/counter section, turn on the TRACK [CUE] key. The TRACK [CUE] key is used to send the signal of the desired track directly to the MONITOR OUT jacks/PHONES jack. Tip! If you press the TRACK [CUE] button when stereo track muting is disabled, the TRACK [CUE] key will blink and the REC TRACK SELECT [ST] key will blink red. This indicates that only the stereo track can be selected as the signal for monitoring. 11 Press the REC TRACK SELECT [ST] key. The blinking TRACK [CUE] key and REC TRACK SELECT [ST] key will now be steadily lit, and the stereo track has been selected as the signal for monitoring. When you use the TRACK [CUE] key, the signal will be sent directly to the MONITOR OUT jacks/PHONES jack (i.e., without passing through a channel), meaning that it will not be possible to use a fader to adjust the level. Lower the [MONITOR OUT] control/ [PHONES] control so that a high volume is not produced suddenly from your monitor speakers/headphones. 12 Press the Locate section [RTZ] key, and then press the Transport section PLAY [ ] key. The "flat" (unprocessed) signal of the stereo track can now be monitored directly from the MONITOR OUT jacks/PHONES jack. Tip! As an alternative way to monitor the flat signal of the stereo track, you can save a scene in which monitor channels 1/2 and the stereo output channel are set to their default settings, and recall this scene when you want to play back the stereo track. 13 If you are satisfied with the recorded result, turn off the TRACK [CUE] key. The REC TRACK SELECT [ST] key will go dark at the same time. To defeat muting of audio tracks 1-16, access the TRACK screen Stereo page and turn the M (Mute) button on once again. Tip! Each song has only one stereo track. If you perform the mixdown again, it will be overwrite the previous stereo track. However even in this case, you can use the [UNDO]/[REDO] keys to compare the previous and most recent versions. Let's record on the AW2816 3 Operation section 61
-
 1
1 -
2
-
3
-
4
-
5
-
6
-
7
-
8
-
9
-
10
-
11
-
12
-
13
-
14
-
15
-
16
-
17
-
18
-
19
-
20
-
21
-
22
-
23
-
24
-
25
-
26
-
27
-
28
-
29
-
30
-
31
-
32
-
33
-
34
-
35
-
36
-
37
-
38
-
39
-
40
-
41
-
42
-
43
-
44
-
45
-
46
-
47
-
48
-
49
-
50
-
51
-
52
-
53
-
54
-
55
-
56
-
57
-
58
-
59
-
60
-
61
-
62
-
63
-
 64
64 -
 65
65 -
 66
66 -
 67
67 -
 68
68 -
 69
69 -
 70
70 -
 71
71 -
 72
72 -
 73
73 -
 74
74 -
75
-
76
-
77
-
78
-
79
-
80
-
81
-
82
-
83
-
84
-
85
-
86
-
87
-
88
-
89
-
90
-
91
-
92
-
93
-
94
-
95
-
96
-
97
-
98
-
99
-
100
-
101
-
102
-
103
-
104
-
105
-
106
-
107
-
108
-
109
-
110
-
111
-
112
-
113
-
114
-
115
-
116
-
117
-
118
-
119
-
120
-
121
-
122
-
123
-
124
-
125
-
126
-
127
-
128
-
129
-
130
-
131
-
132
-
133
-
134
-
135
-
136
-
137
-
138
-
139
-
140
-
141
-
142
-
143
-
144
-
145
-
146
-
147
-
148
-
149
-
150
-
151
-
152
-
153
-
154
-
155
-
156
-
157
-
158
-
159
-
160
-
161
-
162
-
163
-
164
-
165
-
166
-
167
-
168
-
169
-
170
-
171
-
172
-
173
-
174
-
175
-
176
-
177
-
178
-
179
-
180
-
181
-
182
-
183
-
184
-
185
-
186
-
187
-
188
-
189
-
190
-
191
-
192
-
193
-
194
-
195
-
196
-
197
-
198
-
199
-
200
-
201
-
202
-
203
-
204
-
205
-
206
-
207
-
208
-
209
-
210
-
211
-
212
-
213
-
214
-
215
-
216
-
217
-
218
-
219
-
220
-
221
-
222
-
223
-
224
-
225
-
226
-
227
-
228
-
229
-
230
-
231
-
232
-
233
-
234
-
235
-
236
-
237
-
238
-
239
-
240
-
241
-
242
-
243
-
244
-
245
-
246
-
247
-
248
-
249
-
250
-
251
-
252
-
253
-
254
-
255
-
256
-
257
-
258
-
259
-
260
-
261
-
262
-
263
-
264
-
265
-
266
-
267
-
268
-
269
-
270
-
271
-
272
-
273
-
274
-
275
-
276
-
277
-
278
-
279
-
280
-
281
-
282
-
283
-
284
-
285
-
286
-
287
-
288
-
289
-
290
-
291
-
292
-
293
-
294
-
295
-
296
-
297
-
298
-
299
-
300
-
301
-
302
-
303
-
304
-
305
-
306
-
307
-
308
-
309
-
310
-
311
-
312
-
313
-
314
-
315
-
316
-
317
-
318
-
319
-
320
-
321
-
322
-
323
-
324
-
325
-
326
-
327
-
328
-
329
-
330
-
331
-
332
-
333
-
334
-
335
-
336
-
337
-
338
-
339
-
340
-
341
-
342
-
343
-
344
-
345
-
346
-
347
-
348
-
349
-
350
-
351
-
352
-
353
-
354
-
355
-
356
-
357
-
358
-
359
-
360
-
361
-
362
-
363
-
364
-
365
-
366
-
367
-
368
-
369
-
370
-
371
-
372
-
373
-
374
-
375
-
376
-
377
-
378
-
379
-
380
-
381
-
382
-
383
-
384
-
385
-
386
-
387
-
388
-
389
-
390
-
391
-
392
-
393
-
394
-
395
-
396
-
397
-
398
-
399
-
400
-
401
-
402
-
403
-
404
-
405
-
406
-
407
-
408
-
409
-
410
-
411
-
412
-
413
-
414
-
415
-
416
-
417
-
418
-
419
-
420
 |
 |
