Yamaha AW2816 Owner's Manual - Page 59
Recording, Begin performing on your instrument.
 |
View all Yamaha AW2816 manuals
Add to My Manuals
Save this manual to your list of manuals |
Page 59 highlights
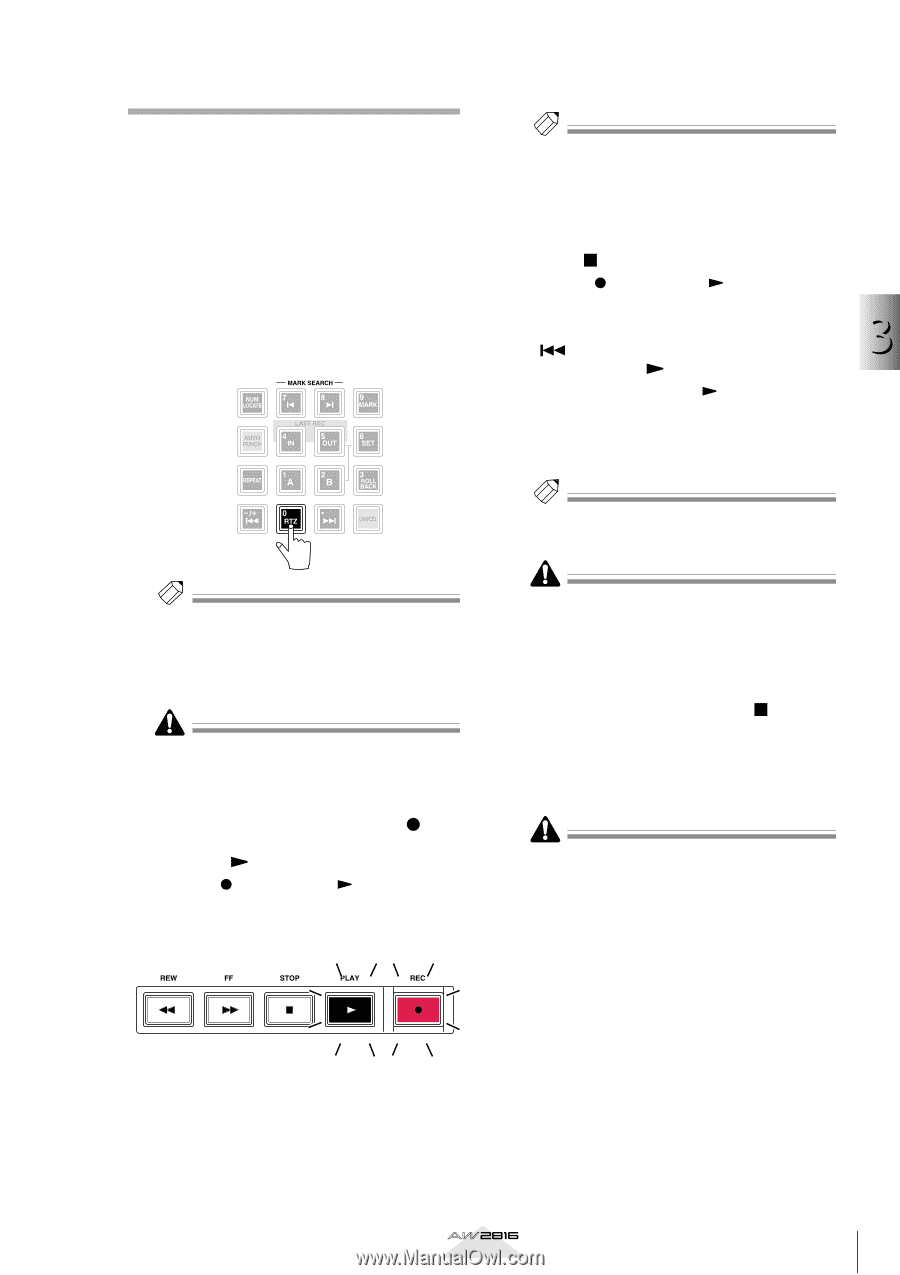
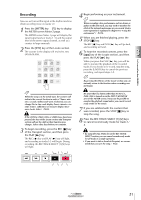
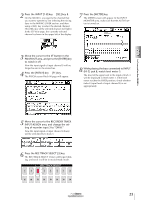
Recording Now we will record the signal of the rhythm machine (drum recording mics) on tracks 1/2. 1 Press the [METER] key ¡ [F2] key to display the METER screen Meter 2 page. The METER screen Meter 2 page will display the input/output levels of tracks 1-16 and the output level of the stereo output channel, as well as a counter in large numerals. 2 Press the [RTZ] key of the Locate section. The counter in the display will rewind to zero (00:00:00.000). Tip! When the song is in the initial state, the counter will indicate the current location in units of "hours: minutes: seconds. millisecond" units. If desired, you can change this to time code display (hours: minutes: seconds: frames. subframes) or measure display (measures: beats. ticks) (¡P.238). If the [SONG], [FILE], [CD], or [EDIT] keys have been pressed, the keys of the Locate section and Transport section will not be valid (or their function may change). Select other keys before you continue. 3 To begin recording, press the REC [ ] key of the Transport section, and then press the PLAY [ ] key. The REC [ ] key and PLAY [ ] key will light, and recording on tracks 1/2 will begin. During recording, the REC TRACK SELECT [1]/[2] keys will light. 4 Begin performing on your instrument. Tip! When recording a live performance such as drums or guitar on the first track, you may wish to monitor the click of the internal metronome as you record. Metronome operation is explained in chapter 14, "Using the metronome" (¡P.229). 5 When you are finished playing, press the STOP [ ] key. The REC [ ] key and PLAY [ ] key will go dark, and recording will end. 6 To hear the recorded content, press the [ ] key of the Locate section, and then 3 press the PLAY [ ] key. When you press the PLAY [ ] key, you will be able to monitor the playback of the recorded tracks. If you decide to re-record, stop the song, press the [UNDO] key to cancel the previous recording, and repeat steps 2-5. Let's record on the AW2816 Tip! By pressing the [IN] key of the Locate section you can instantly return to the location where recording was last begun. Be aware that if a button other than AUTO (i.e., INDI./ALL) is turned on in the INPUT MONITOR area of the METER screen, it may not be possible to monitor the playback sound unless you cancel recordready mode for the tracks. 7 If you are satisfied with the content that was recorded, press the STOP [ ] key to stop the song. 8 Press the REC TRACK SELECT [1]/[2] keys to cancel record-ready mode for tracks 1/ 2. • By using the [ALL SAFE] key in the REC TRACK SELECT section, you can cancel record-ready mode for all tracks in a single operation. • If you want to take a break at this point, we recommend that you save the song (¡P.62). Operation section 51
-
 1
1 -
2
-
3
-
4
-
5
-
6
-
7
-
8
-
9
-
10
-
11
-
12
-
13
-
14
-
15
-
16
-
17
-
18
-
19
-
20
-
21
-
22
-
23
-
24
-
25
-
26
-
27
-
28
-
29
-
30
-
31
-
32
-
33
-
34
-
35
-
36
-
37
-
38
-
39
-
40
-
41
-
42
-
43
-
44
-
45
-
46
-
47
-
48
-
49
-
50
-
51
-
52
-
53
-
 54
54 -
 55
55 -
 56
56 -
 57
57 -
 58
58 -
 59
59 -
 60
60 -
 61
61 -
 62
62 -
 63
63 -
 64
64 -
65
-
66
-
67
-
68
-
69
-
70
-
71
-
72
-
73
-
74
-
75
-
76
-
77
-
78
-
79
-
80
-
81
-
82
-
83
-
84
-
85
-
86
-
87
-
88
-
89
-
90
-
91
-
92
-
93
-
94
-
95
-
96
-
97
-
98
-
99
-
100
-
101
-
102
-
103
-
104
-
105
-
106
-
107
-
108
-
109
-
110
-
111
-
112
-
113
-
114
-
115
-
116
-
117
-
118
-
119
-
120
-
121
-
122
-
123
-
124
-
125
-
126
-
127
-
128
-
129
-
130
-
131
-
132
-
133
-
134
-
135
-
136
-
137
-
138
-
139
-
140
-
141
-
142
-
143
-
144
-
145
-
146
-
147
-
148
-
149
-
150
-
151
-
152
-
153
-
154
-
155
-
156
-
157
-
158
-
159
-
160
-
161
-
162
-
163
-
164
-
165
-
166
-
167
-
168
-
169
-
170
-
171
-
172
-
173
-
174
-
175
-
176
-
177
-
178
-
179
-
180
-
181
-
182
-
183
-
184
-
185
-
186
-
187
-
188
-
189
-
190
-
191
-
192
-
193
-
194
-
195
-
196
-
197
-
198
-
199
-
200
-
201
-
202
-
203
-
204
-
205
-
206
-
207
-
208
-
209
-
210
-
211
-
212
-
213
-
214
-
215
-
216
-
217
-
218
-
219
-
220
-
221
-
222
-
223
-
224
-
225
-
226
-
227
-
228
-
229
-
230
-
231
-
232
-
233
-
234
-
235
-
236
-
237
-
238
-
239
-
240
-
241
-
242
-
243
-
244
-
245
-
246
-
247
-
248
-
249
-
250
-
251
-
252
-
253
-
254
-
255
-
256
-
257
-
258
-
259
-
260
-
261
-
262
-
263
-
264
-
265
-
266
-
267
-
268
-
269
-
270
-
271
-
272
-
273
-
274
-
275
-
276
-
277
-
278
-
279
-
280
-
281
-
282
-
283
-
284
-
285
-
286
-
287
-
288
-
289
-
290
-
291
-
292
-
293
-
294
-
295
-
296
-
297
-
298
-
299
-
300
-
301
-
302
-
303
-
304
-
305
-
306
-
307
-
308
-
309
-
310
-
311
-
312
-
313
-
314
-
315
-
316
-
317
-
318
-
319
-
320
-
321
-
322
-
323
-
324
-
325
-
326
-
327
-
328
-
329
-
330
-
331
-
332
-
333
-
334
-
335
-
336
-
337
-
338
-
339
-
340
-
341
-
342
-
343
-
344
-
345
-
346
-
347
-
348
-
349
-
350
-
351
-
352
-
353
-
354
-
355
-
356
-
357
-
358
-
359
-
360
-
361
-
362
-
363
-
364
-
365
-
366
-
367
-
368
-
369
-
370
-
371
-
372
-
373
-
374
-
375
-
376
-
377
-
378
-
379
-
380
-
381
-
382
-
383
-
384
-
385
-
386
-
387
-
388
-
389
-
390
-
391
-
392
-
393
-
394
-
395
-
396
-
397
-
398
-
399
-
400
-
401
-
402
-
403
-
404
-
405
-
406
-
407
-
408
-
409
-
410
-
411
-
412
-
413
-
414
-
415
-
416
-
417
-
418
-
419
-
420
 |
 |