Yamaha AW2816 Owner's Manual - Page 141
Recording and playing an automix, Recording fader operations in, the automix
 |
View all Yamaha AW2816 manuals
Add to My Manuals
Save this manual to your list of manuals |
Page 141 highlights
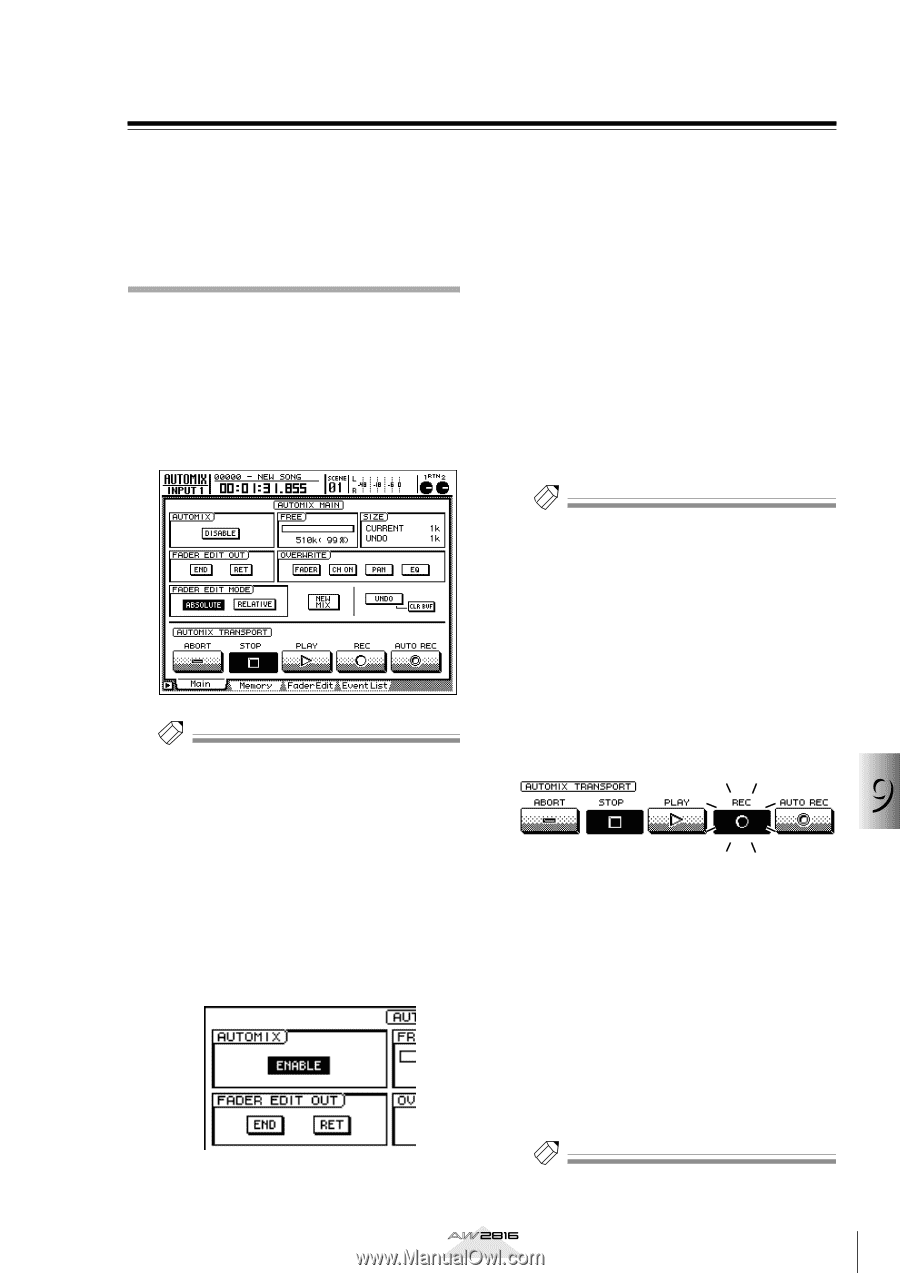
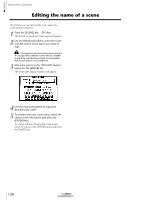
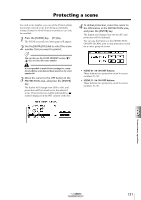
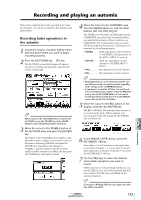
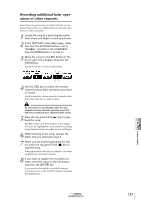
Recording and playing an automix This section explains how fader operations for monitor channels 1-8 can be recorded in the automix and played back. Recording fader operations in the automix 1 Locate the song to a location slightly earlier than the point where you want to begin recording automix. 2 Press the [AUTOMIX] key ¡ [F1] key. The AUTOMIX screen/Main page will appear. Automix recording and playback is performed mainly in this page. Tip! When you press the [AUTOMIX] key to switch to the AUTOMIX screen, the [HOME] key of the FADER MODE section will automatically be turned on. 3 Move the cursor to the DISABLE button of the AUTOMIX area, and press the [ENTER] key. The button in the AUTOMIX area enables or disables the automix. When you move the cursor to the button indicating DISABLE and press the [ENTER] key, the button will change to "ENABLE," and the automix function will be enabled. While automix is enabled, the top panel [AUTOMIX] key will light (or blink). 4 Move the cursor to the OVERWRITE area. Turn the FADER button on, and the other buttons (CH ON, PAN, EQ) off. The FADER, CH ON, PAN, and EQ buttons in the OVERWRITE area select the events that will be recorded in the automix. When a button is on (highlighted), the corresponding type of events will be recorded in the automix. Each button corresponds to the following events. • FADER.......... Fader operations of each channel (1-8/STEREO), and operations of the [RTN 1]/[RTN 2] controls • CH ON ........ [ON] key operations of each channel (1-8/STEREO/RTN 1/ RTN 2) • PAN Pan operations of each channel • EQ EQ operations of each channel Tip! • Recall operations for scene memories and the various libraries can be recorded in automix regardless of the settings of the OVERWRITE buttons. • If you want to record the AUX bus 1-6 send levels, or to record operations of faders 1-8 in the REMOTE screen, turn on the FADER button. If you want to record operations of [ON] keys 1-8 in the REMOTE screen, turn on the CH ON button. 5 Move the cursor to the REC button in the display, and press the [ENTER] key. The REC will blink. This indicates that automix is in record-ready mode. When automix is in record-ready mode, the top panel [AUTOMIX] key will blink red. 9 Using automix 6 In the MIXING LAYER section, press the RECORDER [1-8] key. Now faders 1-8 will function as channel faders for monitor channels 1-8. If you want to record fader operations of monitor channels 9-16, press the RECORDER [9-16] key. 7 Use the [SEL] keys to select the channel whose fader operations you want to record. When automix is in record-ready mode, you can use the [SEL] keys to select the channels that will be recorded. The [SEL] keys will blink for the selected channels. Tip! If you press a blinking [SEL] key once again, the selection will be cancelled. Operation section 135
-
 1
1 -
2
-
3
-
4
-
5
-
6
-
7
-
8
-
9
-
10
-
11
-
12
-
13
-
14
-
15
-
16
-
17
-
18
-
19
-
20
-
21
-
22
-
23
-
24
-
25
-
26
-
27
-
28
-
29
-
30
-
31
-
32
-
33
-
34
-
35
-
36
-
37
-
38
-
39
-
40
-
41
-
42
-
43
-
44
-
45
-
46
-
47
-
48
-
49
-
50
-
51
-
52
-
53
-
54
-
55
-
56
-
57
-
58
-
59
-
60
-
61
-
62
-
63
-
64
-
65
-
66
-
67
-
68
-
69
-
70
-
71
-
72
-
73
-
74
-
75
-
76
-
77
-
78
-
79
-
80
-
81
-
82
-
83
-
84
-
85
-
86
-
87
-
88
-
89
-
90
-
91
-
92
-
93
-
94
-
95
-
96
-
97
-
98
-
99
-
100
-
101
-
102
-
103
-
104
-
105
-
106
-
107
-
108
-
109
-
110
-
111
-
112
-
113
-
114
-
115
-
116
-
117
-
118
-
119
-
120
-
121
-
122
-
123
-
124
-
125
-
126
-
127
-
128
-
129
-
130
-
131
-
132
-
133
-
134
-
135
-
 136
136 -
 137
137 -
 138
138 -
 139
139 -
 140
140 -
 141
141 -
 142
142 -
 143
143 -
 144
144 -
 145
145 -
 146
146 -
147
-
148
-
149
-
150
-
151
-
152
-
153
-
154
-
155
-
156
-
157
-
158
-
159
-
160
-
161
-
162
-
163
-
164
-
165
-
166
-
167
-
168
-
169
-
170
-
171
-
172
-
173
-
174
-
175
-
176
-
177
-
178
-
179
-
180
-
181
-
182
-
183
-
184
-
185
-
186
-
187
-
188
-
189
-
190
-
191
-
192
-
193
-
194
-
195
-
196
-
197
-
198
-
199
-
200
-
201
-
202
-
203
-
204
-
205
-
206
-
207
-
208
-
209
-
210
-
211
-
212
-
213
-
214
-
215
-
216
-
217
-
218
-
219
-
220
-
221
-
222
-
223
-
224
-
225
-
226
-
227
-
228
-
229
-
230
-
231
-
232
-
233
-
234
-
235
-
236
-
237
-
238
-
239
-
240
-
241
-
242
-
243
-
244
-
245
-
246
-
247
-
248
-
249
-
250
-
251
-
252
-
253
-
254
-
255
-
256
-
257
-
258
-
259
-
260
-
261
-
262
-
263
-
264
-
265
-
266
-
267
-
268
-
269
-
270
-
271
-
272
-
273
-
274
-
275
-
276
-
277
-
278
-
279
-
280
-
281
-
282
-
283
-
284
-
285
-
286
-
287
-
288
-
289
-
290
-
291
-
292
-
293
-
294
-
295
-
296
-
297
-
298
-
299
-
300
-
301
-
302
-
303
-
304
-
305
-
306
-
307
-
308
-
309
-
310
-
311
-
312
-
313
-
314
-
315
-
316
-
317
-
318
-
319
-
320
-
321
-
322
-
323
-
324
-
325
-
326
-
327
-
328
-
329
-
330
-
331
-
332
-
333
-
334
-
335
-
336
-
337
-
338
-
339
-
340
-
341
-
342
-
343
-
344
-
345
-
346
-
347
-
348
-
349
-
350
-
351
-
352
-
353
-
354
-
355
-
356
-
357
-
358
-
359
-
360
-
361
-
362
-
363
-
364
-
365
-
366
-
367
-
368
-
369
-
370
-
371
-
372
-
373
-
374
-
375
-
376
-
377
-
378
-
379
-
380
-
381
-
382
-
383
-
384
-
385
-
386
-
387
-
388
-
389
-
390
-
391
-
392
-
393
-
394
-
395
-
396
-
397
-
398
-
399
-
400
-
401
-
402
-
403
-
404
-
405
-
406
-
407
-
408
-
409
-
410
-
411
-
412
-
413
-
414
-
415
-
416
-
417
-
418
-
419
-
420
 |
 |