Yamaha AW2816 Owner's Manual - Page 51
When you are, on inputting characters, refer
 |
View all Yamaha AW2816 manuals
Add to My Manuals
Save this manual to your list of manuals |
Page 51 highlights
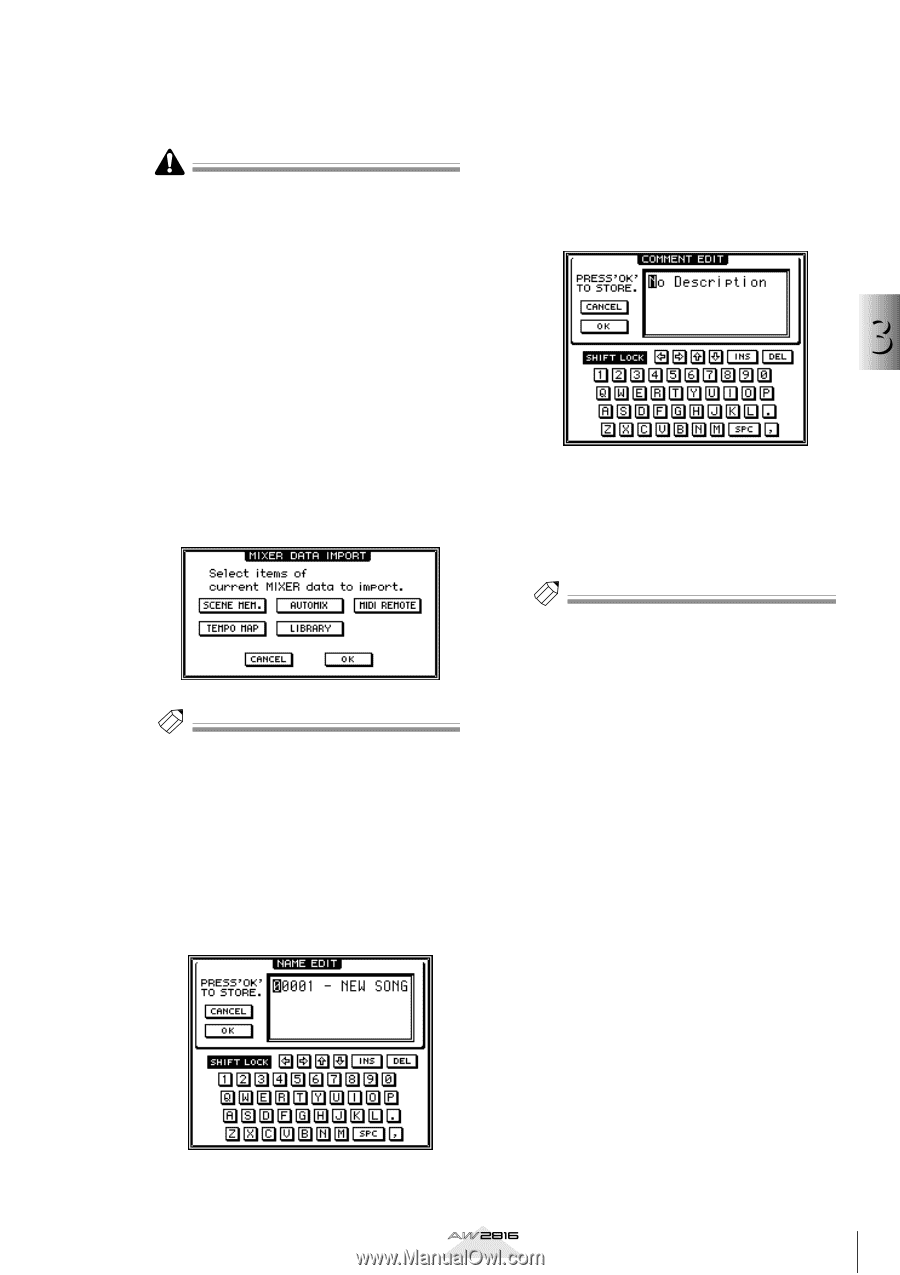
5 Use the Fs and Recbit buttons to select the sampling frequency and number of quantization bits for the newly created song. • It is not possible to change the sampling frequency or quantization after creating the song. • The quantization you select here will affect the number of tracks that can be played back simultaneously while multiple tracks are being recorded simultaneously. If you need 8 tracks of simultaneous recording and 16 tracks of simultaneous playback, you must select 16 bit (¡P.33). • If you intend to write the song to an audio CD, you must select 44.1 kHz as the sampling frequency. It is not possible to create an audio CD from a song whose sampling frequency is 48 kHz. 6 Move the cursor to the OK button and press the [ENTER] key. The MIXER DATA IMPORT popup window will appear. In this popup window you can choose to import (load) various settings such as mixer data (not audio data) from the current song into the newly created song. For this example, you do not need to make any selection here. Tip! • If you select 48 kHz as the sampling frequency, a popup window will appear following step 5, informing you that it will not be possible to create a CD from this song. Move the cursor to the OK button and press the [ENTER] key. • Mixer data can be imported even after a new song is created (¡P.155). 7 Move the cursor to the OK button and press the [ENTER] key. A NAME EDIT popup window will appear, allowing you to assign a name to the new song. 8 Use the character palette to input a song name of up to 64 characters. (For details on inputting characters, refer to page 37.) When you are finished, move the cursor to the OK button and press the [ENTER] key. A COMMENT EDIT popup window will appear, allowing you to assign a comment to the new song. 3 9 As desired, input a comment in the same way as you input the song name. Then move the cursor to the OK button and press the [ENTER] key. The new song will be created. Tip! • The song name and comment can be modified even after the new song is created (¡P.150). • In steps 5-8, you can cancel creation of a new song by moving the cursor to the CANCEL button and pressing the [ENTER] key. Let's record on the AW2816 Operation section 43
-
 1
1 -
2
-
3
-
4
-
5
-
6
-
7
-
8
-
9
-
10
-
11
-
12
-
13
-
14
-
15
-
16
-
17
-
18
-
19
-
20
-
21
-
22
-
23
-
24
-
25
-
26
-
27
-
28
-
29
-
30
-
31
-
32
-
33
-
34
-
35
-
36
-
37
-
38
-
39
-
40
-
41
-
42
-
43
-
44
-
45
-
 46
46 -
 47
47 -
 48
48 -
 49
49 -
 50
50 -
 51
51 -
 52
52 -
 53
53 -
 54
54 -
 55
55 -
 56
56 -
57
-
58
-
59
-
60
-
61
-
62
-
63
-
64
-
65
-
66
-
67
-
68
-
69
-
70
-
71
-
72
-
73
-
74
-
75
-
76
-
77
-
78
-
79
-
80
-
81
-
82
-
83
-
84
-
85
-
86
-
87
-
88
-
89
-
90
-
91
-
92
-
93
-
94
-
95
-
96
-
97
-
98
-
99
-
100
-
101
-
102
-
103
-
104
-
105
-
106
-
107
-
108
-
109
-
110
-
111
-
112
-
113
-
114
-
115
-
116
-
117
-
118
-
119
-
120
-
121
-
122
-
123
-
124
-
125
-
126
-
127
-
128
-
129
-
130
-
131
-
132
-
133
-
134
-
135
-
136
-
137
-
138
-
139
-
140
-
141
-
142
-
143
-
144
-
145
-
146
-
147
-
148
-
149
-
150
-
151
-
152
-
153
-
154
-
155
-
156
-
157
-
158
-
159
-
160
-
161
-
162
-
163
-
164
-
165
-
166
-
167
-
168
-
169
-
170
-
171
-
172
-
173
-
174
-
175
-
176
-
177
-
178
-
179
-
180
-
181
-
182
-
183
-
184
-
185
-
186
-
187
-
188
-
189
-
190
-
191
-
192
-
193
-
194
-
195
-
196
-
197
-
198
-
199
-
200
-
201
-
202
-
203
-
204
-
205
-
206
-
207
-
208
-
209
-
210
-
211
-
212
-
213
-
214
-
215
-
216
-
217
-
218
-
219
-
220
-
221
-
222
-
223
-
224
-
225
-
226
-
227
-
228
-
229
-
230
-
231
-
232
-
233
-
234
-
235
-
236
-
237
-
238
-
239
-
240
-
241
-
242
-
243
-
244
-
245
-
246
-
247
-
248
-
249
-
250
-
251
-
252
-
253
-
254
-
255
-
256
-
257
-
258
-
259
-
260
-
261
-
262
-
263
-
264
-
265
-
266
-
267
-
268
-
269
-
270
-
271
-
272
-
273
-
274
-
275
-
276
-
277
-
278
-
279
-
280
-
281
-
282
-
283
-
284
-
285
-
286
-
287
-
288
-
289
-
290
-
291
-
292
-
293
-
294
-
295
-
296
-
297
-
298
-
299
-
300
-
301
-
302
-
303
-
304
-
305
-
306
-
307
-
308
-
309
-
310
-
311
-
312
-
313
-
314
-
315
-
316
-
317
-
318
-
319
-
320
-
321
-
322
-
323
-
324
-
325
-
326
-
327
-
328
-
329
-
330
-
331
-
332
-
333
-
334
-
335
-
336
-
337
-
338
-
339
-
340
-
341
-
342
-
343
-
344
-
345
-
346
-
347
-
348
-
349
-
350
-
351
-
352
-
353
-
354
-
355
-
356
-
357
-
358
-
359
-
360
-
361
-
362
-
363
-
364
-
365
-
366
-
367
-
368
-
369
-
370
-
371
-
372
-
373
-
374
-
375
-
376
-
377
-
378
-
379
-
380
-
381
-
382
-
383
-
384
-
385
-
386
-
387
-
388
-
389
-
390
-
391
-
392
-
393
-
394
-
395
-
396
-
397
-
398
-
399
-
400
-
401
-
402
-
403
-
404
-
405
-
406
-
407
-
408
-
409
-
410
-
411
-
412
-
413
-
414
-
415
-
416
-
417
-
418
-
419
-
420
 |
 |