Yamaha AW2816 Owner's Manual - Page 324
TRACK screen, TR View
 |
View all Yamaha AW2816 manuals
Add to My Manuals
Save this manual to your list of manuals |
Page 324 highlights
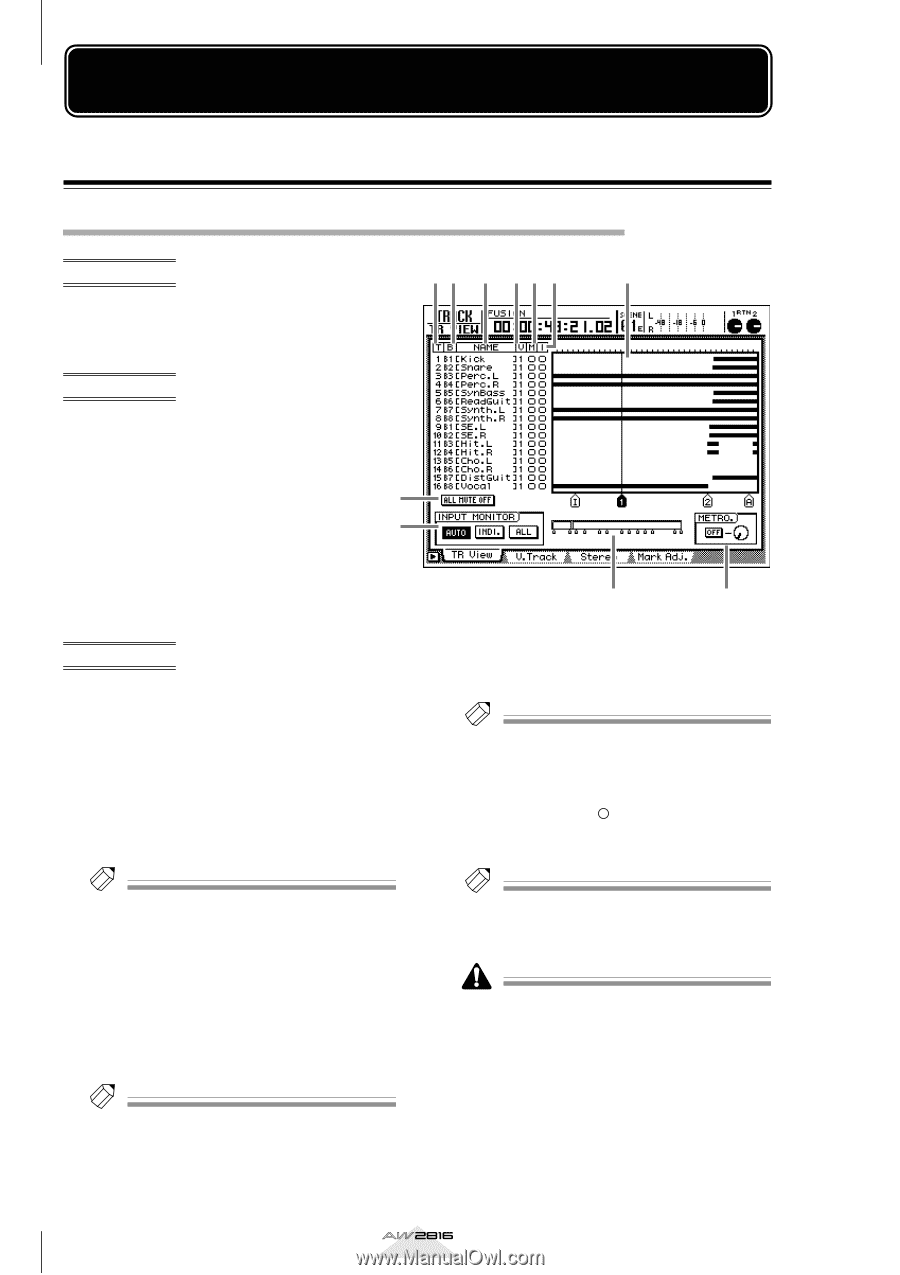
TRACK screen TR View page View the recorded content for each track Function The regions of each track are displayed as bar graphs. In this page you can also set the input monitor for each track, and switch muting on/off. Key operation • [TRACK] key ¡ [F1] (TR View) key • Repeatedly press the [TRACK] key until the screen shown at the right appears. 12 3 45 6 7 8 9 Screen functions A T (Track) This is the track number 1-16. B B (Bus) This indicates the type of signal assigned to the input (recorder input) of each track 1-16. The abbreviations have the following meaning. • B1-B8 Buses 1-8 • D1-D16 Direct output of input channels 1-8 Tip! The signals assigned to the recorder inputs can be specified in the RECORDER TRACK INPUT ASSIGN area of the PATCH screen/Patch IN page (¡P.73). C NAME This displays the name of the virtual track selected for each track 1-16. Tracks in which nothing has been recorded will indicate "-NO REC-". When you record something in a track, a name of "V.Tr xy" (x=track number 1-16, y=virtual track number 1-8) will be assigned automatically. Tip! • A name of up to 16 characters can be assigned to a virtual track, but only the first 8 characters will be displayed in the NAME column (3). • The name of a virtual track can be edited in the EDIT screen/TR Edit page. J K D V (Virtual track) This is the virtual track number (1-8) currently selected for each track 1-16. Tip! The virtual track used for each track can be selected in the TRACK screen/V.Track page. E M (Mute) This displays the mute on/off status of tracks 1-16 as "q" (mute=on) or " " (mute=off) symbols. You can also switch mute on/off by moving the cursor to this area and pressing the [ENTER] key. Tip! • The M column is linked with the MUTE buttons of the METER screen (¡P.351). • The mute on/off setting of each track does not affect the [ON] keys of the monitor channels. • On the AW2816, the number of tracks that can be played back simultaneously may be limited by the number of tracks that are set to record-ready mode. In this case, muting will be forcibly turned on for tracks that cannot be played back. • If you want to defeat muting for a track that was forcibly muted, you must first mute another track. If you attempt to defeat muting without increasing the number of muted tracks, a message of "CANNOT CHANGE MUTE" will be displayed, and muting will not be defeated. • By pressing the [ALL SAFE] key you can cancel the record-ready and muted status of all tracks. 322 Reference section
-
 1
1 -
2
-
3
-
4
-
5
-
6
-
7
-
8
-
9
-
10
-
11
-
12
-
13
-
14
-
15
-
16
-
17
-
18
-
19
-
20
-
21
-
22
-
23
-
24
-
25
-
26
-
27
-
28
-
29
-
30
-
31
-
32
-
33
-
34
-
35
-
36
-
37
-
38
-
39
-
40
-
41
-
42
-
43
-
44
-
45
-
46
-
47
-
48
-
49
-
50
-
51
-
52
-
53
-
54
-
55
-
56
-
57
-
58
-
59
-
60
-
61
-
62
-
63
-
64
-
65
-
66
-
67
-
68
-
69
-
70
-
71
-
72
-
73
-
74
-
75
-
76
-
77
-
78
-
79
-
80
-
81
-
82
-
83
-
84
-
85
-
86
-
87
-
88
-
89
-
90
-
91
-
92
-
93
-
94
-
95
-
96
-
97
-
98
-
99
-
100
-
101
-
102
-
103
-
104
-
105
-
106
-
107
-
108
-
109
-
110
-
111
-
112
-
113
-
114
-
115
-
116
-
117
-
118
-
119
-
120
-
121
-
122
-
123
-
124
-
125
-
126
-
127
-
128
-
129
-
130
-
131
-
132
-
133
-
134
-
135
-
136
-
137
-
138
-
139
-
140
-
141
-
142
-
143
-
144
-
145
-
146
-
147
-
148
-
149
-
150
-
151
-
152
-
153
-
154
-
155
-
156
-
157
-
158
-
159
-
160
-
161
-
162
-
163
-
164
-
165
-
166
-
167
-
168
-
169
-
170
-
171
-
172
-
173
-
174
-
175
-
176
-
177
-
178
-
179
-
180
-
181
-
182
-
183
-
184
-
185
-
186
-
187
-
188
-
189
-
190
-
191
-
192
-
193
-
194
-
195
-
196
-
197
-
198
-
199
-
200
-
201
-
202
-
203
-
204
-
205
-
206
-
207
-
208
-
209
-
210
-
211
-
212
-
213
-
214
-
215
-
216
-
217
-
218
-
219
-
220
-
221
-
222
-
223
-
224
-
225
-
226
-
227
-
228
-
229
-
230
-
231
-
232
-
233
-
234
-
235
-
236
-
237
-
238
-
239
-
240
-
241
-
242
-
243
-
244
-
245
-
246
-
247
-
248
-
249
-
250
-
251
-
252
-
253
-
254
-
255
-
256
-
257
-
258
-
259
-
260
-
261
-
262
-
263
-
264
-
265
-
266
-
267
-
268
-
269
-
270
-
271
-
272
-
273
-
274
-
275
-
276
-
277
-
278
-
279
-
280
-
281
-
282
-
283
-
284
-
285
-
286
-
287
-
288
-
289
-
290
-
291
-
292
-
293
-
294
-
295
-
296
-
297
-
298
-
299
-
300
-
301
-
302
-
303
-
304
-
305
-
306
-
307
-
308
-
309
-
310
-
311
-
312
-
313
-
314
-
315
-
316
-
317
-
318
-
 319
319 -
 320
320 -
 321
321 -
 322
322 -
 323
323 -
 324
324 -
 325
325 -
 326
326 -
 327
327 -
 328
328 -
 329
329 -
330
-
331
-
332
-
333
-
334
-
335
-
336
-
337
-
338
-
339
-
340
-
341
-
342
-
343
-
344
-
345
-
346
-
347
-
348
-
349
-
350
-
351
-
352
-
353
-
354
-
355
-
356
-
357
-
358
-
359
-
360
-
361
-
362
-
363
-
364
-
365
-
366
-
367
-
368
-
369
-
370
-
371
-
372
-
373
-
374
-
375
-
376
-
377
-
378
-
379
-
380
-
381
-
382
-
383
-
384
-
385
-
386
-
387
-
388
-
389
-
390
-
391
-
392
-
393
-
394
-
395
-
396
-
397
-
398
-
399
-
400
-
401
-
402
-
403
-
404
-
405
-
406
-
407
-
408
-
409
-
410
-
411
-
412
-
413
-
414
-
415
-
416
-
417
-
418
-
419
-
420
 |
 |