Canon EOS Rebel T1i Digital Photo Professional 3.6 for Windows Instruction Man - Page 100
Additional information, Canceling a specified erased dust spot only
 |
View all Canon EOS Rebel T1i manuals
Add to My Manuals
Save this manual to your list of manuals |
Page 100 highlights
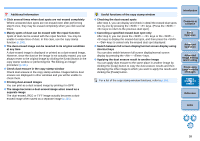
Additional information O Click several times when dust spots are not erased completely Where unwanted dust spots are not erased even after performing step 5 once, they may be erased completely when you click several times. O Mainly spots of dust can be erased with the repair function Spots of dust can be erased with the repair function. You may be unable to erase lines of dust. In this case, use the copy stamp function (p.100). O The dust-erased image can be reverted to its original condition at any time A dust-erased image is displayed or printed as a dust-erased image. However, since the dust on the image is not actually erased, you can always revert to the original image by clicking the [Undo] button in the copy stamp window or performing the "Re-Editing an Image" procedure (p.101). O Check dust erasure in the copy stamp window Check dust erasure in the copy stamp window. Images before dust erasure are displayed in other windows and you will be unable to check them. O Printing dust-erased images You can print as a dust-erased image by printing it in DPP. O The image becomes a dust-erased image when saved as a separate image The dust-erased JPEG or TIFF image actually becomes a dusterased image when saved as a separate image (p.101). Useful functions of the copy stamp window O Checking the dust erased spots After step 3, you can display and check in detail the erased dust spots one by one by pressing the + keys. (Press the + keys to return to the previous dust spot.) O Canceling a specified erased dust spot only After step 3, you can press the + keys or the + keys to display the erased dust spot, and then press the + keys to cancel only the erased dust spot displayed. O Switch between full screen display/normal screen display using shortcut keys You can also switch between full screen display/normal screen display by pressing the + keys. O Applying the dust erasure result to another image You can apply dust erasure to the same place in another image by clicking the [Copy] button to copy the dust erasure results and then displaying the other image to which you want to apply the results and clicking the [Paste] button. For a list of the copy stamp window functions, refer to p.116. Introduction Contents at a Glance 1Basic Operation 2Advanced Operation 3Advanced Image Editing and Printing 4 Processing Large Numbers of Images 5Editing JPEG/TIFF Images Reference Index 99
-
 1
1 -
2
-
3
-
4
-
5
-
6
-
7
-
8
-
9
-
10
-
11
-
12
-
13
-
14
-
15
-
16
-
17
-
18
-
19
-
20
-
21
-
22
-
23
-
24
-
25
-
26
-
27
-
28
-
29
-
30
-
31
-
32
-
33
-
34
-
35
-
36
-
37
-
38
-
39
-
40
-
41
-
42
-
43
-
44
-
45
-
46
-
47
-
48
-
49
-
50
-
51
-
52
-
53
-
54
-
55
-
56
-
57
-
58
-
59
-
60
-
61
-
62
-
63
-
64
-
65
-
66
-
67
-
68
-
69
-
70
-
71
-
72
-
73
-
74
-
75
-
76
-
77
-
78
-
79
-
80
-
81
-
82
-
83
-
84
-
85
-
86
-
87
-
88
-
89
-
90
-
91
-
92
-
93
-
94
-
 95
95 -
 96
96 -
 97
97 -
 98
98 -
 99
99 -
 100
100 -
 101
101 -
 102
102 -
 103
103 -
 104
104 -
 105
105 -
106
-
107
-
108
-
109
-
110
-
111
-
112
-
113
-
114
-
115
-
116
-
117
-
118
-
119
-
120
-
121
-
122
-
123
-
124
-
125
-
126
 |
 |