Canon EOS Rebel T1i Digital Photo Professional 3.6 for Windows Instruction Man - Page 52
Displaying an Area Beyond the Set Range as a Warning Indicator (Highlight/Shadow Warning)
 |
View all Canon EOS Rebel T1i manuals
Add to My Manuals
Save this manual to your list of manuals |
Page 52 highlights
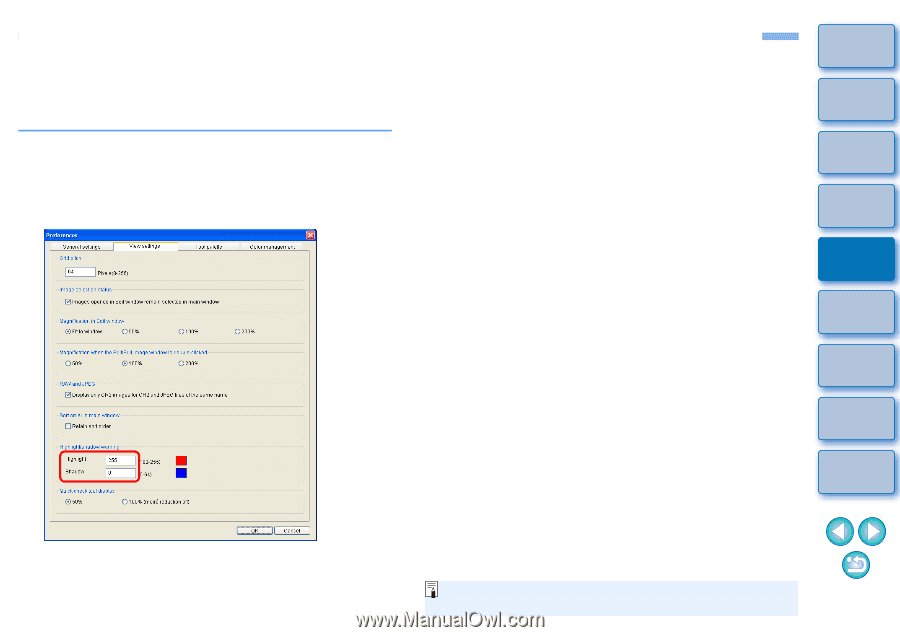
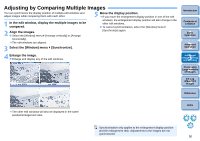
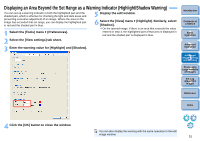
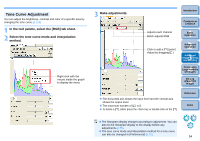
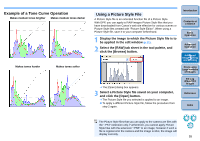
Displaying an Area Beyond the Set Range as a Warning Indicator (Highlight/Shadow Warning) You can set up a warning indicator in both the highlighted part and the shaded part, which is effective for checking the light and dark areas and preventing excessive adjustment of an image. Where the area on the image has exceeded that set range, you can display the highlighted part in red and the shaded part in blue. 1 Select the [Tools] menu ` [Preferences]. 5 Display the edit window. 6 Select the [View] menu ` [Highlight]. Similarly, select [Shadow]. ¿ On the opened image, if there is an area that exceeds the value entered in step 3, the highlighted part of that area is displayed in red and the shaded part is displayed in blue. 2 Select the [View settings] tab sheet. 3 Enter the warning value for [Highlight] and [Shadow]. Introduction Contents at a Glance 1Basic Operation 2Advanced Operation 3Advanced Image Editing and Printing 4 Processing Large Numbers of Images 5Editing JPEG/TIFF Images Reference Index 4 Click the [OK] button to close the window. You can also display the warning with the same operation in the edit image window. 51
-
 1
1 -
2
-
3
-
4
-
5
-
6
-
7
-
8
-
9
-
10
-
11
-
12
-
13
-
14
-
15
-
16
-
17
-
18
-
19
-
20
-
21
-
22
-
23
-
24
-
25
-
26
-
27
-
28
-
29
-
30
-
31
-
32
-
33
-
34
-
35
-
36
-
37
-
38
-
39
-
40
-
41
-
42
-
43
-
44
-
45
-
46
-
 47
47 -
 48
48 -
 49
49 -
 50
50 -
 51
51 -
 52
52 -
 53
53 -
 54
54 -
 55
55 -
 56
56 -
 57
57 -
58
-
59
-
60
-
61
-
62
-
63
-
64
-
65
-
66
-
67
-
68
-
69
-
70
-
71
-
72
-
73
-
74
-
75
-
76
-
77
-
78
-
79
-
80
-
81
-
82
-
83
-
84
-
85
-
86
-
87
-
88
-
89
-
90
-
91
-
92
-
93
-
94
-
95
-
96
-
97
-
98
-
99
-
100
-
101
-
102
-
103
-
104
-
105
-
106
-
107
-
108
-
109
-
110
-
111
-
112
-
113
-
114
-
115
-
116
-
117
-
118
-
119
-
120
-
121
-
122
-
123
-
124
-
125
-
126
 |
 |