Canon EOS Rebel T1i Digital Photo Professional 3.6 for Windows Instruction Man - Page 58
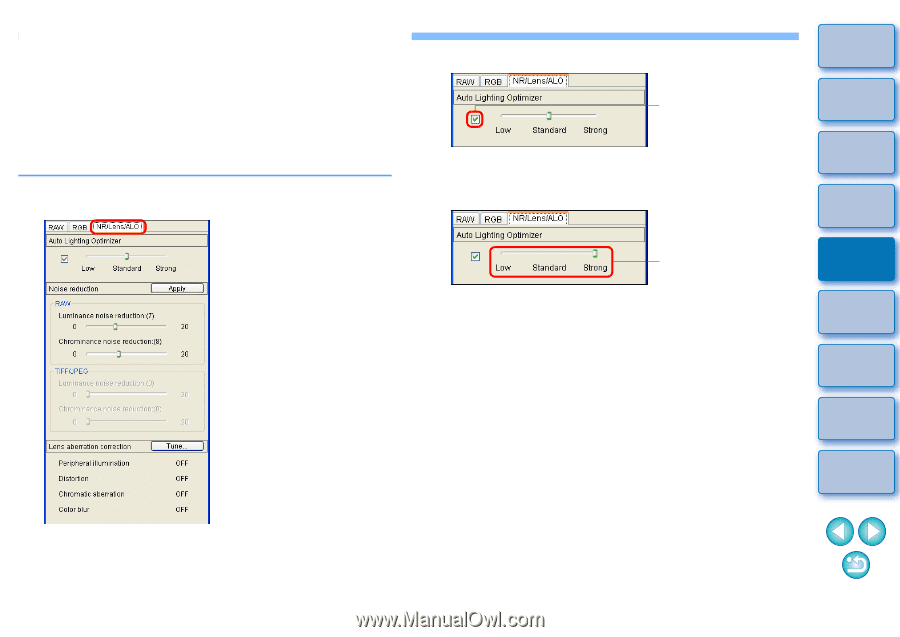
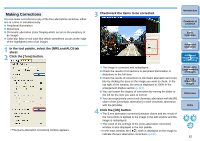
Using the Auto Lighting Optimizer, Select the [NR/Lens/ALO] tab sheet from the tool
 |
View all Canon EOS Rebel T1i manuals
Add to My Manuals
Save this manual to your list of manuals |
Page 58 highlights
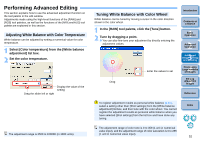
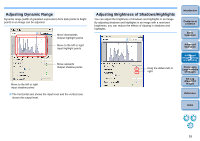
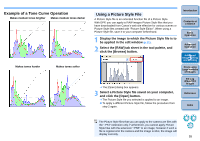
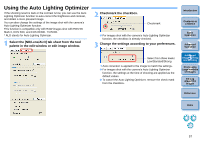
Using the Auto Lighting Optimizer If the shooting result is dark or the contrast is low, you can use the Auto Lighting Optimizer function to auto-correct the brightness and contrast, and obtain a more pleasant image. You can also change the settings of the image shot with the camera's Auto Lighting Optimizer function. This function is compatible only with RAW images shot with EOS 5D Mark II, EOS 50D, and EOS REBEL T1i/500D. * ALO stands for Auto Lighting Optimizer. 1 Select the [NR/Lens/ALO] tab sheet from the tool palette in the edit window or edit image window. 2 Checkmark the checkbox. Checkmark O For images shot with the camera's Auto Lighting Optimizer function, the checkbox is already checked. 3 Change the settings according to your preferences. Select from three levels: Low/Standard/Strong ¿ Auto correction is applied to the image to match the settings. O For images shot with the camera's Auto Lighting Optimizer function, the settings at the time of shooting are applied as the default values. O To cancel the Auto Lighting Optimizer, remove the check mark from the checkbox. Introduction Contents at a Glance 1Basic Operation 2Advanced Operation 3Advanced Image Editing and Printing 4 Processing Large Numbers of Images 5Editing JPEG/TIFF Images Reference Index 57
-
 1
1 -
2
-
3
-
4
-
5
-
6
-
7
-
8
-
9
-
10
-
11
-
12
-
13
-
14
-
15
-
16
-
17
-
18
-
19
-
20
-
21
-
22
-
23
-
24
-
25
-
26
-
27
-
28
-
29
-
30
-
31
-
32
-
33
-
34
-
35
-
36
-
37
-
38
-
39
-
40
-
41
-
42
-
43
-
44
-
45
-
46
-
47
-
48
-
49
-
50
-
51
-
52
-
 53
53 -
 54
54 -
 55
55 -
 56
56 -
 57
57 -
 58
58 -
 59
59 -
 60
60 -
 61
61 -
 62
62 -
 63
63 -
64
-
65
-
66
-
67
-
68
-
69
-
70
-
71
-
72
-
73
-
74
-
75
-
76
-
77
-
78
-
79
-
80
-
81
-
82
-
83
-
84
-
85
-
86
-
87
-
88
-
89
-
90
-
91
-
92
-
93
-
94
-
95
-
96
-
97
-
98
-
99
-
100
-
101
-
102
-
103
-
104
-
105
-
106
-
107
-
108
-
109
-
110
-
111
-
112
-
113
-
114
-
115
-
116
-
117
-
118
-
119
-
120
-
121
-
122
-
123
-
124
-
125
-
126
 |
 |