Canon EOS Rebel T1i Digital Photo Professional 3.6 for Windows Instruction Man - Page 62
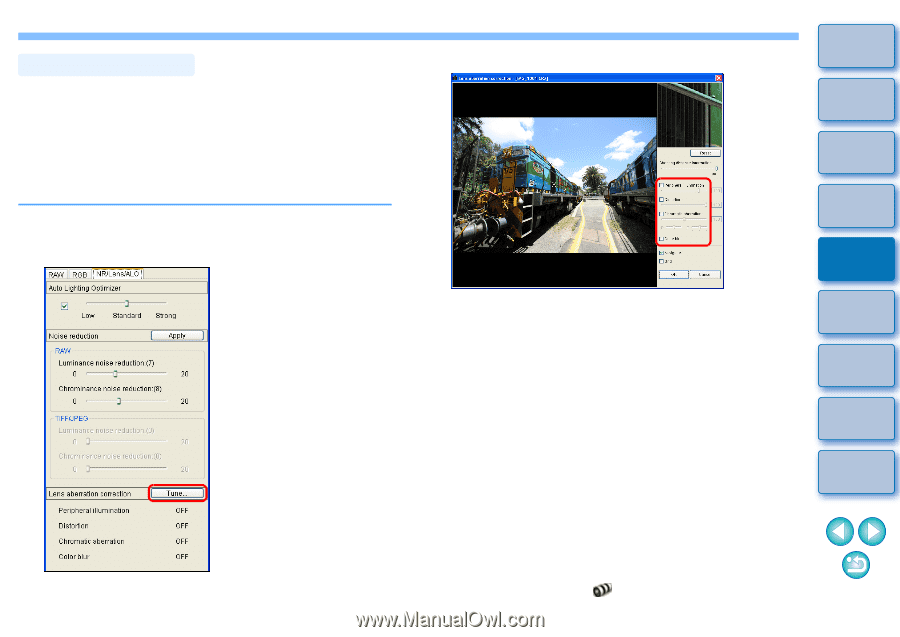
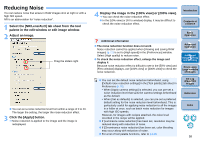
Making Corrections, Checkmark the items to be corrected., Click the [OK] button., In the tool palette
 |
View all Canon EOS Rebel T1i manuals
Add to My Manuals
Save this manual to your list of manuals |
Page 62 highlights
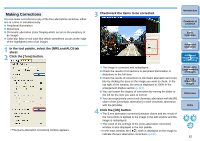
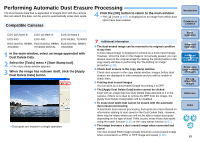
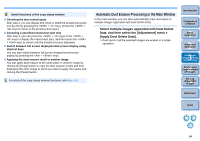
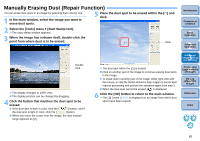
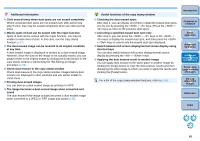
Making Corrections You can make corrections to any of the four aberrations as below, either one at a time or simultaneously. O Peripheral illumination O Distortions O Chromatic aberration (color fringing which occurs in the periphery of an image) O Color blur (blue or red color blur which sometimes occurs at the edge of the highlighted area of an image) 1 In the tool palette, select the [NR/Lens/ALO] tab sheet. 2 Click the [Tune] button. ¿ The [Lens aberration correction] window appears. 3 Checkmark the items to be corrected. Introduction Contents at a Glance 1Basic Operation 2Advanced Operation 3Advanced Image Editing and Printing ¿ The image is corrected and redisplayed. O Check the results of corrections to peripheral illumination or distortions in the full view. O Check the results of corrections to chromatic aberration and color blur by clicking the area on the image you want to check. In the top right of the window, the area is displayed at 200% in the enlargement display section (p.115). O You can lessen the degree of correction by moving the slider to the left for the item you want to correct. O You can respectively correct red chromatic aberration with the [R] slider of the [Chromatic aberration] or blue chromatic aberration with the [B] slider. 4 Click the [OK] button. ¿ The [Lens aberration correction] window closes and the result of the corrections is applied to the image in the edit window and the image is redisplayed. ¿ The result of the settings of the [Lens aberration correction] window is also displayed in the tool palette. ¿ In the main window, the [ ] mark is displayed on the image to indicate the lens aberration corrections (p.107). 4 Processing Large Numbers of Images 5Editing JPEG/TIFF Images Reference Index 61
-
 1
1 -
2
-
3
-
4
-
5
-
6
-
7
-
8
-
9
-
10
-
11
-
12
-
13
-
14
-
15
-
16
-
17
-
18
-
19
-
20
-
21
-
22
-
23
-
24
-
25
-
26
-
27
-
28
-
29
-
30
-
31
-
32
-
33
-
34
-
35
-
36
-
37
-
38
-
39
-
40
-
41
-
42
-
43
-
44
-
45
-
46
-
47
-
48
-
49
-
50
-
51
-
52
-
53
-
54
-
55
-
56
-
 57
57 -
 58
58 -
 59
59 -
 60
60 -
 61
61 -
 62
62 -
 63
63 -
 64
64 -
 65
65 -
 66
66 -
 67
67 -
68
-
69
-
70
-
71
-
72
-
73
-
74
-
75
-
76
-
77
-
78
-
79
-
80
-
81
-
82
-
83
-
84
-
85
-
86
-
87
-
88
-
89
-
90
-
91
-
92
-
93
-
94
-
95
-
96
-
97
-
98
-
99
-
100
-
101
-
102
-
103
-
104
-
105
-
106
-
107
-
108
-
109
-
110
-
111
-
112
-
113
-
114
-
115
-
116
-
117
-
118
-
119
-
120
-
121
-
122
-
123
-
124
-
125
-
126
 |
 |